When running a Shopify store, the first things you need to get right are the customers' checkout experience and the payment gateways. And among the many options available, Stripe easily stands out as one of the most trusted processors worldwide. But how to add Stripe to Shopify, exactly?
No worries; in this article, we'll show you a simple way to add Stripe to your Shopify store in 2025:
- Step 1. Access Shopify settings and payments
- Step 2. Add and install Stripe Card Payments
- Step 3. Connect and authorize your Stripe account
- Step 4. Configure settings and activate Stripe
Let's get started!
How to Add Stripe to Shopify via Module Installation
Overall, the fastest and most efficient way to integrate Stripe into your Shopify store is through module installation. This method keeps the entire process inside your Shopify admin panel, ensuring that your payment setup is secure, streamlined, and free from unnecessary complication. Let's examine the steps in more detail!
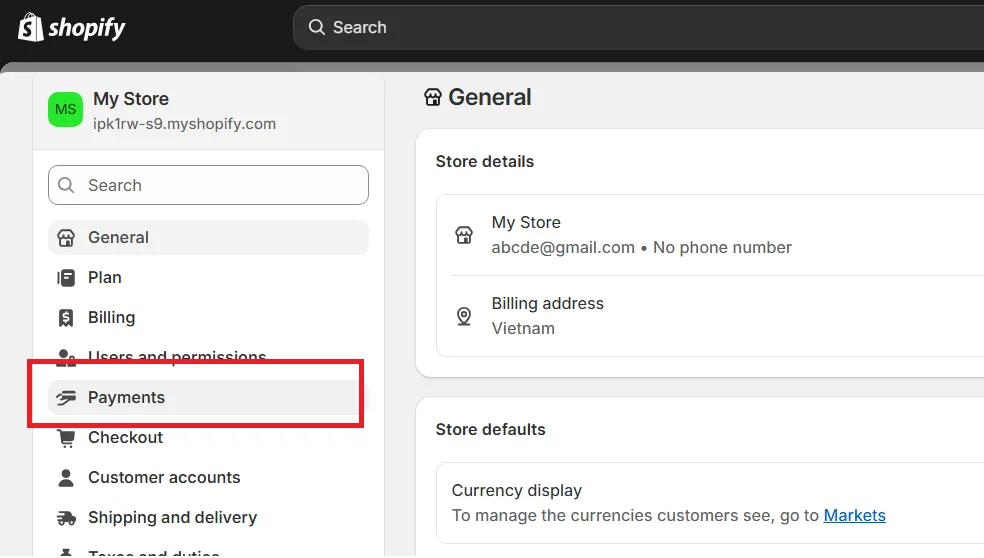
Step 1. Access Shopify settings and payments
After logging into your Shopify admin dashboard, the first place you'll head to is the Settings area. Within this menu, select Payments, which is specifically dedicated to managing your payment providers. That is where you'll be able to add Stripe as a new gateway.
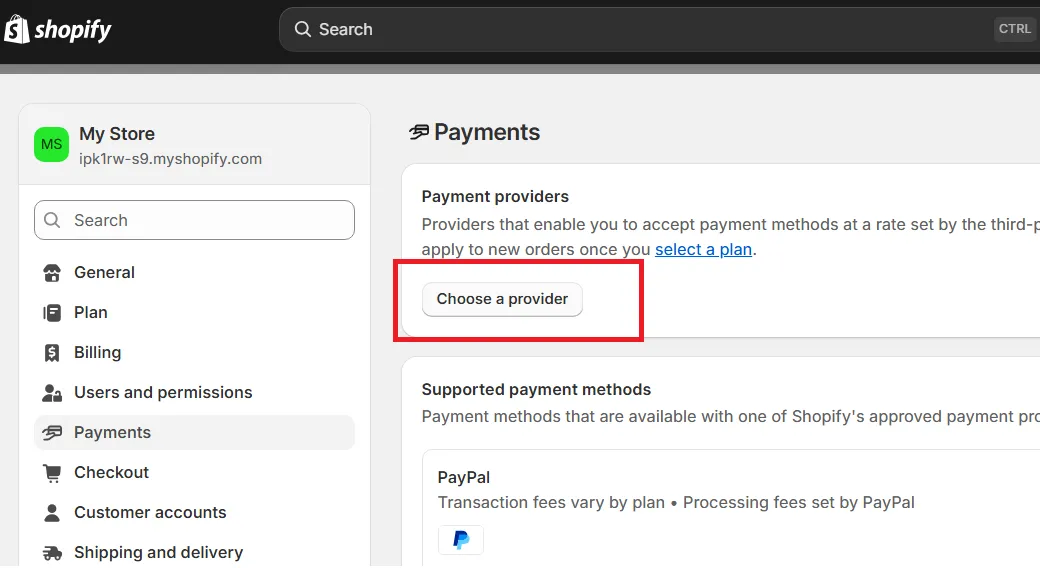
Step 2. Add and install Stripe Card Payments
Inside the Payments section, Shopify will prompt you to choose a new provider.
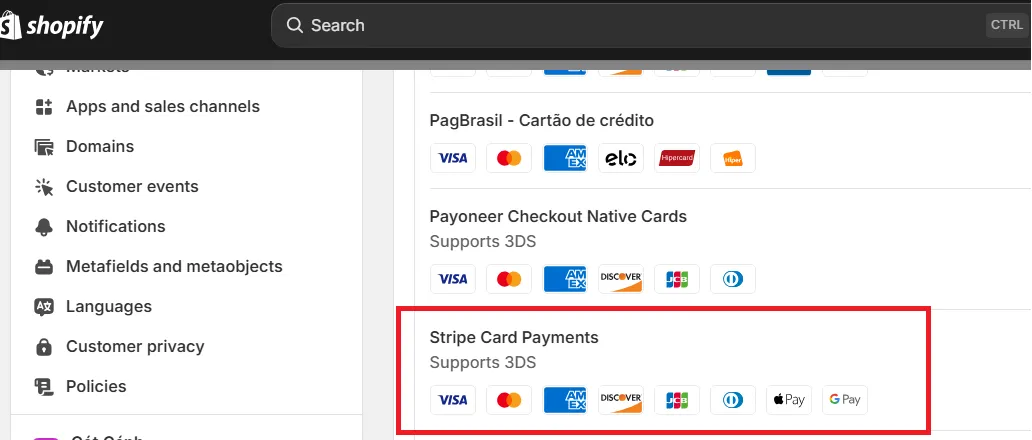
Next, search for Stripe Card Payments in the available list. If it appears, you can proceed immediately, but if it doesn't, you'll need to request a dedicated installation link from Stripe Support.
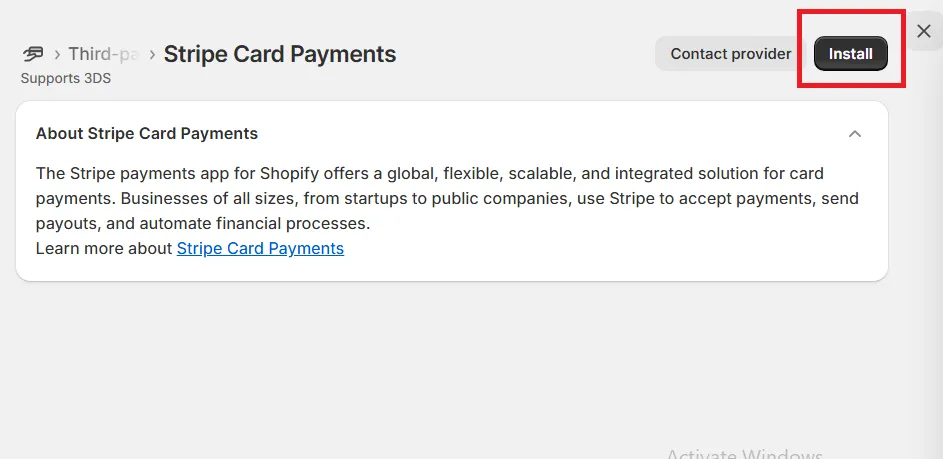
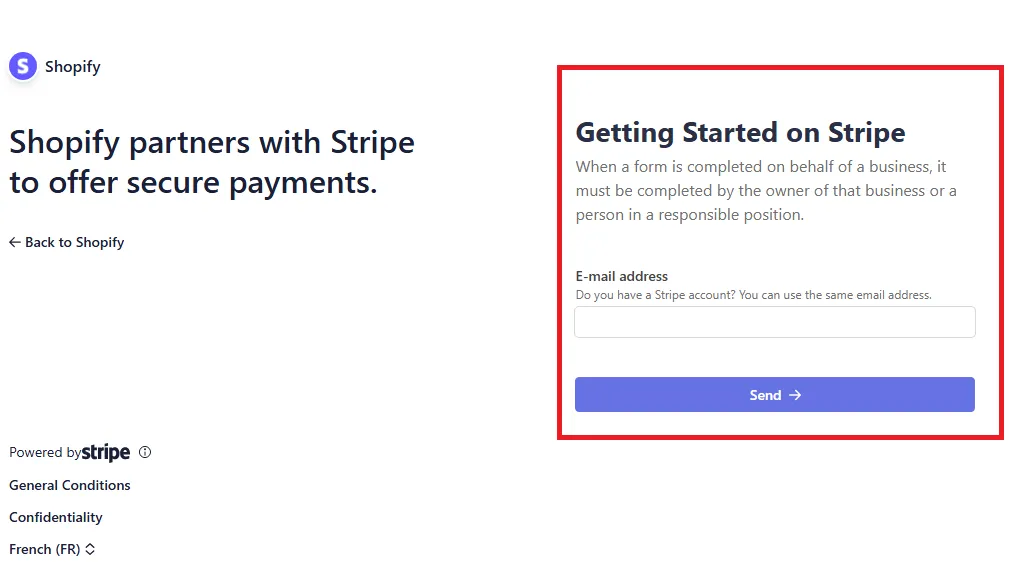
Once Stripe Card Payments becomes available, click on it to begin the setup. Shopify will redirect you to an installation page where you'll be asked to confirm permissions. By selecting Install, you authorize Shopify and Stripe to work together securely.
Step 3. Connect and authorize your Stripe account
After the installation is complete, the system will guide you to log in to your Stripe account. Enter your credentials carefully, and make sure to choose the same Stripe account that has been previously associated with your Shopify store, if applicable.
Step 4. Configure settings and activate Stripe
Once your account is connected, you'll be returned to the Stripe Card Payments settings page within Shopify. Here, you'll have the chance to review and adjust your account information. When you're satisfied with all the information, scroll down and select “Submit”.
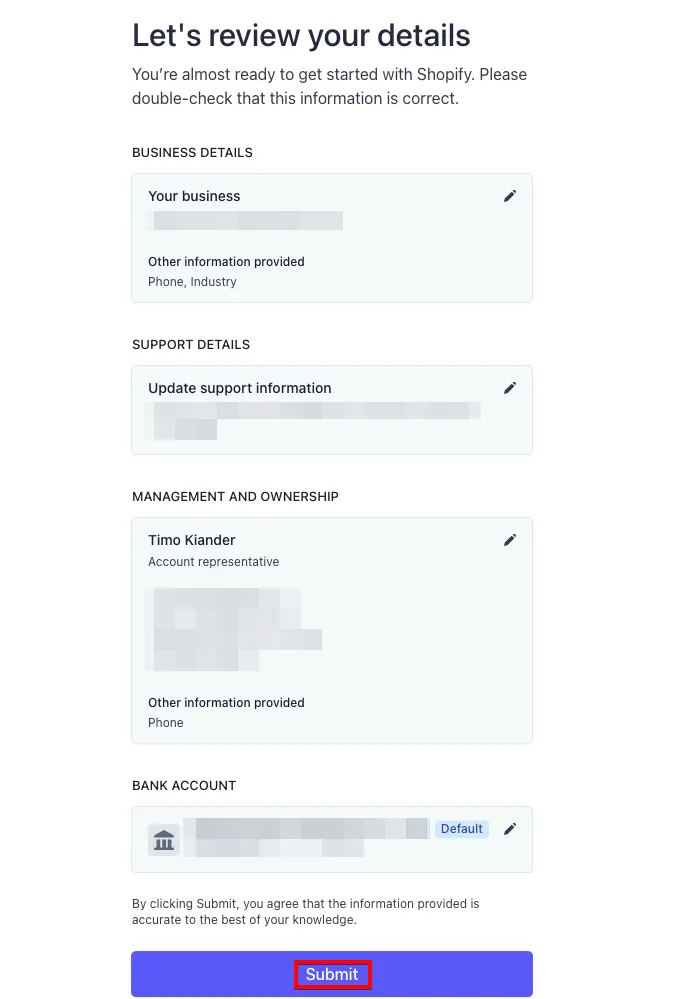
From that moment on, Stripe will be live in your store, ready to accept customer payments. And that's how to add Stripe to Shopify!
How to Add Stripe to Shopify using Shopify Payments
Another pretty easy way to add Stripe to Shopify is through Shopify Payments, the platform's built-in gateway that runs on Stripe technology.
Shopify Payments allows you to accept multiple types of credit card payments directly on your store without forcing customers to leave the checkout page, while also saving you from extra third-party transaction fees. In other words, you get the convenience of Stripe without having to install a separate provider, and your buyers enjoy a smoother checkout flow!
With that being cleared, let's walk through how to activate Stripe on Shopify through Shopify Payments:
Step 1. Go to Payments
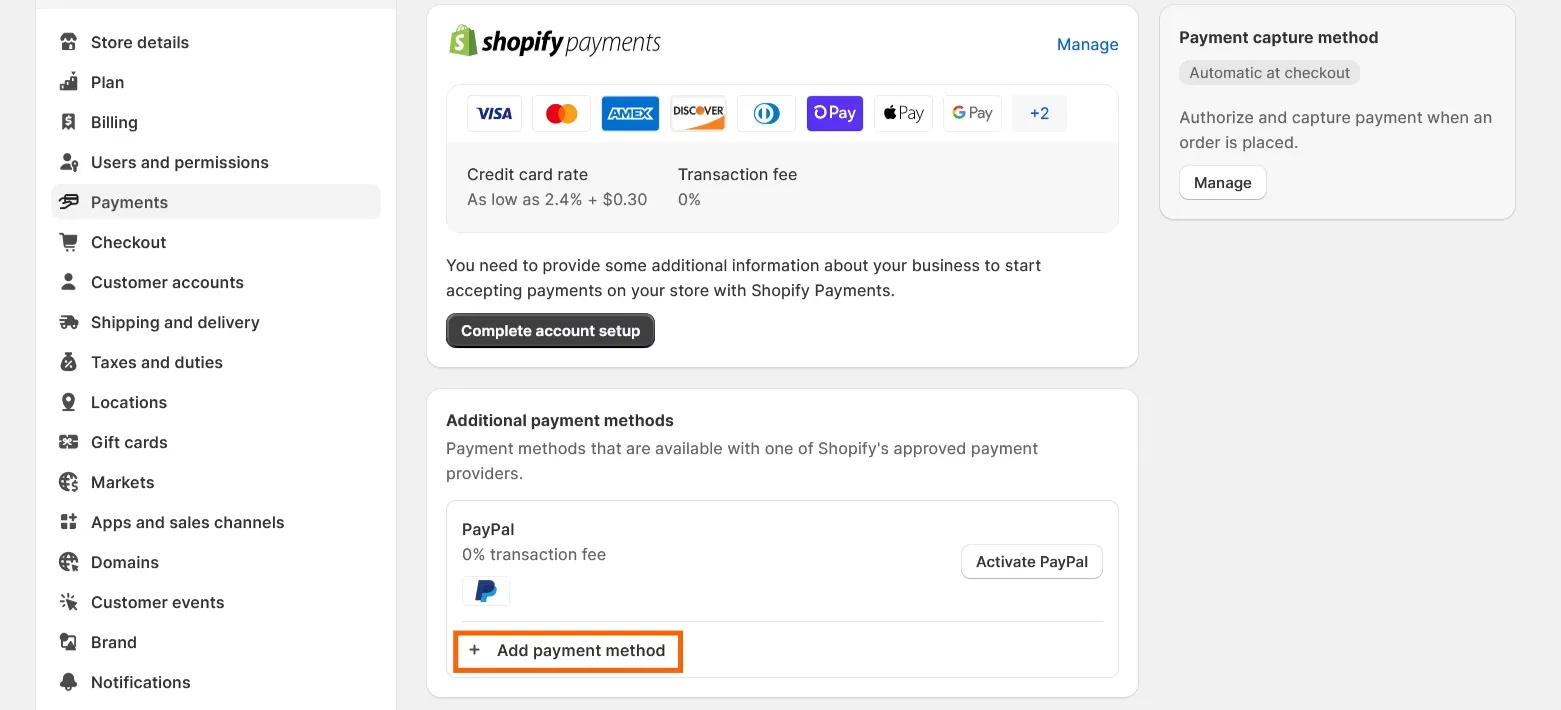
First, log in to your Shopify admin dashboard and navigate to the Settings area. Then, inside the Settings menu, look for the Payments tab. Clicking this will take you to the dedicated area where payment providers are managed.

Step 2. Select or change your payment provider
Now that you're in the Payments module, scroll to the section for adding payment methods. Here, you'll see the option to “Add payment method.” When you open the list, search for Stripe by name.
Depending on your country, you may find Stripe listed directly, or you may see that it is unavailable. That is because in regions where Shopify Payments is supported, Stripe won't appear separately; the system automatically routes transactions through Stripe behind the scenes. In other words, activating Shopify Payments effectively means you're already using Stripe, but under Shopify's own label.
Step 3. Connect and activate Stripe
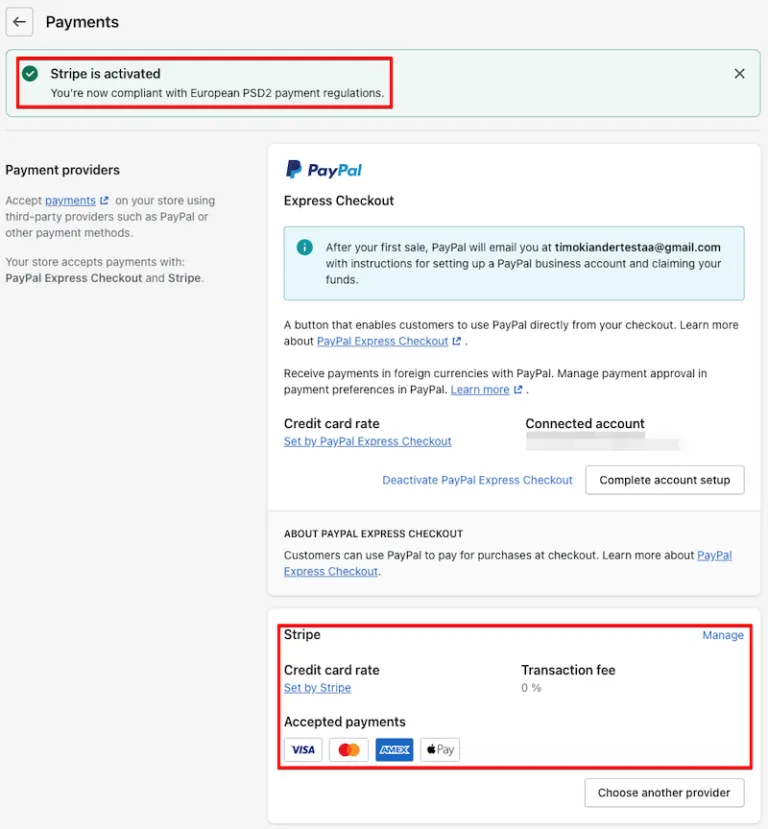
If Stripe is available in your region as a standalone option, selecting it will prompt you to log in with your Stripe credentials. After signing in, confirm the connection and click “Activate.” From that point, your Shopify store will be linked to Stripe, and you'll be able to accept payments seamlessly.
If Stripe doesn't show up because Shopify Payments covers your country, all you need to do is enable Shopify Payments instead. The checkout will still be powered by Stripe on the back end, which gives you the same benefits with less setup work!
Supported Transaction Types and Card Brands on the Shopify Stripe Integration
Managing to add Stripe to Shopify means your store can cover all the core payment needs of an online business, from simple authorizations to complete refunds. This table sums up all the types of transactions available for your Shopify Stripe payments:
Transaction Type | Description |
Authorization (authorize only) | Places a temporary hold on a customer’s funds without immediately completing the charge, useful for merchants who want to confirm stock or services before finalizing the payment. |
Sale (authorize and capture) | Processes the payment in a single step by both authorizing and capturing funds right away, which is the most common flow for online purchases. |
Capture (capture only) | Completes the transaction by capturing funds from a previously authorized payment, giving merchants more control over when they actually collect the money. |
Cancellation (invalidation) | Allows merchants to cancel an authorization before funds are captured, effectively releasing the hold on a customer’s account. |
Refund (credit) | Sends money back to the customer after a sale has been completed, either in full or in part, offering flexibility for returns or order adjustments. |
Most importantly, Shopify’s Stripe integration also ensures you can accept payments from the most widely used card networks and modern wallet options:
- American Express
- Diners Club
- MasterCard
- Visa
- Discover
- Google Pay
- Apple Pay
Why Add Stripe to Shopify?
Now that we've covered how to add Stripe to Shopify, it's time to pause a little to ask yourself: why go through the effort in the first place?
All in all, Stripe is one of the most trusted payment processors in the world, known for its reliability and ability to handle transactions smoothly at scale. Connecting it to Shopify means every sale is backed by a system built to support businesses of all sizes, from small startups to global brands.
Plus, one of the main reasons merchants turn to Stripe is its broad support for payment types and currencies. With Stripe, you can accept major credit cards, alternative card networks, and even digital wallets like Apple Pay and Google Pay. This feature makes it easier for you to serve customers from different regions and meet them where they are most comfortable paying. Having multiple payment options at checkout also reduces cart abandonment, since shoppers won't feel restricted or forced to use a method they don't prefer.
Another important advantage is cost efficiency. Shopify Payments, which is powered by Stripe in many regions, helps merchants avoid extra transaction fees charged by third-party gateways. Simply put, you get to keep more of your revenue while still giving customers a frictionless, on-site checkout experience.
Common Problems When Adding Stripe to Shopify
Lastly, though it's quite simple to learn how to add Stripe to Shopify, the process isn't always free of complications. Fortunately, these problems are well-known and can be solved with a few practical steps:

Problem 1: Stripe not showing as a payment option:
One of the most frequent frustrations merchants encounter is opening the Payments section of their Shopify admin only to find that Stripe isn't listed as an available provider. This issue can feel confusing at first, especially if you know Stripe operates in your region.
The reason behind this, as briefly mentioned above, is that in countries where Shopify Payments is supported, Stripe no longer appears as a separate option. Shopify essentially routes all payments through its own gateway, which is powered by Stripe technology.
Long story short, even if you don't see Stripe by name, your customers' card payments are still processed through it; you don't have to do anything at all. Still, for merchants in countries where Shopify Payments isn't available, the fix is to contact Stripe Support and request an installation link.
Problem 2: Authorization errors during setup
Another common issue arises during the connection phase, where merchants attempt to log in to their Stripe account but are met with an authorization error.
This problem often happens when the Stripe account being used does not match the one previously tied to the Shopify store. Inconsistent login credentials or trying to connect a new Stripe account can trigger this error as well. Not to mention, for first-time users, incomplete Stripe accounts without proper verification documents may also fail authorization checks.
To fix this, first make sure you're logging into the correct Stripe account, especially if you've used Stripe with Shopify before. Using the wrong one will prevent successful integration. And if you're setting up Stripe for the first time, double-check that your account is fully verified with all the requested documents (such as business registration details or identification).
Problem 3: Customers unable to complete payments
Sometimes the setup appears successful from the merchant's side, but customers report payment failures when checking out.
The underlying cause is usually a misconfiguration, such as certain card brands not being enabled in Stripe or digital wallets like Apple Pay and Google Pay not being activated. Another possible culprit is a mismatch between your Shopify store's currency and the currencies Stripe supports in your region.
The solution is to revisit your Stripe dashboard and confirm that all major card brands are enabled, including Visa, MasterCard, and American Express, as well as alternative brands if relevant to your customer base. Also, check that Apple Pay and Google Pay are turned on, since more and more customers prefer these fast, mobile-friendly options.
Finally, verify that your store currency in Shopify matches what Stripe is set to process in your country. Once these configurations are aligned, customers should be able to complete payments without interruption.
How to Add Stripe to Shopify: FAQs
Do I need Stripe if I have Shopify?
Not necessarily. If you're in a region where Shopify Payments is supported and you choose to enable it, then you don't need to add Stripe separately because Shopify Payments is already powered by Stripe. In that case, Stripe works invisibly in the background, and you enjoy all the benefits without having to manage a separate Stripe account.
However, if Shopify Payments is not available in your country, then you will need to add Stripe as a standalone payment provider.
How much does Stripe charge on Shopify?
Stripe charges 2.9% + 30¢ per online transaction in the US for domestic cards and wallets, with additional fees for international cards, currency conversion, and manually entered cards. For in-person transactions, Stripe's fee is 2.7% + 5¢. And when using Stripe directly on Shopify (rather than the platform's default Shopify Payments), you also pay Shopify a 2% transaction fee.
How can I add Stripe to my website?
To add Stripe directly to a website (outside Shopify), you would create a Stripe account, generate API keys, and integrate them into your site through Stripe's checkout or payment APIs.
For Shopify specifically, you can either activate Shopify Payments (which uses Stripe behind the scenes) or, if it isn't available in your country, request a manual installation link from Stripe Support to add it as a payment provider.
Why is Stripe not an option in Shopify?
The most common cause is regional restrictions. Stripe is not available in every country, and Shopify only lists providers that can legally operate in your store's location. If your store is registered in a region where Stripe doesn't yet support merchant accounts, it simply won't show up as an option to add.
Another possibility is tied to Shopify's own policies. In markets where Shopify Payments is supported, Shopify may prioritize its native gateway. Specifically, in some cases, Stripe may still be added directly as a third-party provider, but in others, the option may be restricted or hidden because Shopify wants transactions to flow through Shopify Payments instead.
Final Words
No matter which method works best for your store, learning how to add Stripe to Shopify means building a smoother path from browsing to purchase. And in today’s competitive market, that seamless payment experience can make all the difference in winning customer trust and driving more sales!
For more tips, check out our Shopify guide and join our Facebook Community.

