To encourage your customers to make their purchases, you must ensure they have all available information about the products. The best way to do that is to learn how to add custom text field on Shopify product page, specifically for the following:
Keep scrolling for the details.
Let Us Help You Move to Shopify!
Focus on your business and leave your Shopify migration in good hands.

How to Add Custom Text Field on Shopify Product Admin Page
If you want to make your product pages more informative and personalized, learning how to add custom text field on Shopify product page is a simple and effective solution. Below is a quick overview of the steps you'll need to follow:
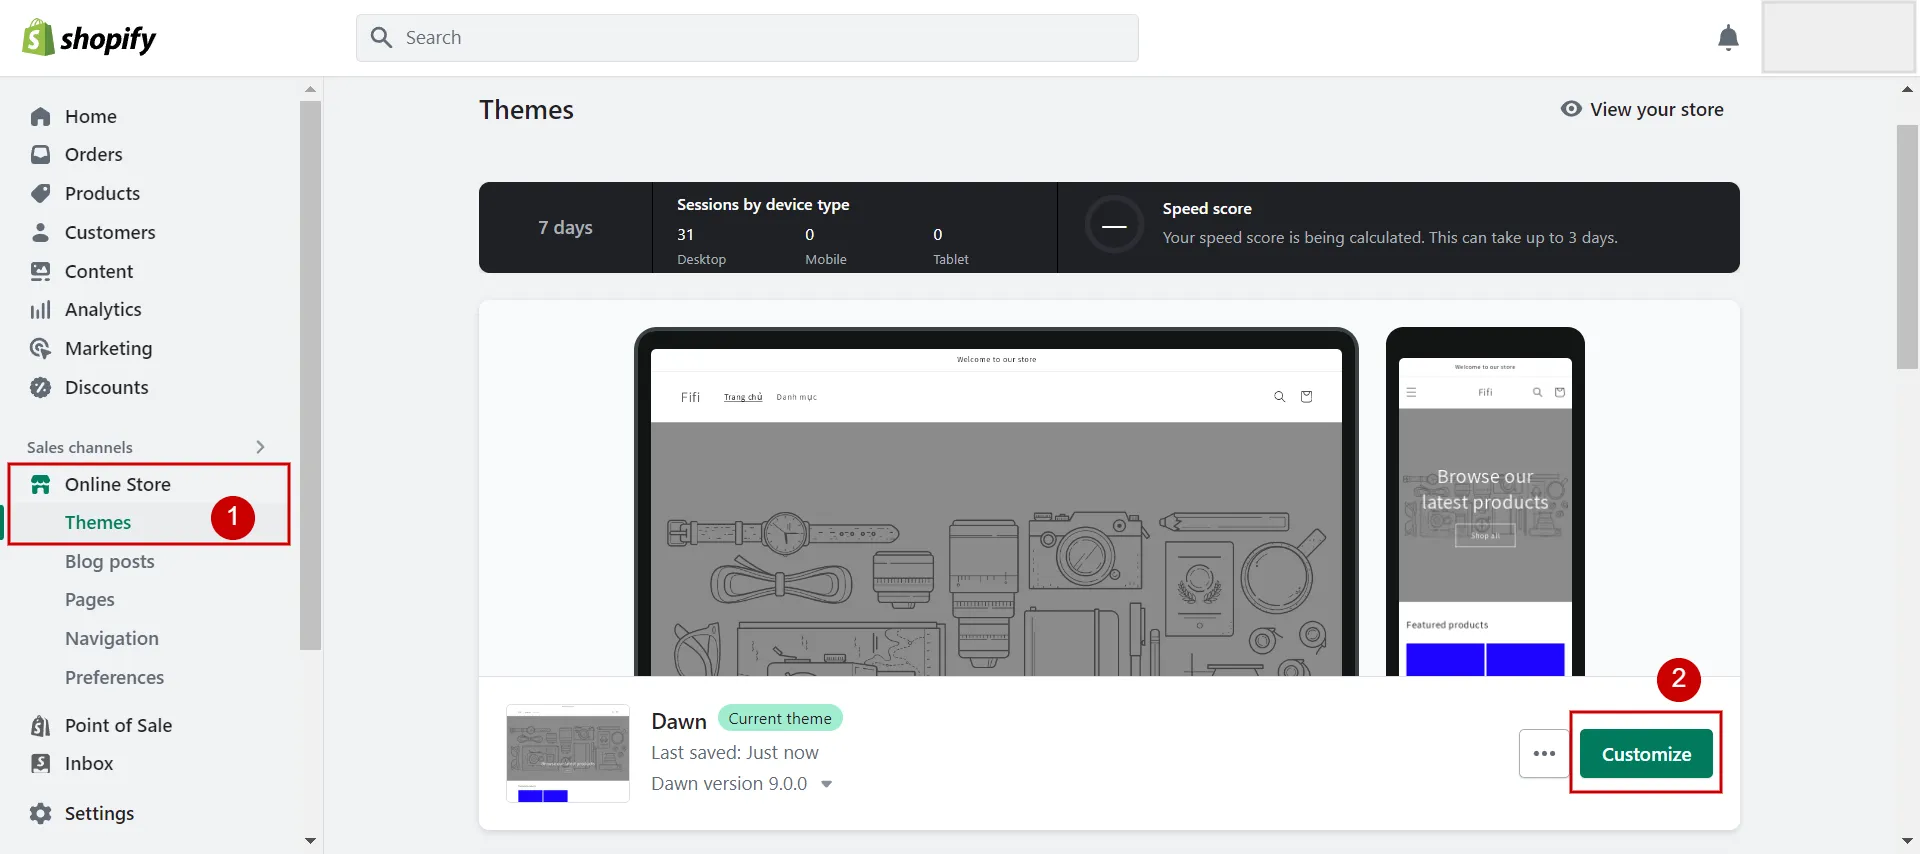
- Step 1. Go to “Themes” > Customize.”
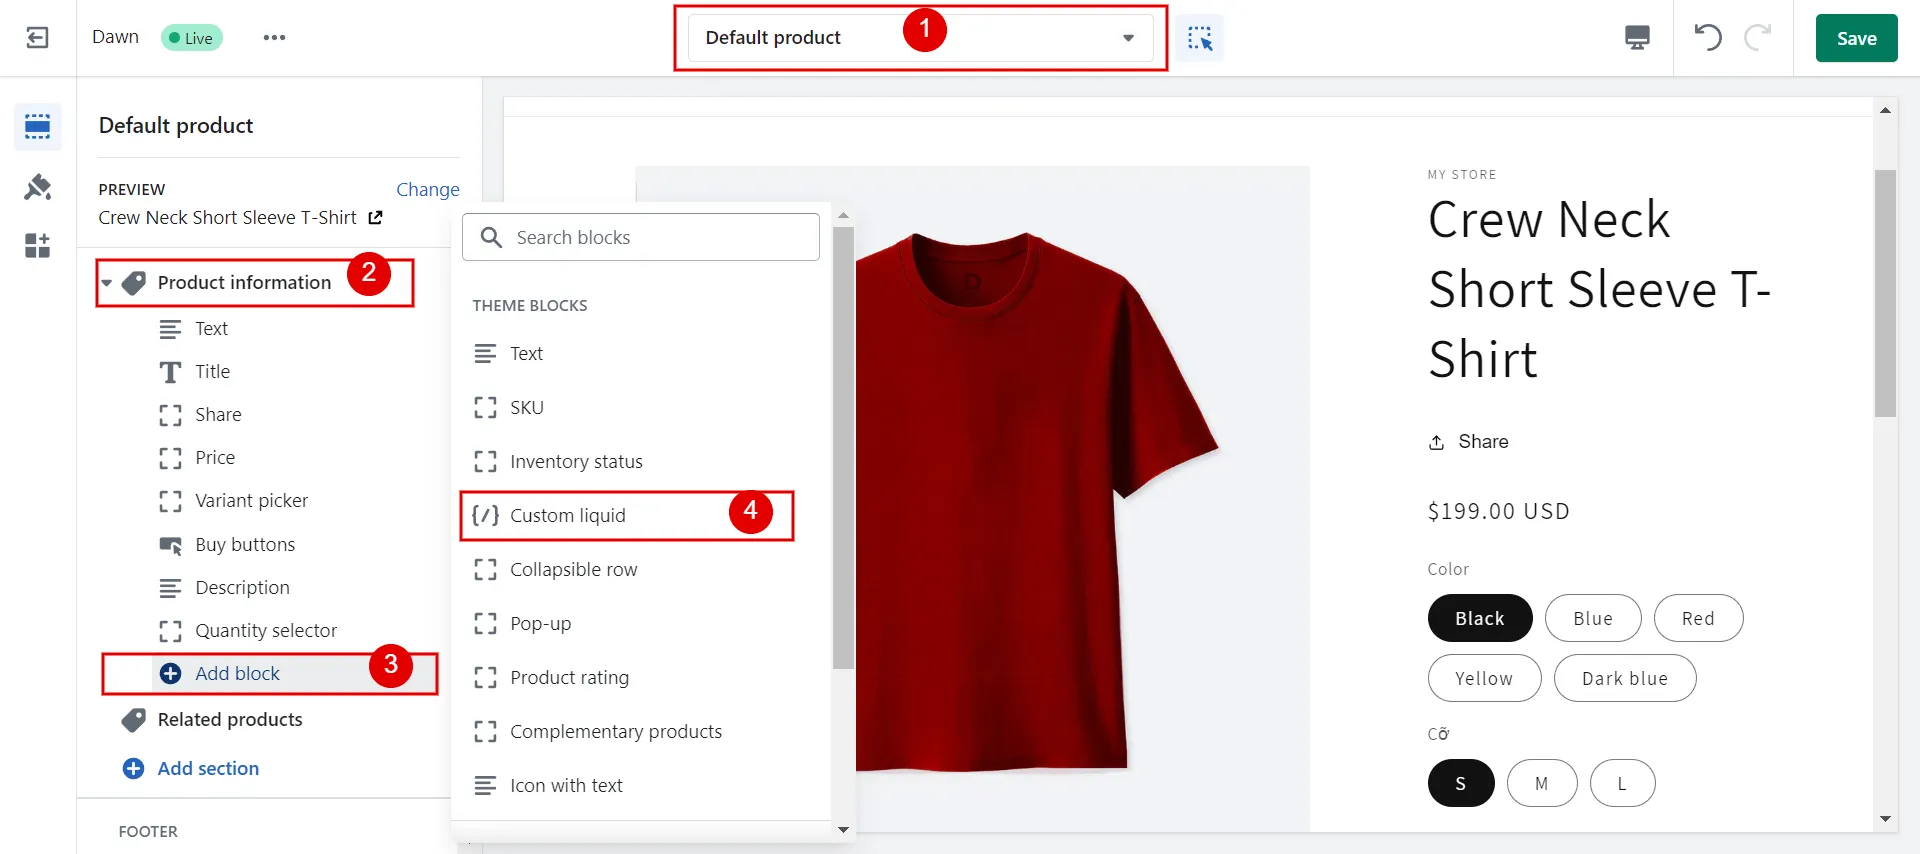
- Step 2. “Choose “Default Product” in the drop-down.
- Step 3. Go to “Product Information” > “Add Block” > “Custom Liquid.”
- Step 4. Create the custom field.
- Step 5. Click “Save.”
Let’s break those steps down further so you can add Shopify product custom fields with confidence:
First, choose “Online Store” > “Themes” and click the green button “Customize” in the current theme.
Then, in the theme editor, choose “Default product” in the drop-down of the head page. Next, select “Product Information” > “Add Block” > “Custom Liquid” to add a new custom field on product pages Shopify.
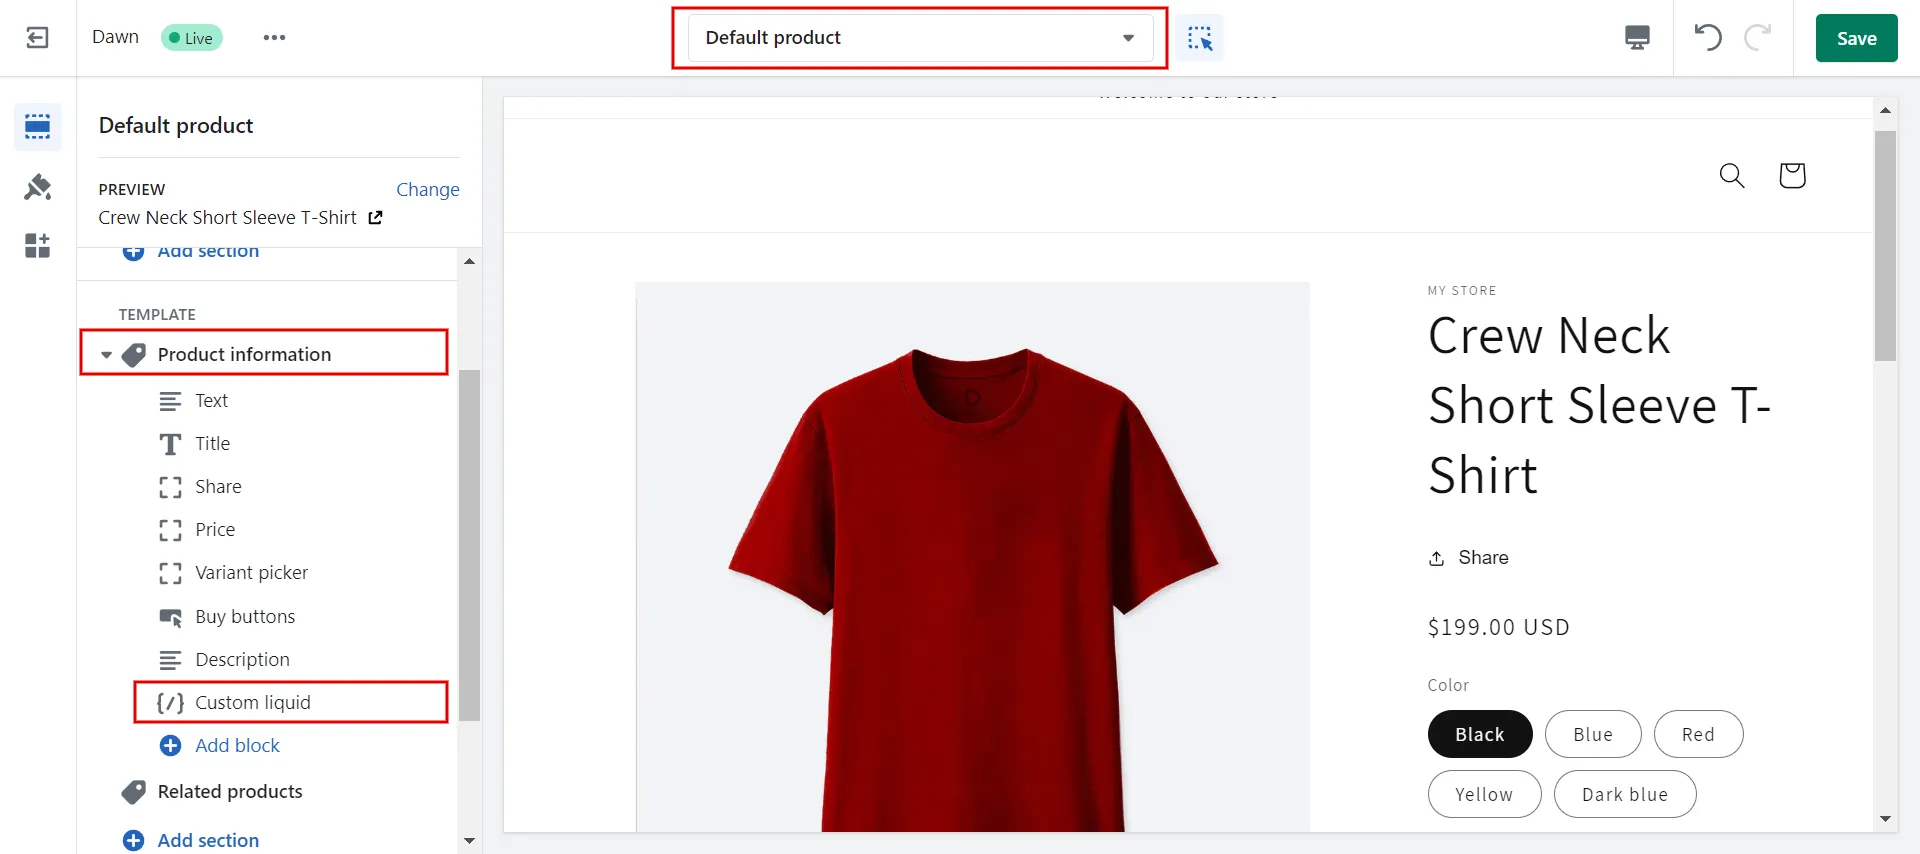
After that, click “Custom liquid” under the “Product Information” tab.
In the box of custom liquids, add the snippets and preview the changes live in your editor. After adding and modifying the snippet sample below, create a custom text box to input more details about the product.
<div class=”custom-field”> {{ product.custom_field }} </div>
<textarea id=”custom-print-message”placeholder=”Custom Print Message”name=” properties[Message]”></textarea>

Finally, click “Save” once you are satisfied. Check out our Shopify Products Page guide for more information and insights!
How to Add Custom Text Field on Shopify Product Page by Types
Use the Theme Editor and its Custom Liquid to add a custom text field to the comment box, estimated delivery dates, line item properties, and tabs. For size charts, either use the product media or the description box to upload the chart image.
Now that you have learnt how to add custom text field on Shopify product page, let's move on to the following:
1. Comment box
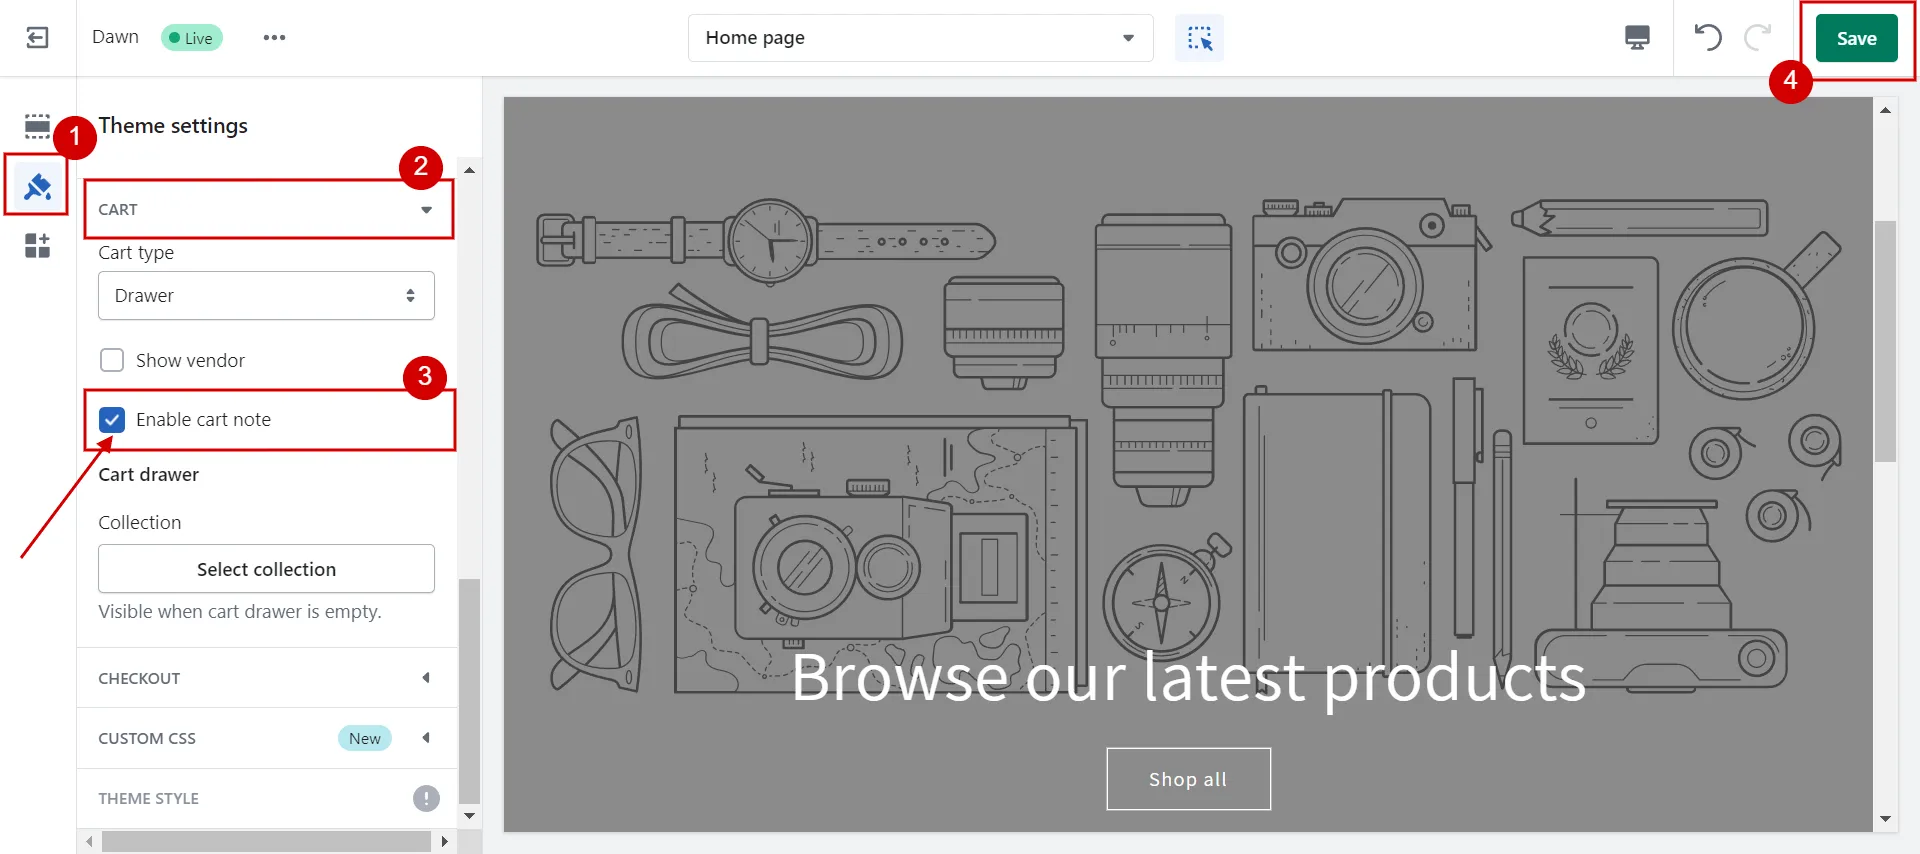
How do you turn on the comment box (or order notes) on your cart page? Go to “Online Store” > Themes” in the Shopify admin dashboard. Find the theme you want to edit, then click “Customize” > “Theme Settings.”
Next, click on “Cart” and tick “Enable Order Notes” or “Enable Cart Notes”. Hit “Save” when you are done.
2. Size chart
To add custom text field with size charts, you can either add a size chart image to the product media or add an image of a sizing chart in the description.
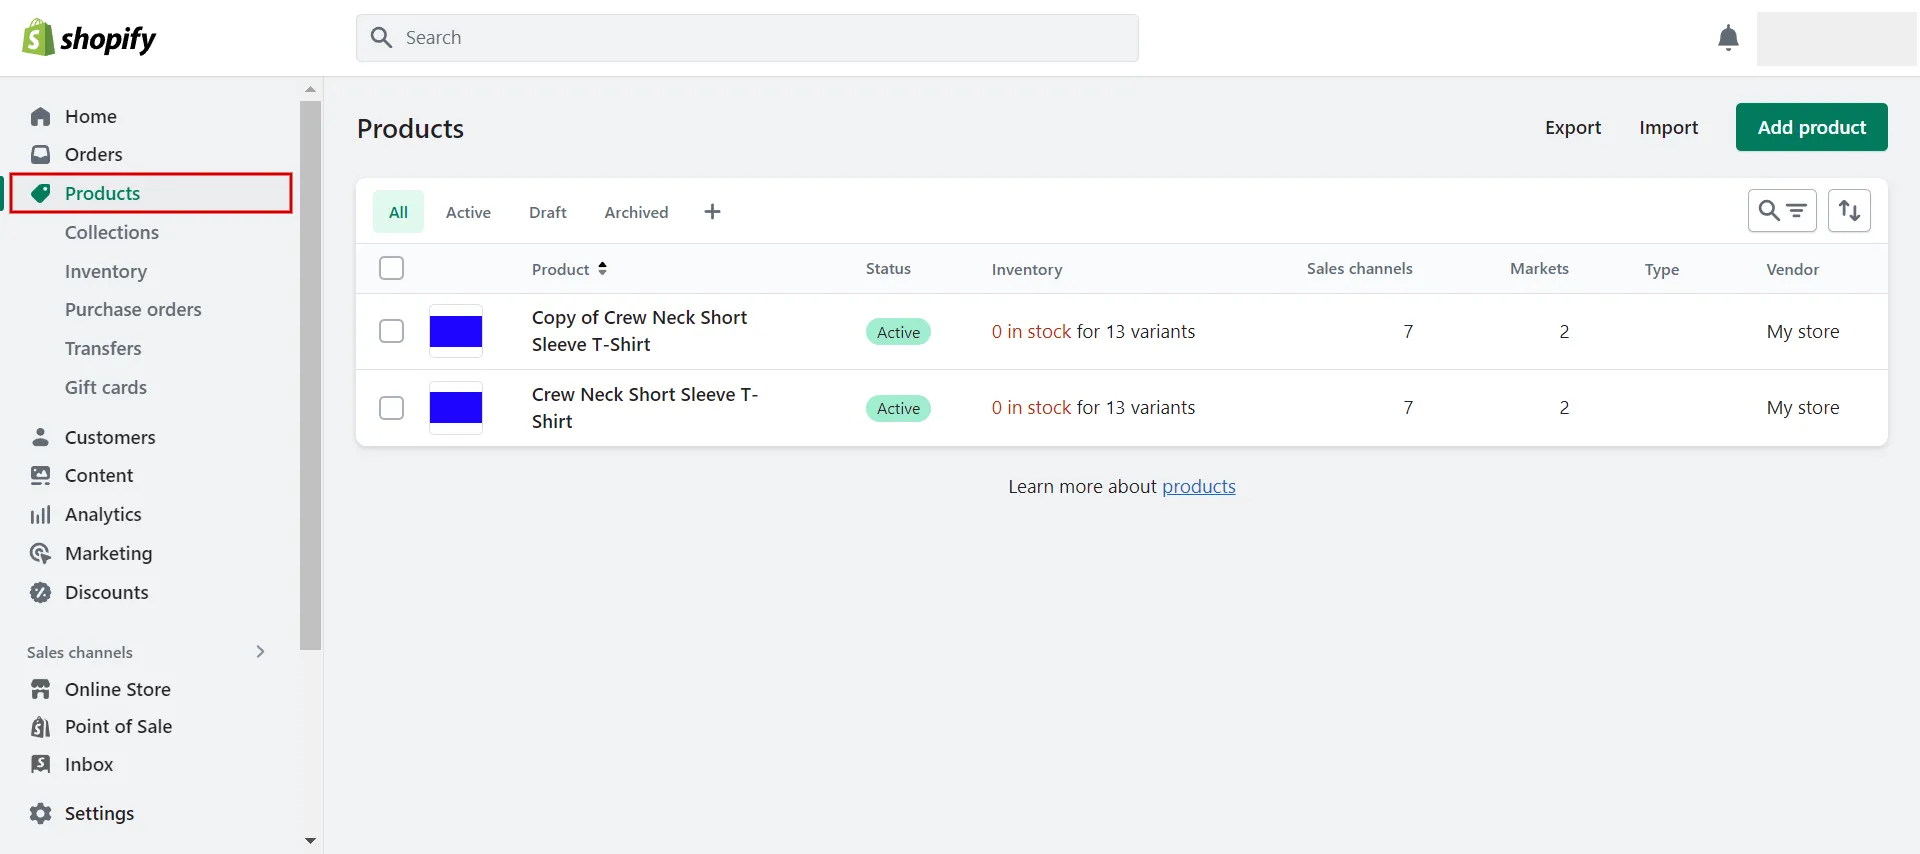
First, choose the “Products” tab in the admin panel, then choose the product for which you want to add a size chart.
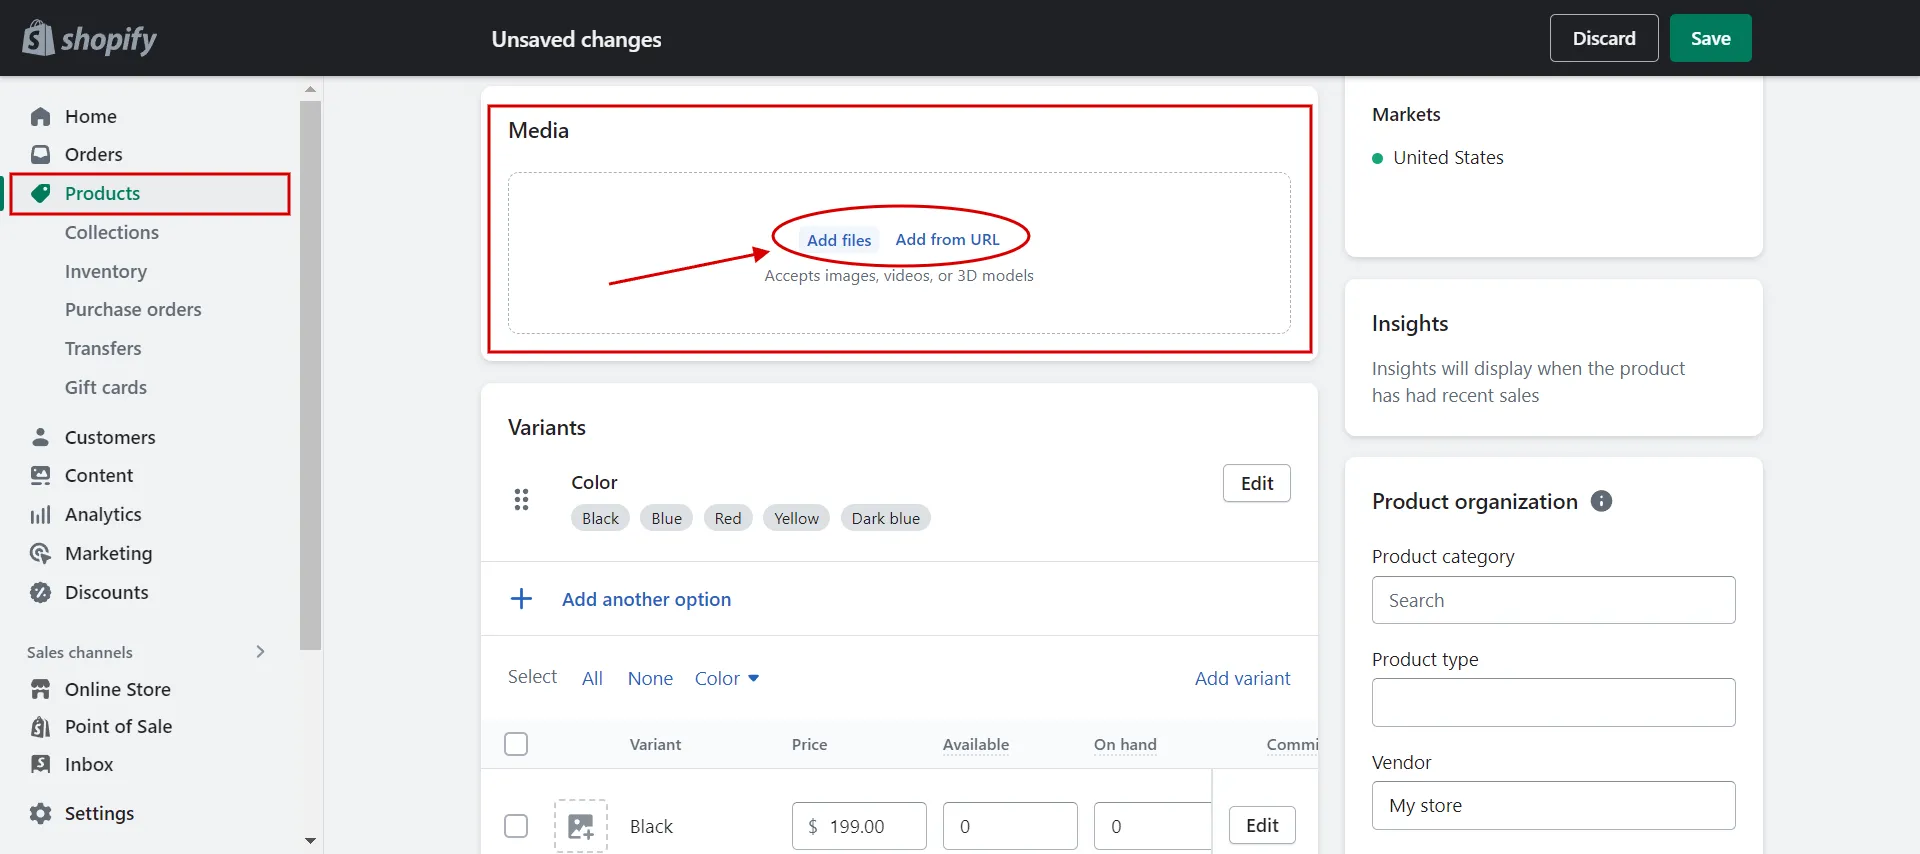
Next, find the “Media” tab and click “Add file” or “Add from URL” to import size chart images.
Or you can add size chart images directly in the description box.
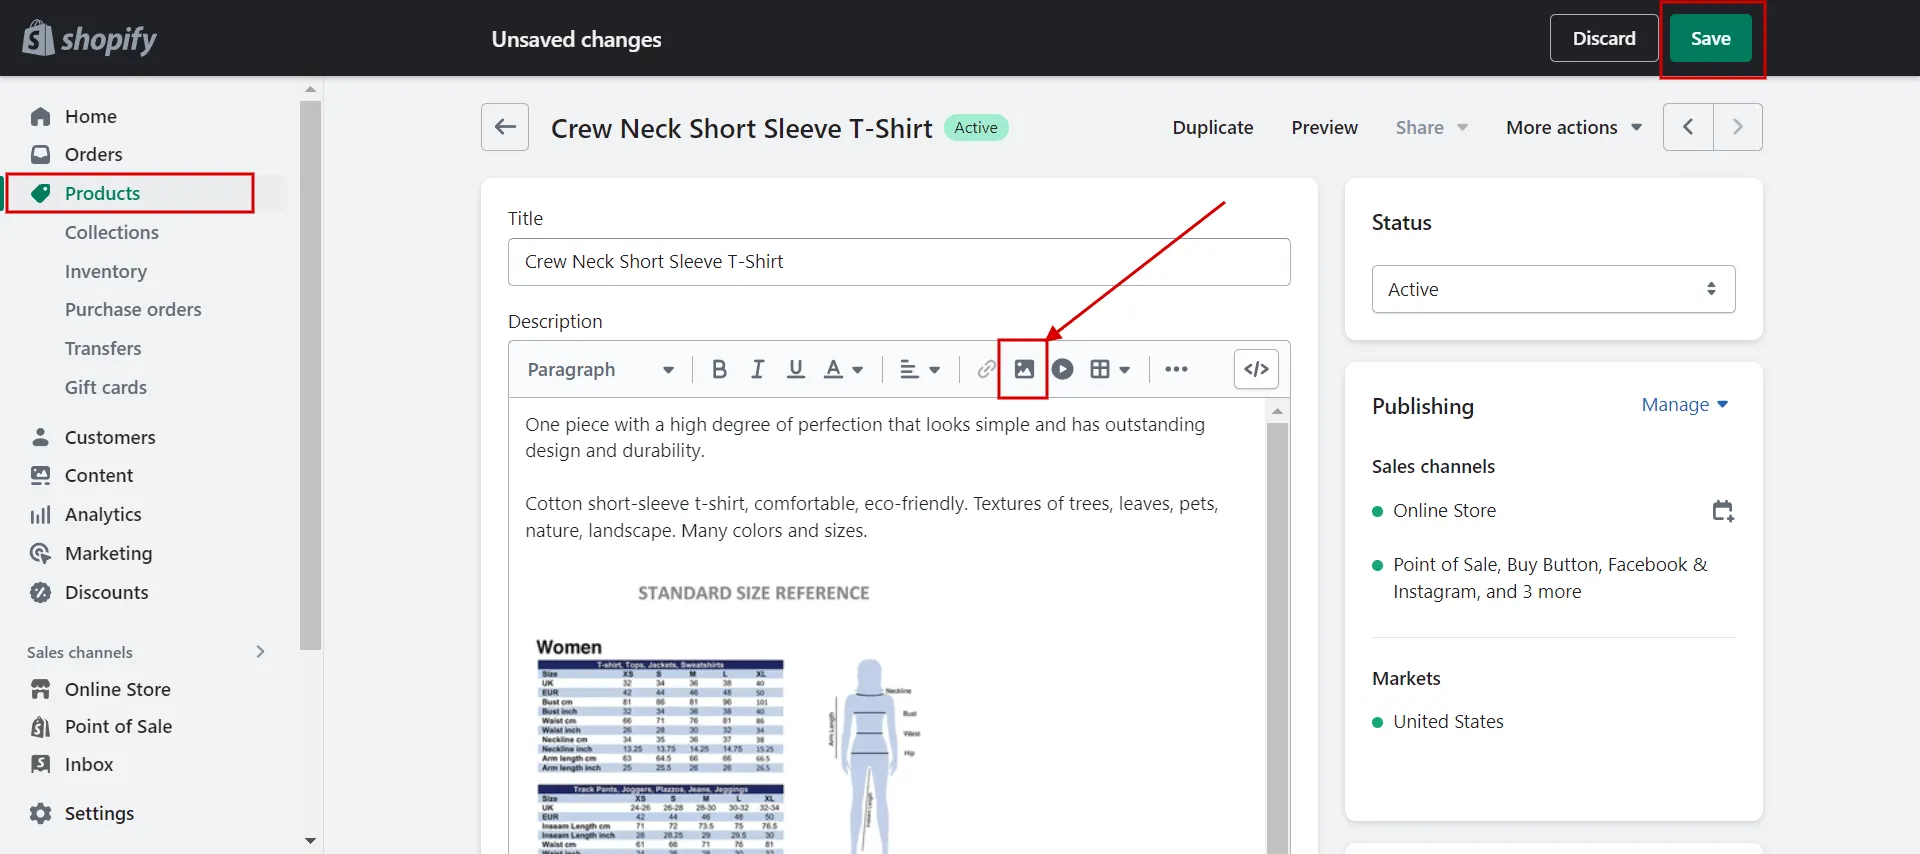
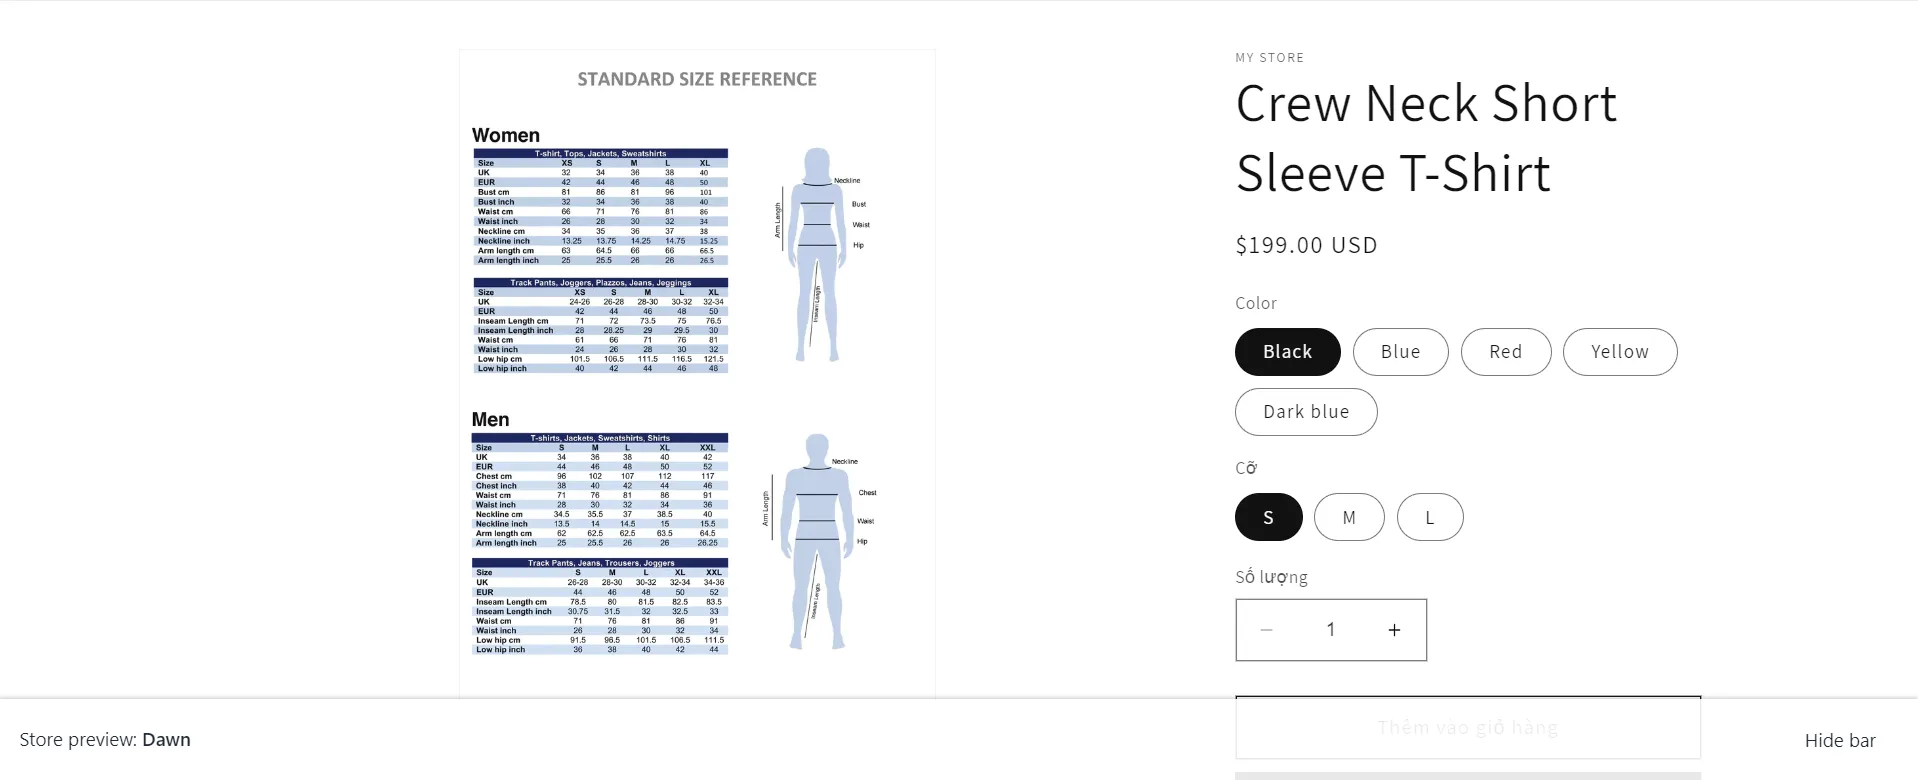
To check the result, click the “Preview” tab.
3. Tabs
To activate collapsible tabs, navigate to the Theme editor from Shopify Admin. Select “Products” > “Default Product” to access the product page template.
Next, click on the “Add block” in the “Product Information” section and select the “Collapsible Tab” block.
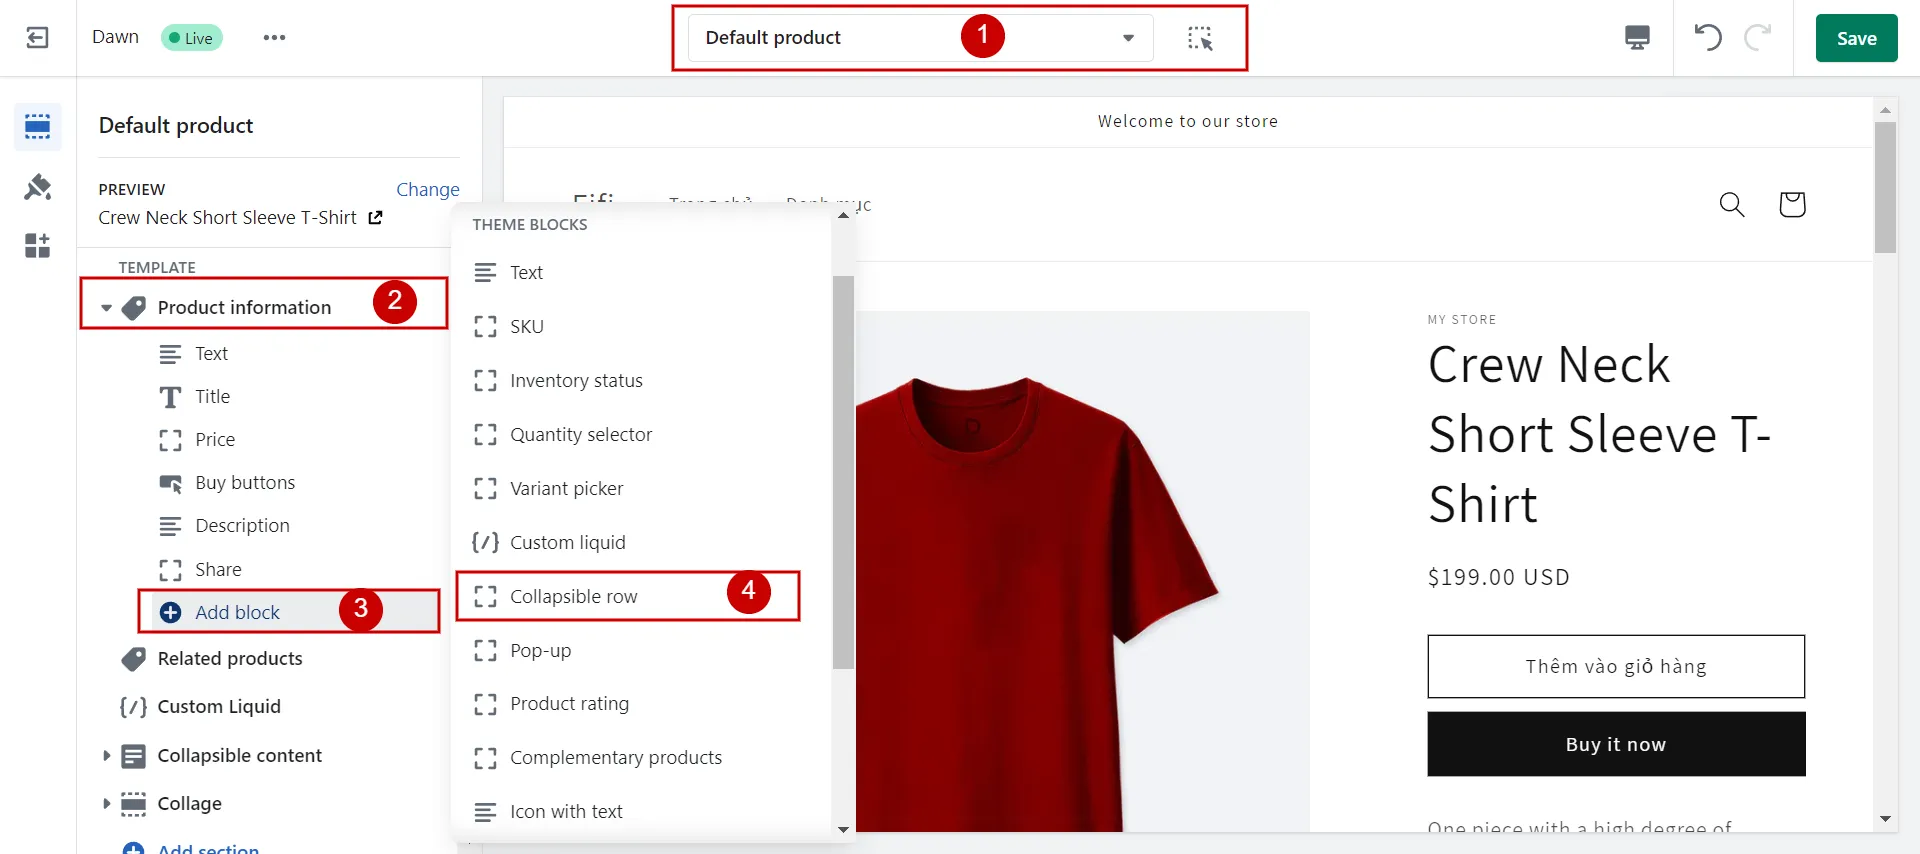
Then, click “Collapsible Row” to change the value.
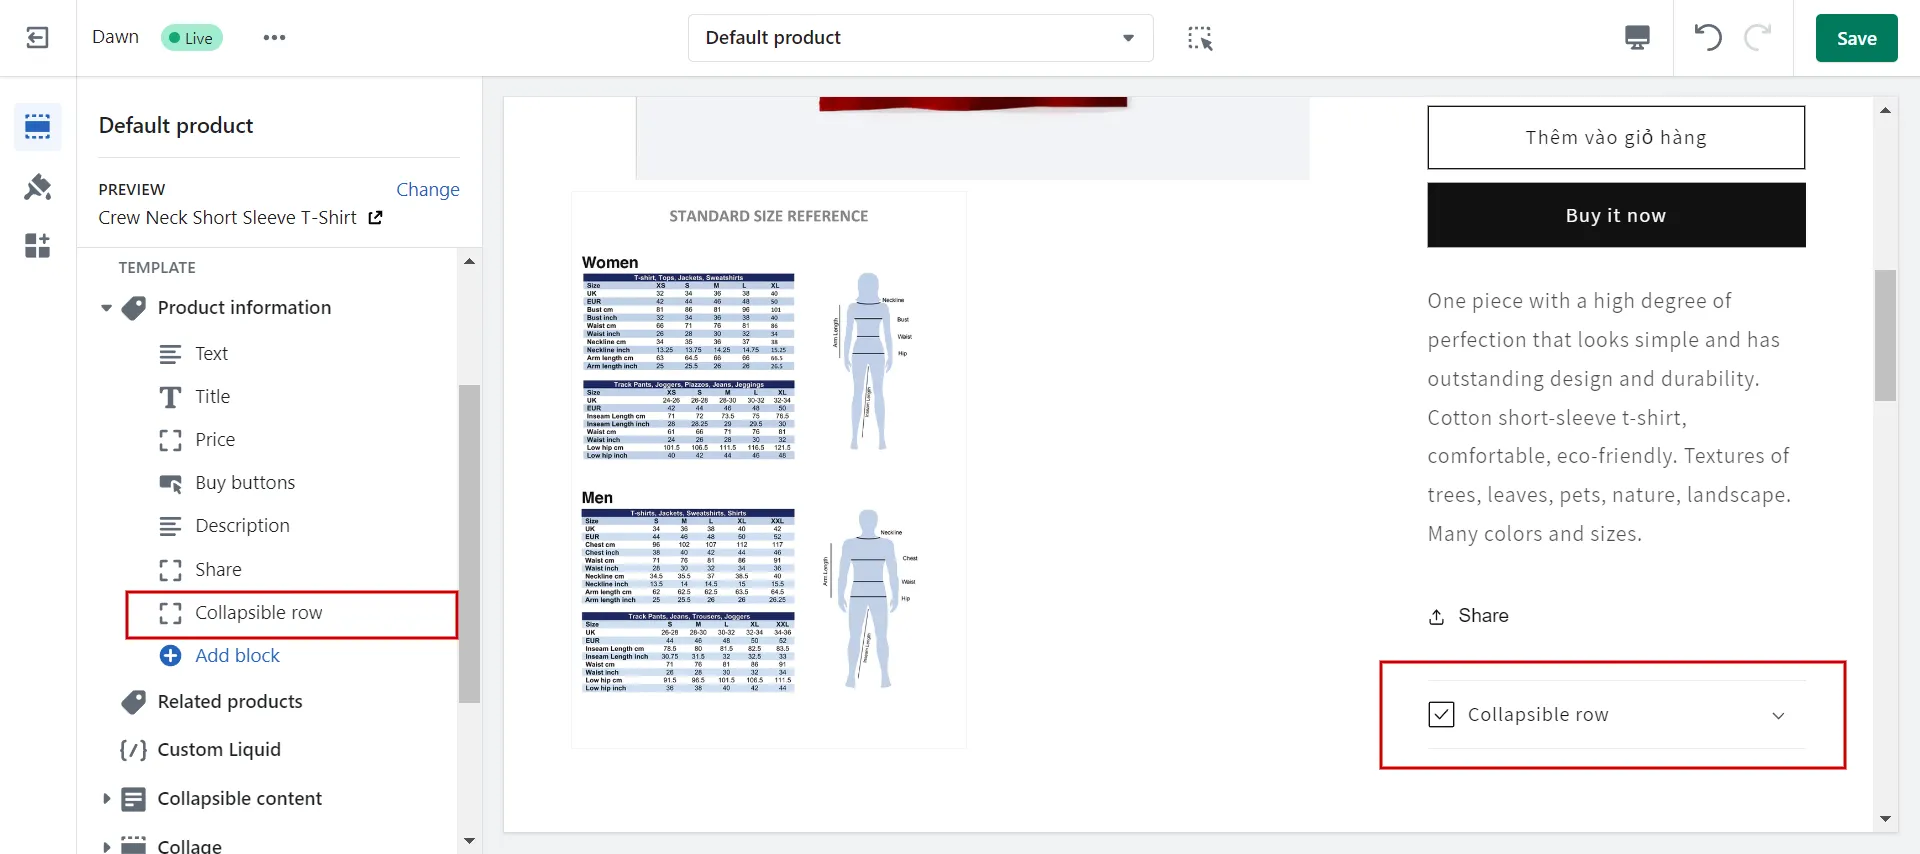
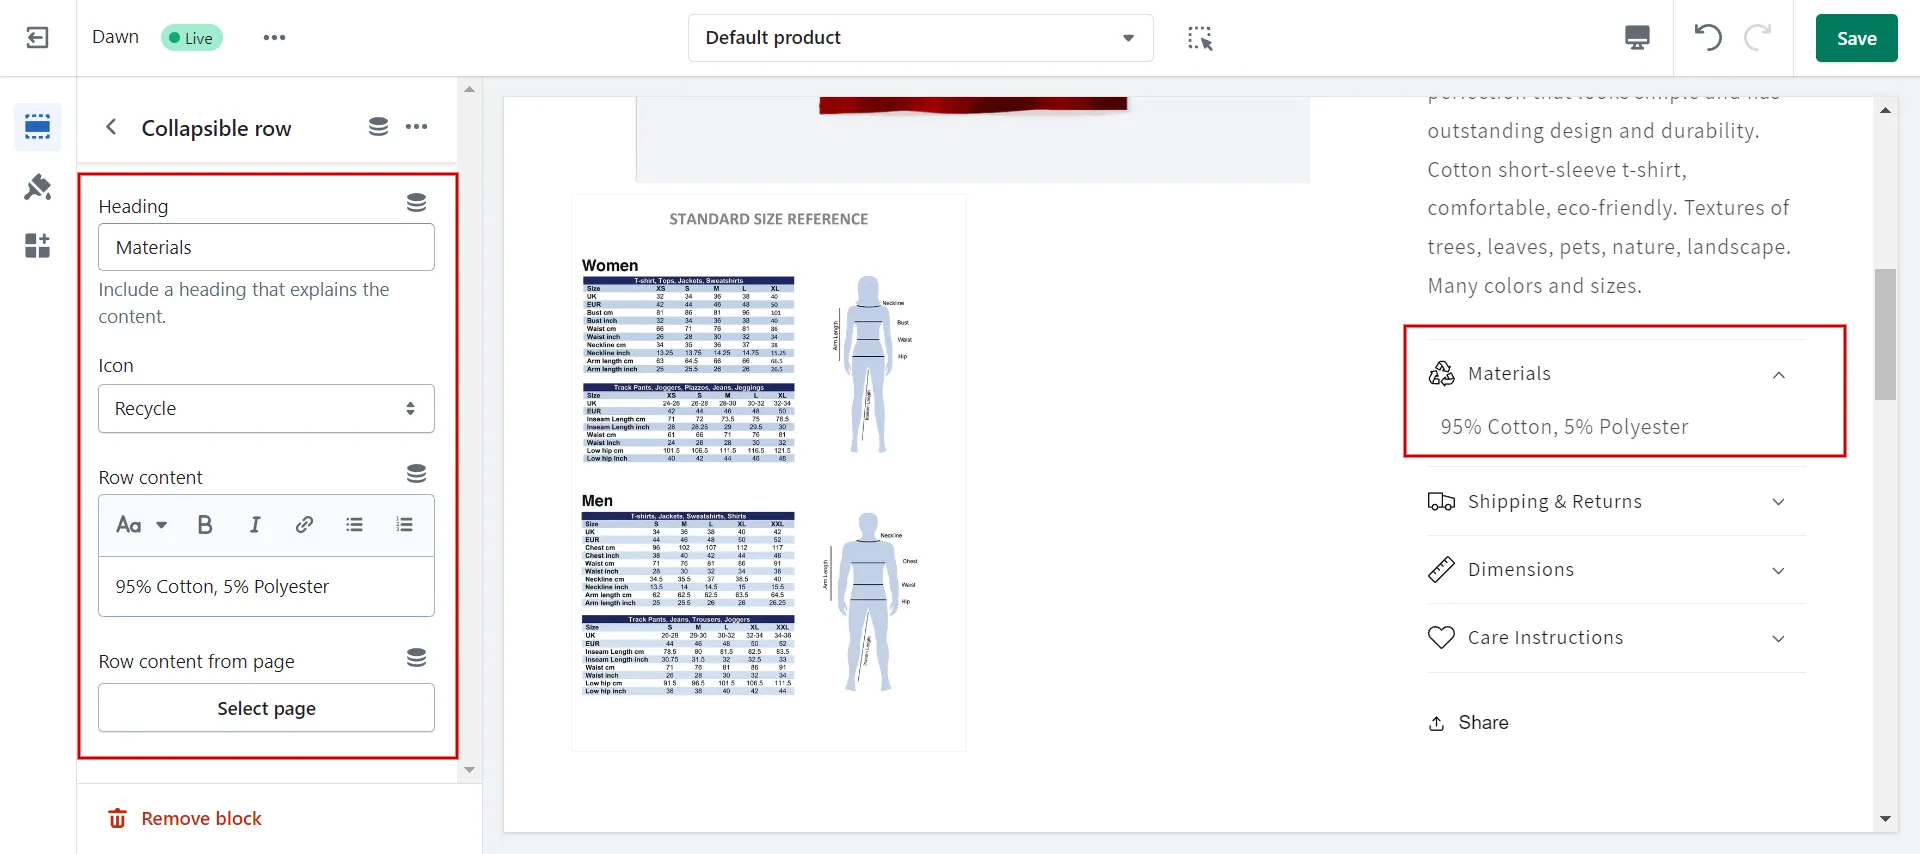
In the “Collapsible” tab, add details information about the product, namely materials, shipping & returns, dimension, care instruction, etc.
4. Estimated delivery date
To add an estimated delivery date to a Shopify product page, you can either use a collapsible row or use the custom liquid from the Theme editor.
Navigate to the “Online Store” > “Themes” > “Customize.” Then, in the Theme editor, click “Product” > “Default Product Template.” Alternatively, utilize your previous design if you have created a custom product page template.
On the product page, include a “Custom Liquid” section and place it wherever you want. Then, insert the code into the box of custom liquid.
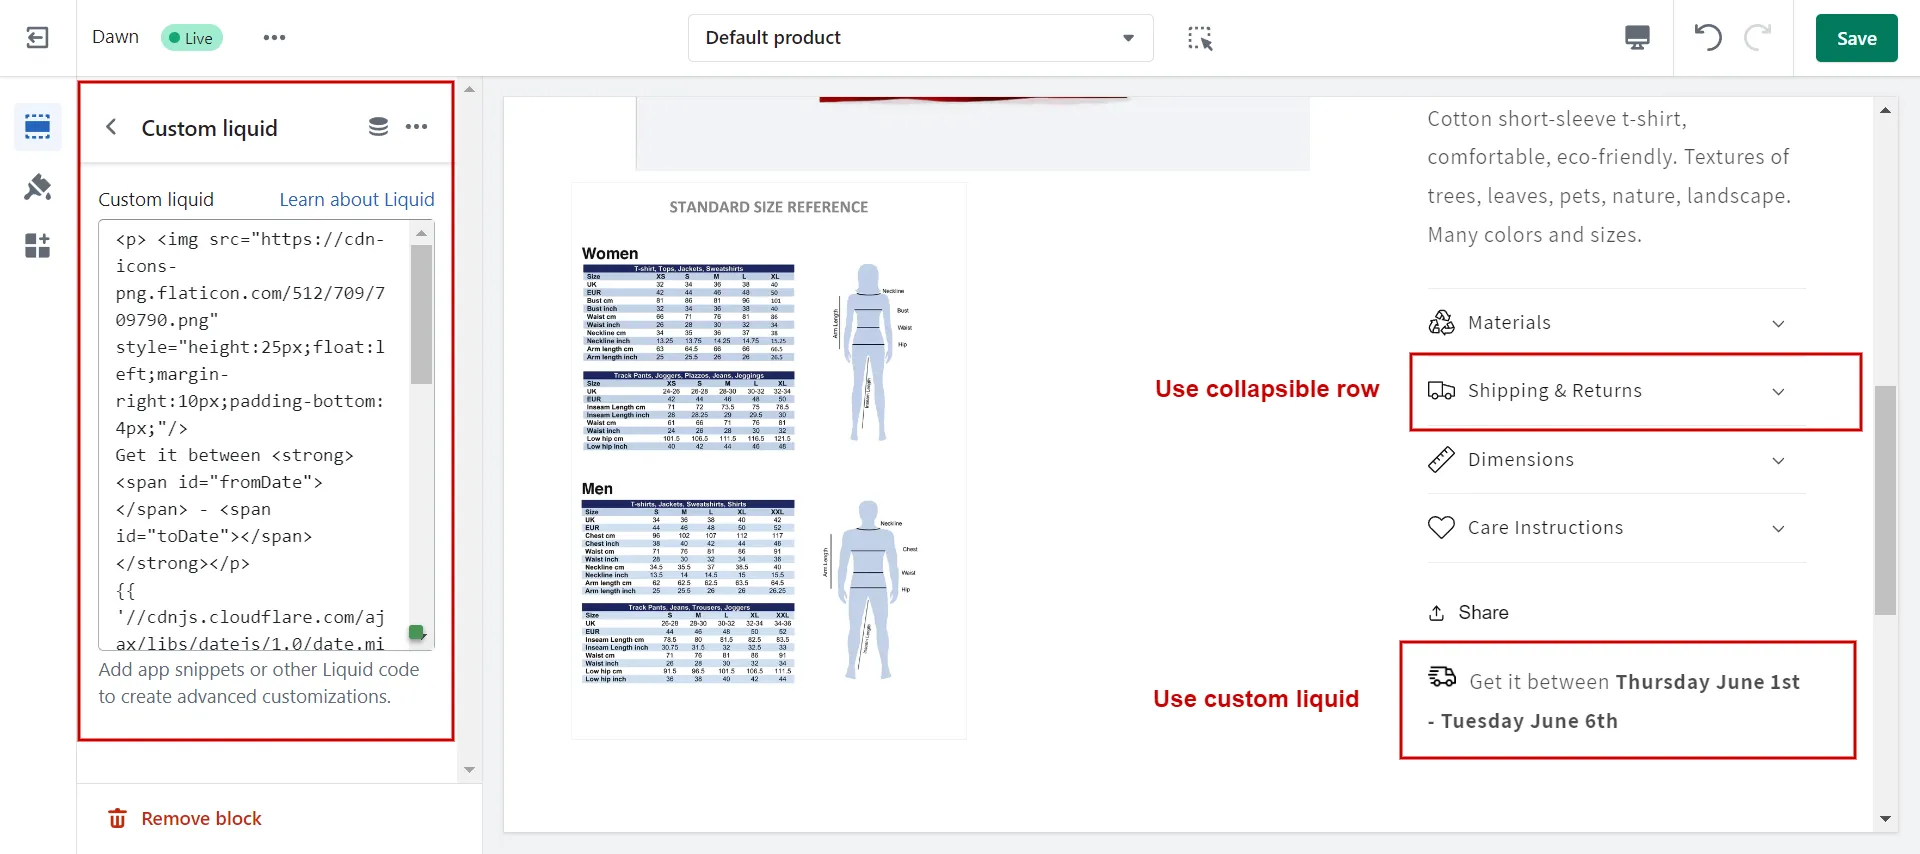
For both approaches, this is how the delivery date appears on the front-end page:
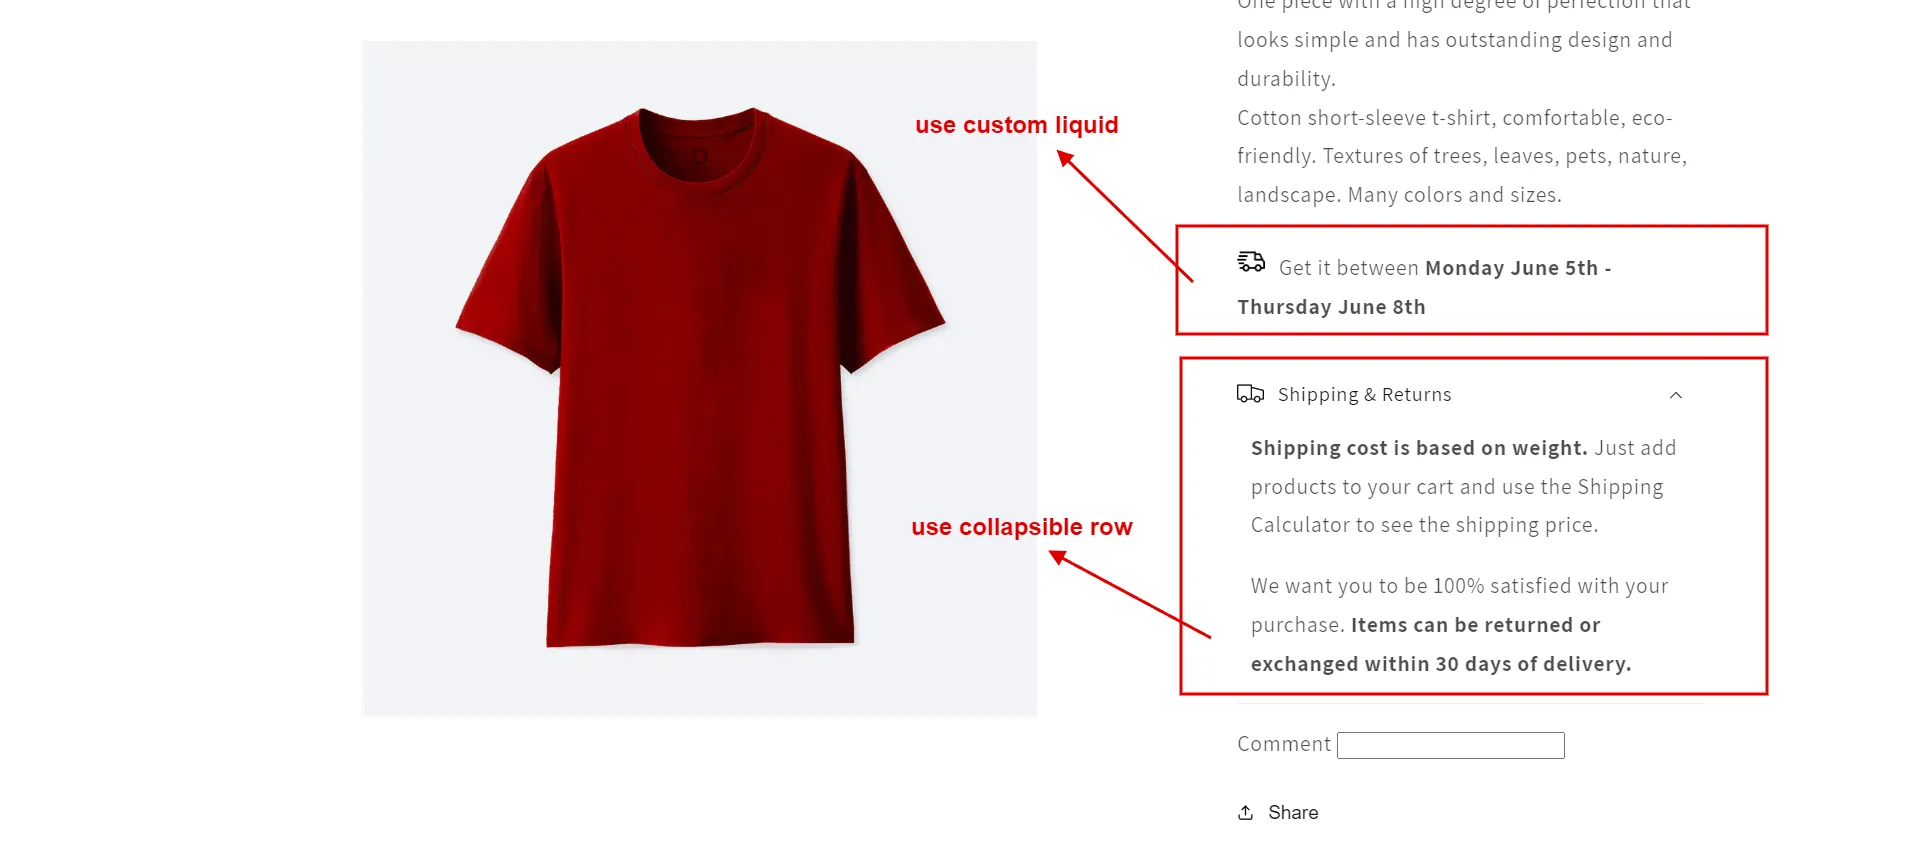
Finally, click “Save” to save your changes.
5. Line item properties
Line item properties allow Shopify merchants to collect customization data from the buyer for an item added to the cart. To add line item properties Shopify, go to the Theme Editor > “Default Product,' then choose “Product Information” > “Add Block” > “Custom Liquid,” just like with the 4 previous content types.

Check out the UI element generator to generate snippets if you cannot write snippets by yourself.
Why A Custom Text Field Matters in Shopify
Custom text fields let Shopify merchants share more information about their products beyond the default settings, including special care instructions, supplier background, product-specific tabs, and other important aspects:
- Not every product fits into the same mold. Hence, custom text fields help you showcase what makes this particular product stand out. Examples are electronics (warranty details or voltage specifications) and clothing (custom size guides or material percentages).
- Managing additional data for products or orders can become overwhelming if relying solely on spreadsheets or external systems. With custom fields, you can add custom labels for internal organization, such as “seasonal” or “limited edition.”
- The more detailed and clear your product pages are, the happier your customers will be. When customers find the information they need quickly and easily, they are likely to buy and return for more.
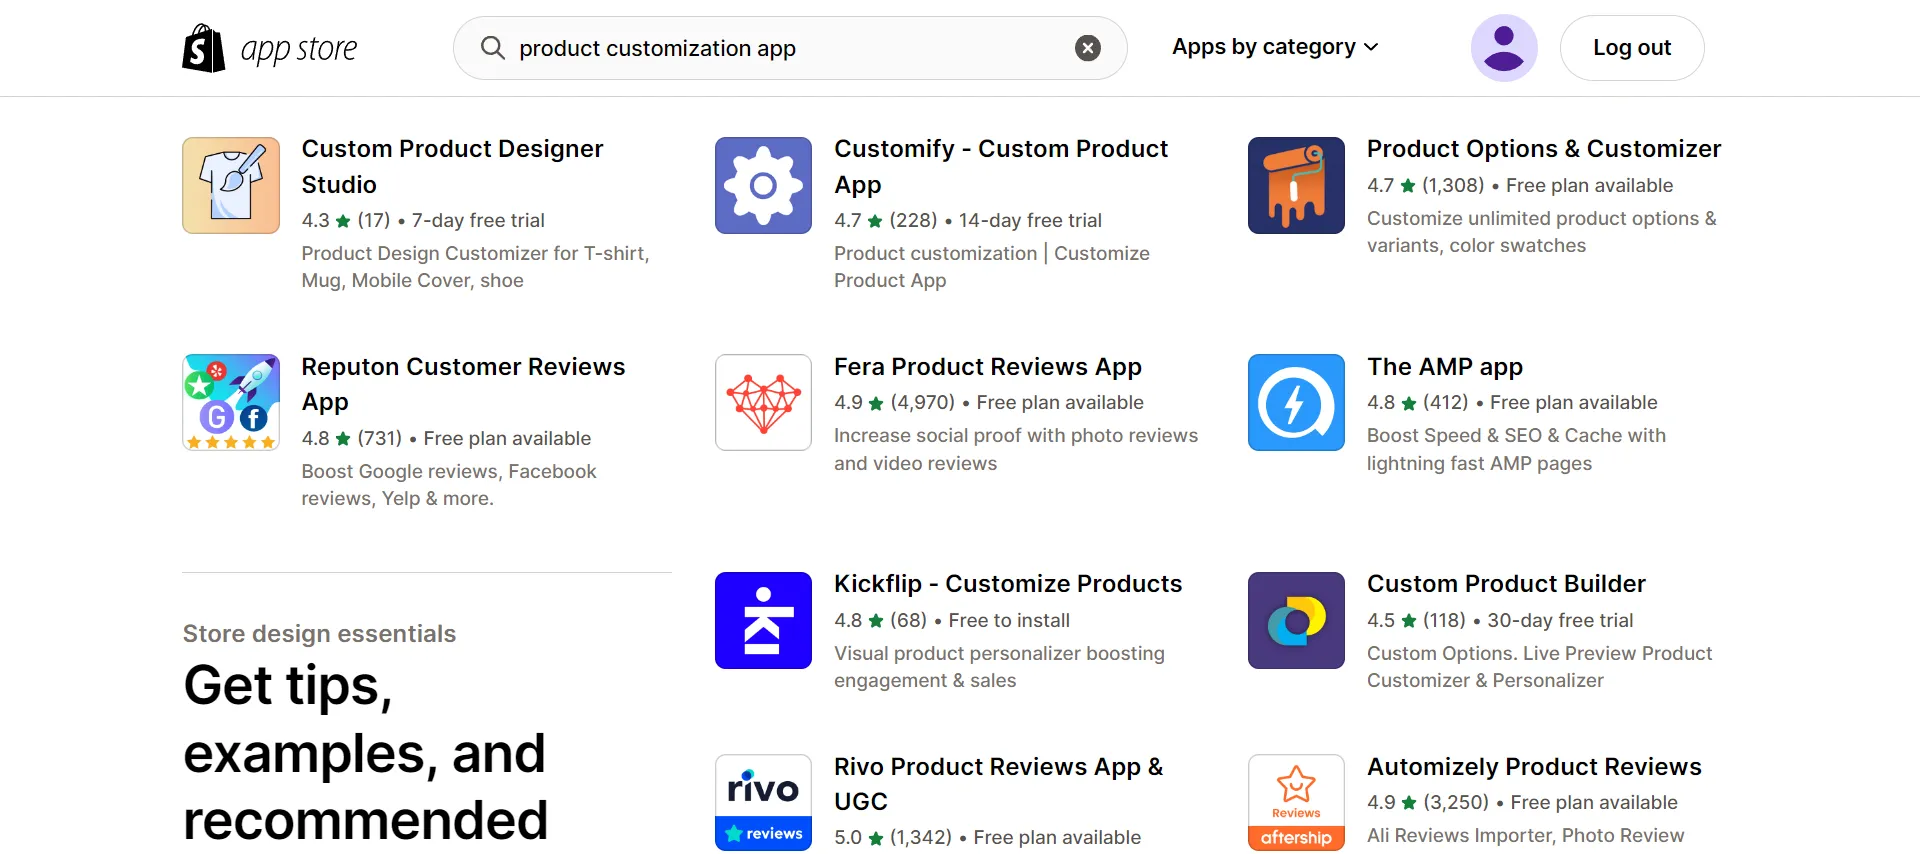
4 Apps to Add Custom Text Field on Shopify Product Page
Product Options and Customizer is the best Shopify app on the market for adding custom text fields. It offers diverse features and a relatively affordable pricing range (up to less than $50 per month). Other notable apps include Customify ‑ Product Customizer, Custom Product Builder, and Customily.
Below are the pros and cons of all these 4 applications:
Shopify App | Pros | Cons |
Product Options and Customizer (0$ to $49.9 per month) | + Allow for limitless product options + 24/7 tech support | + A bit glitchy for higher plans (Premium Plus) |
Customify ‑ Product Customizer (0$ to $30 per month) | + Fully responsive and work on all devices. | + Slow loading |
Custom Product Builder (0$ to $50 per month) | + Items customization. | + No Old/New sorting filters for the product list |
Customily (0$ to $49 per month) | + Allow your customers to add text, select a font and color, add images, textures, and clipart… | + Not user-friendly |
Troubleshooting Common Problems
Now that we've covered how to add custom text field on Shopify product page, let's go one step further! To make sure your setup process is as smooth as possible, here are some common issues you might run into, along with explanations and suggested solutions:
Issues | Reasons | Solutions |
Custom field doesn’t show on storefront | The snippet might be placed in the wrong block or template | Double-check that the snippet is inserted inside the correct Product Information section under the “Default Product” template. |
Line item property not passing to cart | The name="properties[Message]" input may be missing or misformatted | Make sure the input field has the correct name="properties[YourField]" format to properly register custom data with the product. |
Fields look out of place or misaligned | CSS conflicts or a lack of theme styling for new elements | Add custom CSS to match your theme’s style. Use the theme editor or custom CSS blocks to adjust padding, margins, and fonts for consistency. |
Field disappears after theme update | Theme updates may overwrite custom code | Always back up your code snippets and reapply them after updating the theme. Use theme versioning if available. |
Slow page load after adding fields | Too many third-party apps or poorly optimized snippets | Limit unnecessary apps/scripts and optimize any custom code. Use tools like Shopify Analyzer or Lighthouse to check performance impact. |
Tips to Design Eye-Catching Custom Text Fields
To create visually attractive custom fields, ensure they match your store's themes and pair with interactive elements (e.g., real-time character counters). Also, position fields where they naturally belong and use conditional logic to show fields only when needed.
Match the style of your store's theme
First, make sure the fields blend harmoniously with your store's overall design, particularly in terms of existing fonts, colors, and styles. For example, if your store uses rounded buttons and a modern sans-serif font, your text fields should reflect the same aesthetic. Consistency helps build trust with your audience!
Incorporate interactive elements
Besides the overall design, interactive elements also help engage users better. Cases in point are real-time character counters, live previews of personalized text (e.g., engraving previews), or tooltips explaining field requirements. Small as they are, these touches will provide amazing visual feedback and enhance customer experience.
Position fields where they make sense
Where you place your custom text fields is just as important as their look! These fields should appear in logical locations where users expect to find them.
Specifically, a personalization field for engraving must be placed near the product description or image, not buried at the bottom of the page. Or, regarding backend fields, consider grouping them logically with related settings (such as near inventory or pricing fields) to make them easier to find and manage.
Use conditional logic for dynamic fields
Lastly, not every field needs to be visible all the time. Instead, use conditional logic to display custom fields ONLY when they're relevant.
For example, a text field for a personalized gift message should only appear if the customer selects “This is a gift” during checkout. Similarly, a field for special delivery instructions must be shown only for specific shipping methods. This dynamic approach keeps your page clean and avoids overwhelming buyers.
How to Add Custom Text Field on Shopify – FAQs
How do I add a text field to my Shopify product page?
To add a text field to your Shopify product page:
Step 1. Go to the Shopify's admin panel
Step 2. Click "Product Page" > "Customize Tab."
Step 3. Add text, images, and other fiels using the built-in customization tools.
How do I add a custom field to my Shopify product?
Here's how you add a custom field to your Shopify product:
Step 1. Go to the Shopify admin panel
Step 2. Click "Online Store" > "Theme."
Step 3. Choose the theme you want to edit
Step 4. Click “Actions” > “Edit Code.”
Step 5. Find the “product.liquid” file under "Templates."
Step 6. Replace the code line {{ product.description }} with {{ product.custom_field }}
How do I customize my Shopify product page?
Below are three main steps to customize a Shopify product page:
Step 1. In the admin panel, go to "Online Store" > "Theme" > "Customize."
Step 2. Go to "Products template" > "Add Block" to generate Custom liquid.
Step 3. Add snippets in a custom liquid box.
How do I change the meta description on my Shopify product page?
Follow these four steps to change the meta description:
Step 1. Click on the "Products" tab from Shopify's admin panel.
Step 2. Choose the product whose description you want to change.
Step 3. Add new content to the description box on the details page.
Step 4. Click the Save button.
How do I change the product button text in Shopify?
To change the product button text in Shopify:
Step 1. Go to "Online Store" > "Themes" > "Actions" > "Edit Code."
Step 2. Open your Locales folder and find the "en.default.json" file.
Step 3. Locate the product button's code in this file and change the red text.
Final Words
This article has explained how to add custom text field on Shopify product page. Simply utilize Shopify Liquid to create comment boxes, size charts, collectible tabs, line item properties, and more. Your product page looks more attractive and informative that way.
And for merchants from other platforms who want to utilize this Shopify feature, LitExtension has your back! With over 12 years of experience and a satisfaction rate of 99% across 200,000 customers, we will make sure your Shopify migration is smooth and 100% hassle-free.
For more information, check out our Shopify guide and join our eCommerce community to gain more intriguing ideas.

