For many Shopify merchants, one of the biggest hurdles is to keep customers from abandoning their carts at the very last moment. That's where flexible payment solutions, like Afterpay, come in, and learning how to add Afterpay to Shopify can easily create a more comfortable path to checkout!
In this guide, we'll walk you through the specific steps of adding Afterpay to a Shopify store, including:
- Step 1. Download the Afterpay app
- Step 2. Connect your Business Hub account
- Step 3. Confirm and activate
- Step 4. Manage your integration (optional)
Let's get started!
Requirements to Add Afterpay to Shopify
We believe you now understand very well how to add Afterpay to Shopify. Before jumping into the setup, however, it’s important to make sure your Shopify store meets the basic requirements that allow Afterpay to work properly:
1. Countries supported by Afterpay
Afterpay is not yet available worldwide, so your eligibility depends heavily on where your store operates.
Currently, Shopify merchants can use Afterpay only if they are based in the United States, Canada, Australia, or New Zealand. And as mentioned, merchants in the United Kingdom can also access Afterpay under the Clearpay brand. If your business operates outside of these supported regions, you will not be able to activate Afterpay on your Shopify store.
2. Eligible store address
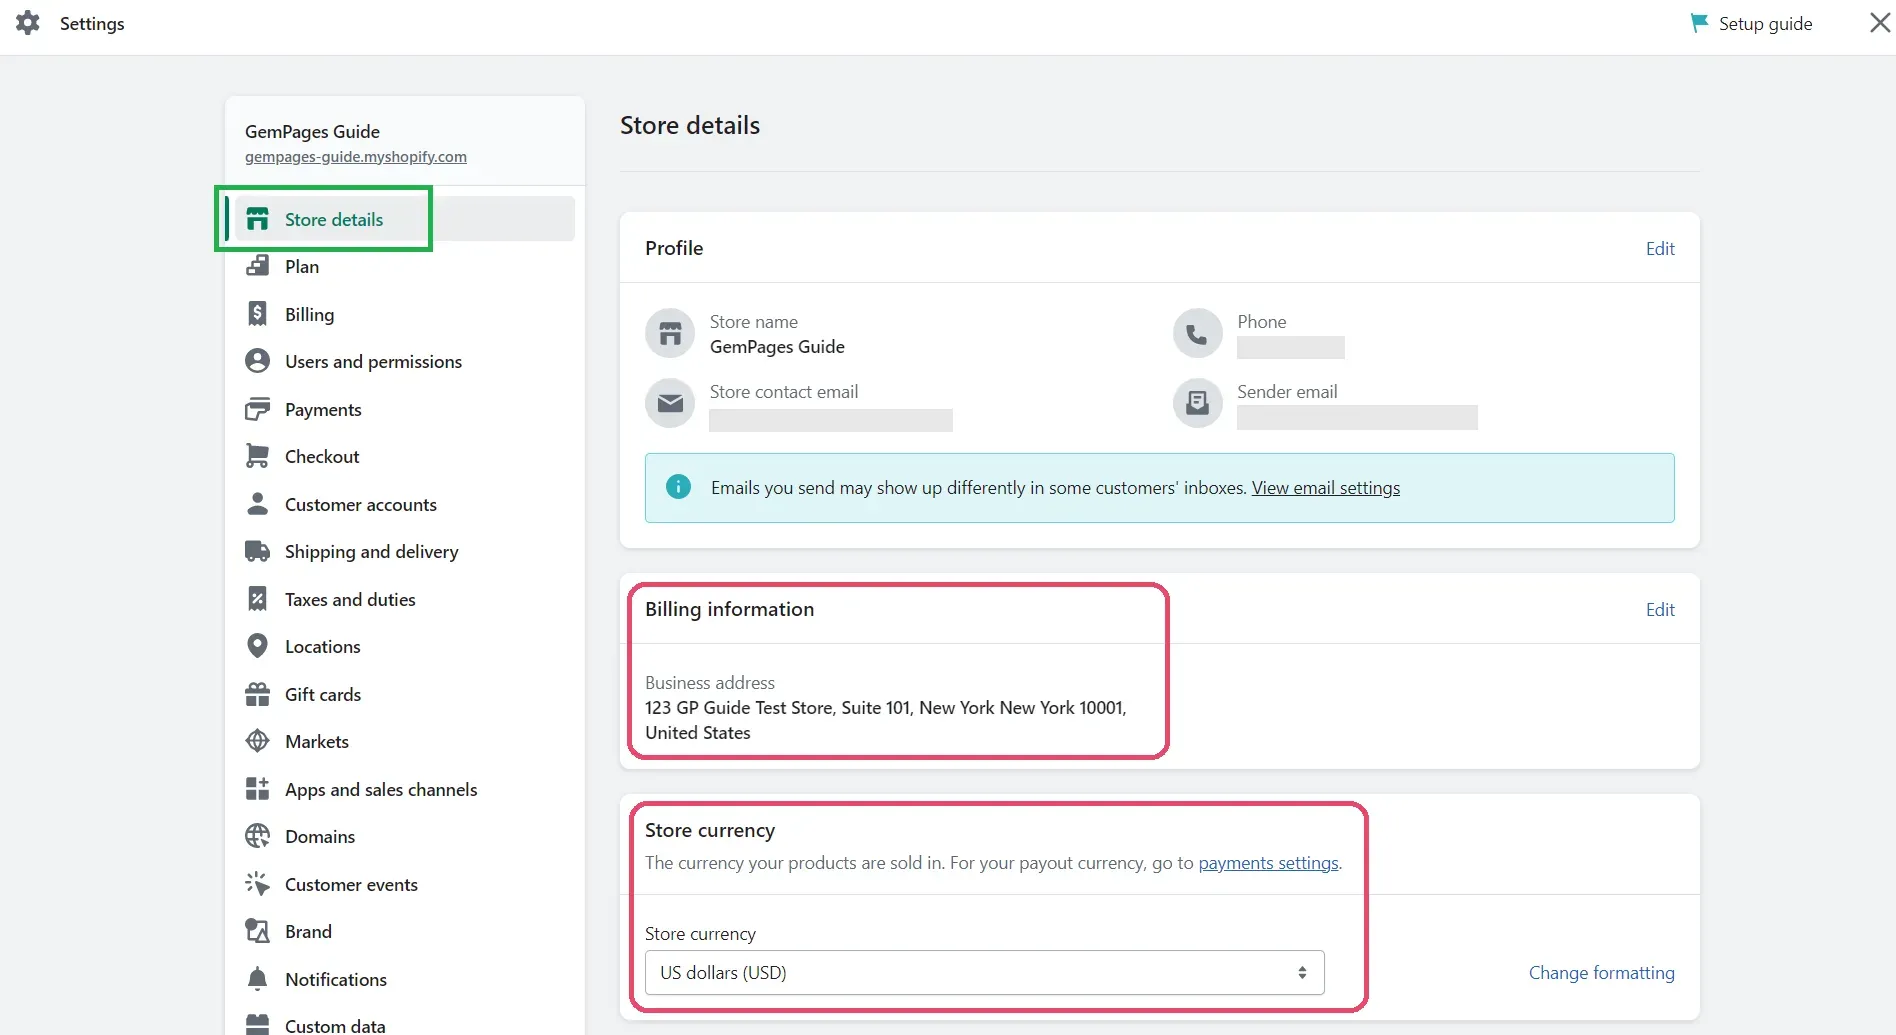
Secondly, your Shopify store address must align with the country tied to your Afterpay account. In other words, if your Afterpay account is registered in the U.S., then your store address in Shopify also needs to be set to a U.S. location.
To confirm this, head into your Shopify admin, click on Settings, then Store details. Under the Billing information section, make sure your business address lists one of the eligible countries.
3. Eligible store currency
Remember that the store currency is just as important as the store address!
Since Afterpay only works with currencies that match its supported regions, your store must be set to either U.S. Dollars (USD), New Zealand Dollars (NZD), Australian Dollars (AUD), or Canadian Dollars (CAD). You can verify or adjust your store currency in the same Store details section under Settings. If your currency is set to something else, Afterpay will not appear as a payment option.
4. Payment settings
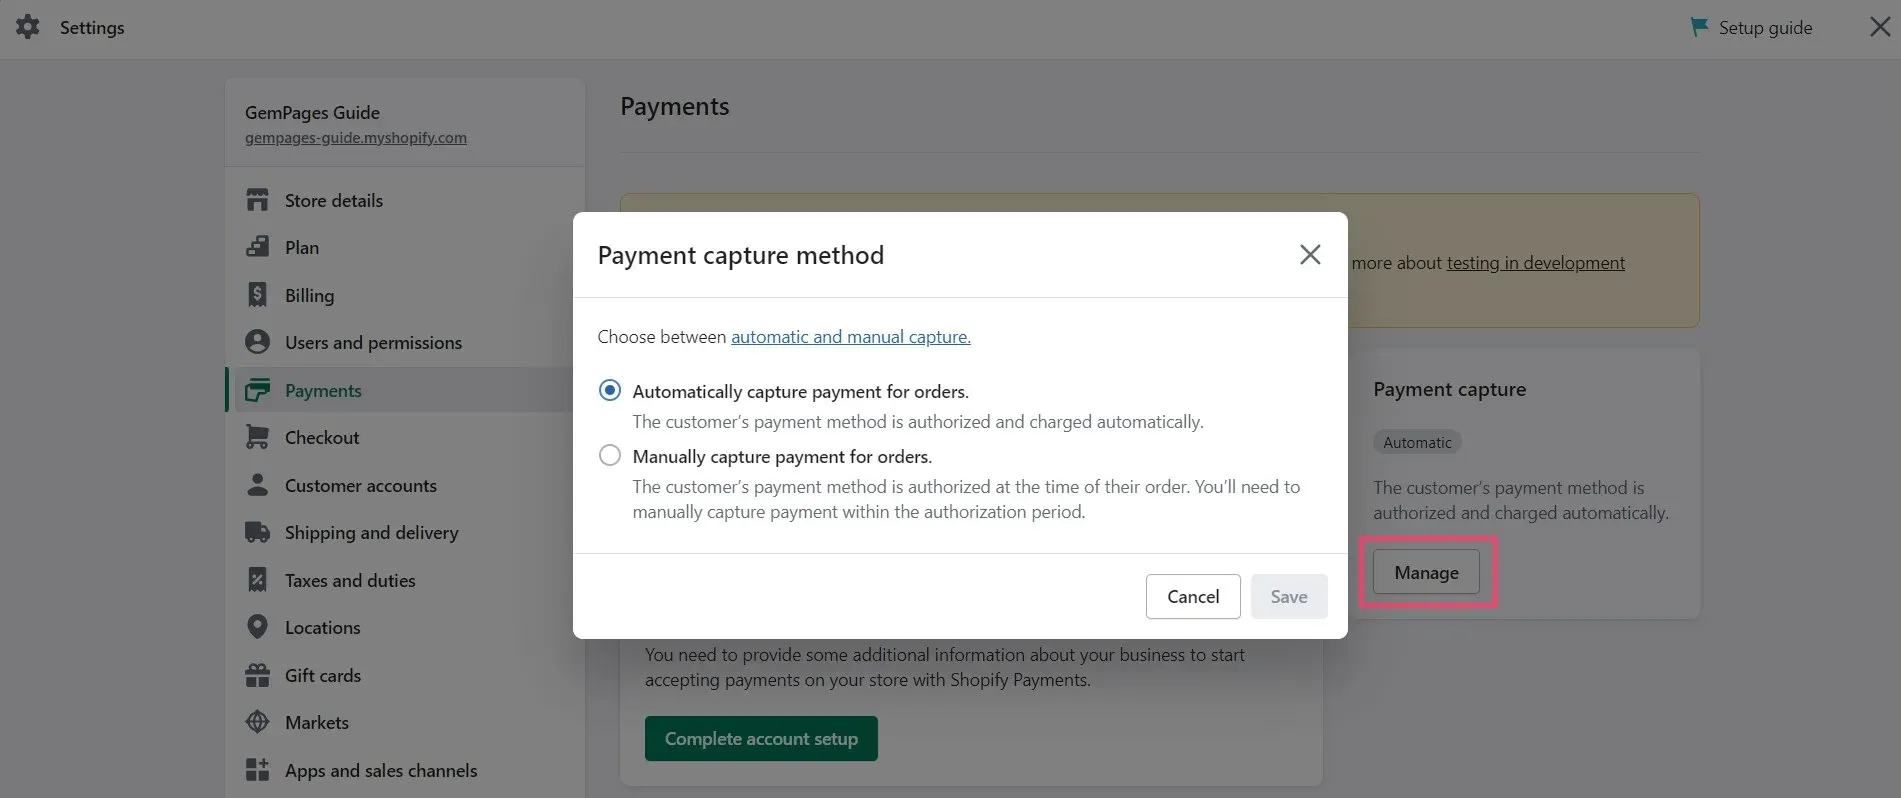
Lastly, before moving on to how to add Afterpay to Shopify, remember that Shopify needs to automatically capture payments for orders when Afterpay is in use.
To confirm this, go to your Shopify admin, select Settings, then Payments. Under the Payment capture section, click Manage and make sure the option for automatic capture is enabled. Otherwise, if this setting is left on manual capture, transactions through Afterpay won’t process correctly.
How to Add Afterpay to Shopify in 4 easy steps?
To add Afterpay to your Shopify store, you simply need to follow these steps:
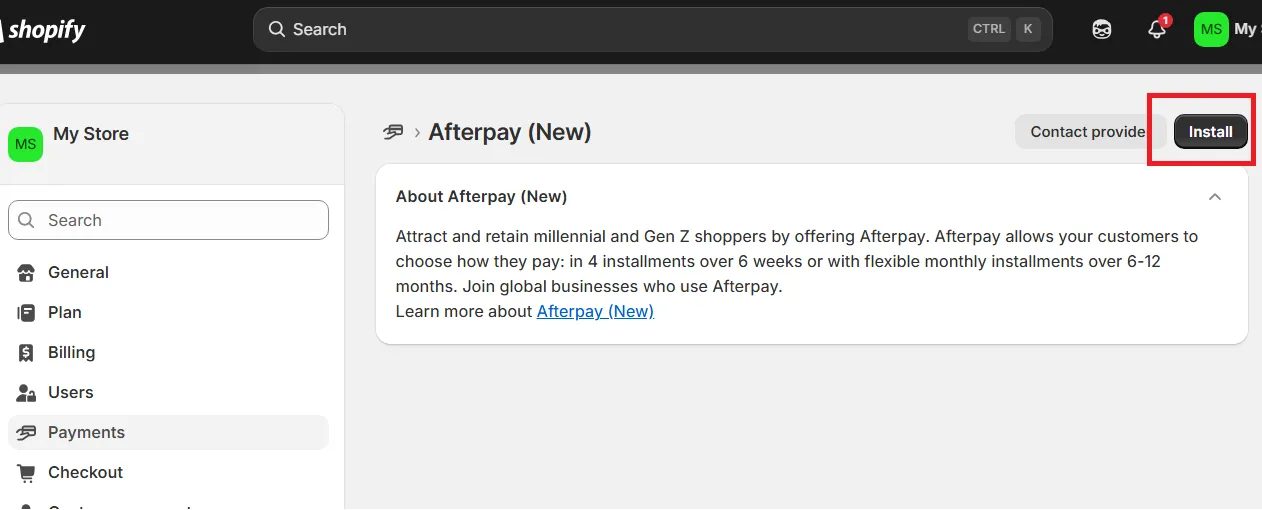
Step 1. Download the Afterpay app
First, head into your Shopify admin and click here to locate the Afterpay payment app.
When you log in and select the app, Shopify will display the installation screen. Hit “Install,” and once the setup completes, you’ll see Afterpay listed among your apps in the Shopify dashboard.
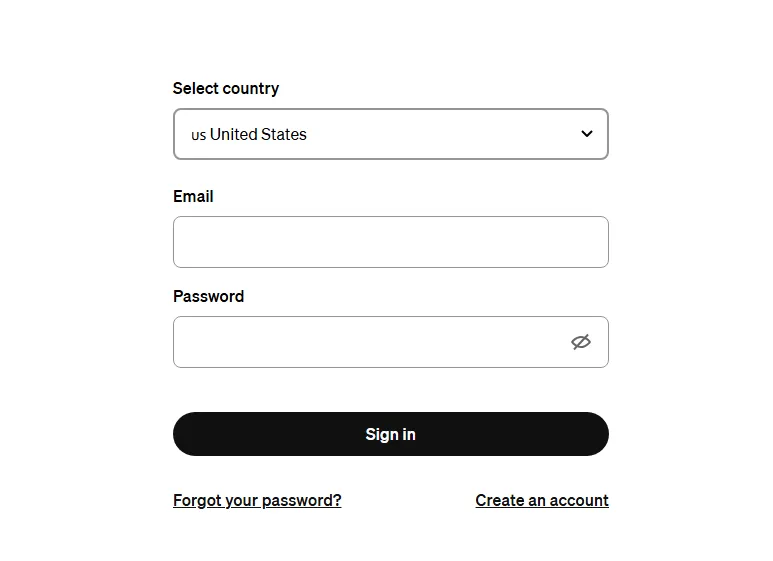
Step 2. Connect your Business Hub account
Now, with the app installed, you'll be redirected to Afterpay’s Business Hub to verify and connect your merchant account. If you’re not already signed in, log in to your Business Hub account to continue.
From there, select the correct merchant account that matches your Shopify store from the dropdown list. Keep in mind that this part is very important; after all, choosing the wrong account could create issues with transactions!
And once you’ve selected the right account, click the “Connect” button. If all goes well, your Business Hub account is now linked to Shopify, and you’ll be redirected back to your admin panel.
Step 3. Confirm and activate
After the connection is established, Shopify will present you with options to finalize the setup. You’ll see toggle switches and a menu for further actions.
At this point, you need to activate Afterpay as a payment gateway. Make sure that Test Mode is left inactive; enabling it will break the integration, as it’s only intended for dedicated test environments.
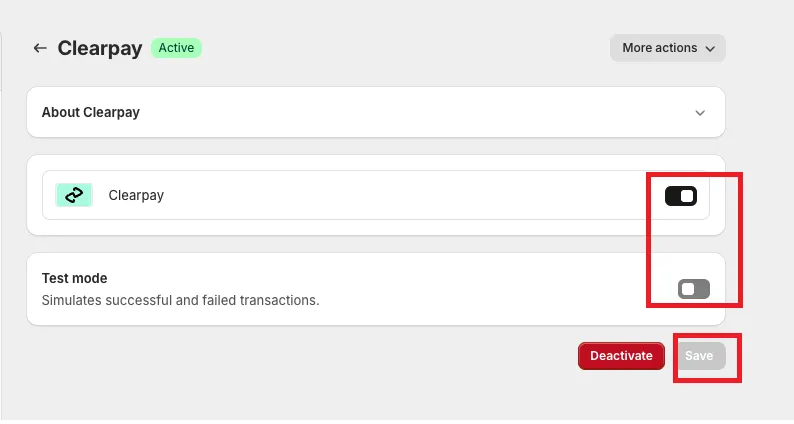
Once you activate the gateway, your store is ready to accept Afterpay. To double-check, head to your storefront and go through the checkout process. You should see Afterpay listed as one of the available payment methods now. And that’s how to add Afterpay to Shopify!
Step 4. Manage your integration (optional)
There may be times when you need to adjust the merchant account tied to your Shopify store.
To do this, go into your Shopify admin, open Settings, then navigate to Payments. Select the Afterpay (New) payment app, and under “More actions,” choose Manage.
This step will take you back to the Business Hub, where you can pick a different merchant account. Once you hit “Connect,” Shopify will update the integration, and your store will be linked to the new account.
*Note: Adding Afterpay to Shopify works just like integrating other Shopify-supported solutions, such as:
- How to add AliExpress to Shopify
- How to add Printify to Shopify
- How to add Klaviyo to Shopify
- How to add Venmo to Shopify
- How to add Affirm to Shopify
The process is straightforward: simply install the app, adjust the settings, connect it with your store, and activate it to start using right away!
How to Add Afterpay On-Site Messaging?
Once Afterpay is active and visible at your checkout, the next step is to make sure your customers know it’s available before they even reach payment.
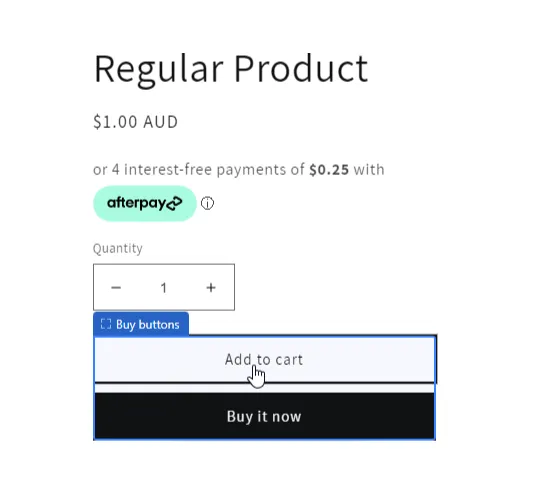
And that’s where Afterpay On-Site Messaging comes in! This feature places clear payment messaging directly on your product and cart pages, helping shoppers understand that they can split payments into installments.
However, before starting, you must first learn how to add Afterpay to Shopify and ensure it is fully functional as instructed above; otherwise, the messaging app will not display properly. After that, follow the steps below:
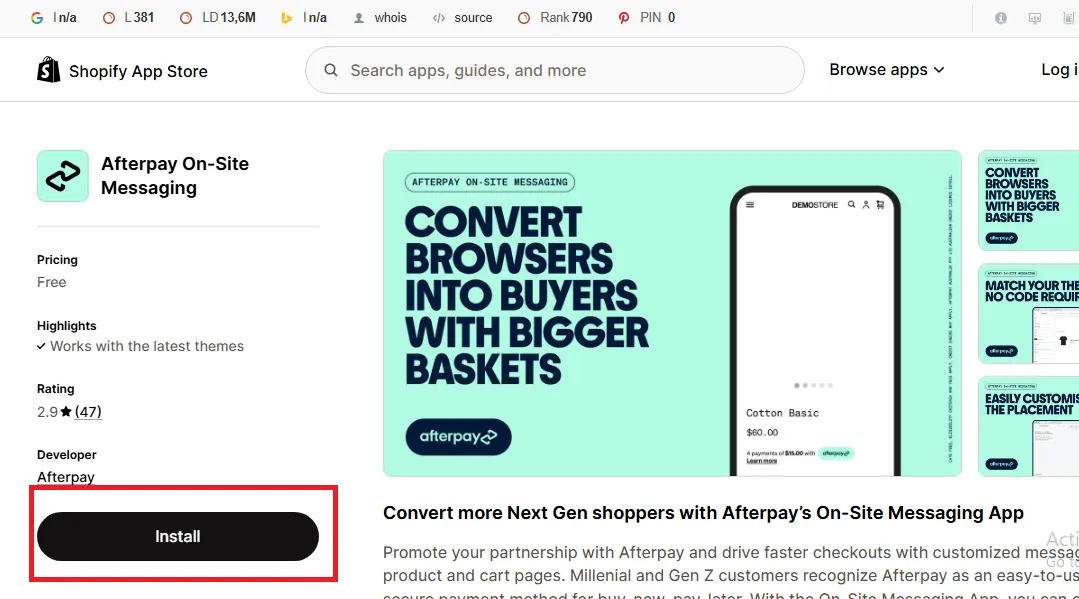
Step 1. Install the Afterpay On-Site Messaging app
First, download the Afterpay On-Site Messaging app from the Shopify App Store. Once you click to install, Shopify will display a confirmation screen in your admin dashboard. Approve the installation, and you’ll see the app appear in your list of installed applications.
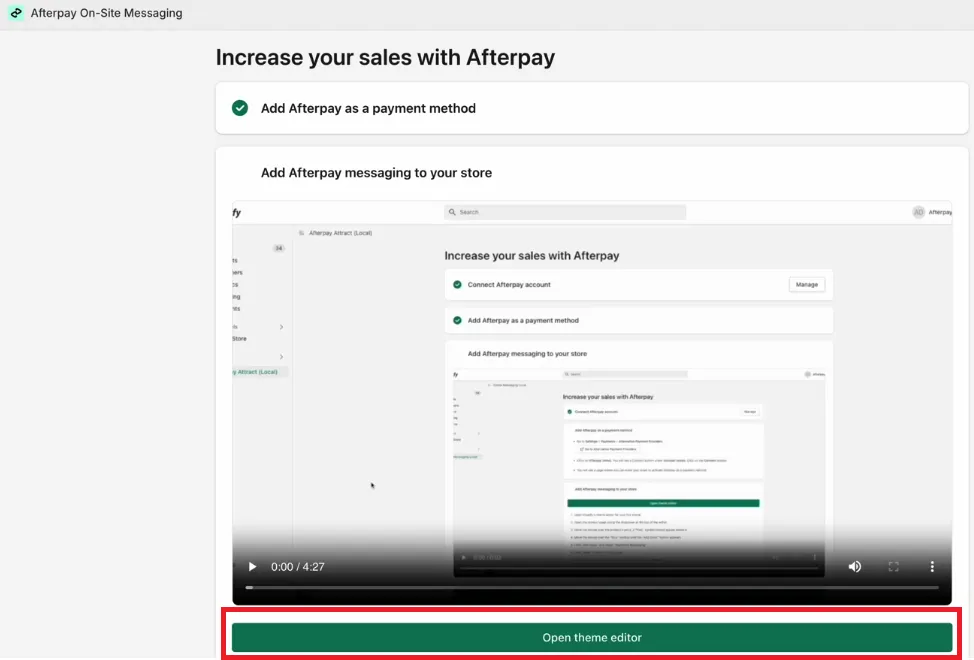
Step 2. Add messaging to product pages
To place messaging on your product pages, open the Theme Editor from the Afterpay On-Site Messaging app.
At the top of the editor, use the dropdown menu to select “Products,” and then choose either the default product template or the specific template you want to customize. Keep in mind that messaging is tied to templates: if you have multiple product page templates, you’ll need to add messaging to each one individually.
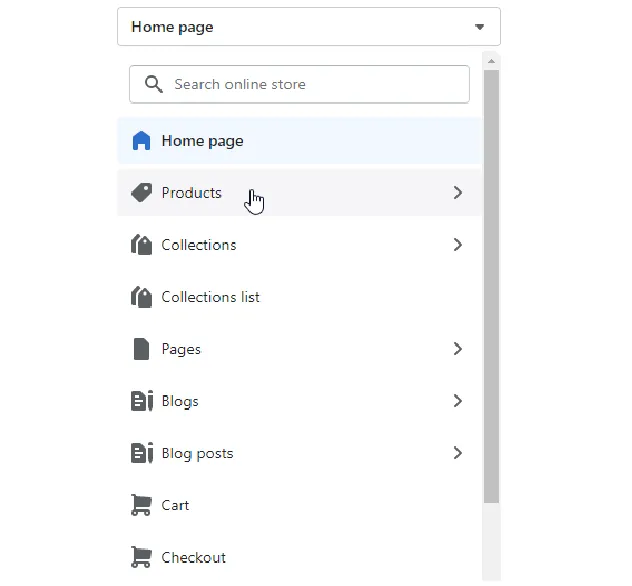
Next, hover over the product price area until a “+” symbol appears. When the option to add a block shows up, select Payments Messaging – Afterpay On-Site Messaging. You’ll immediately see the message preview on your page.
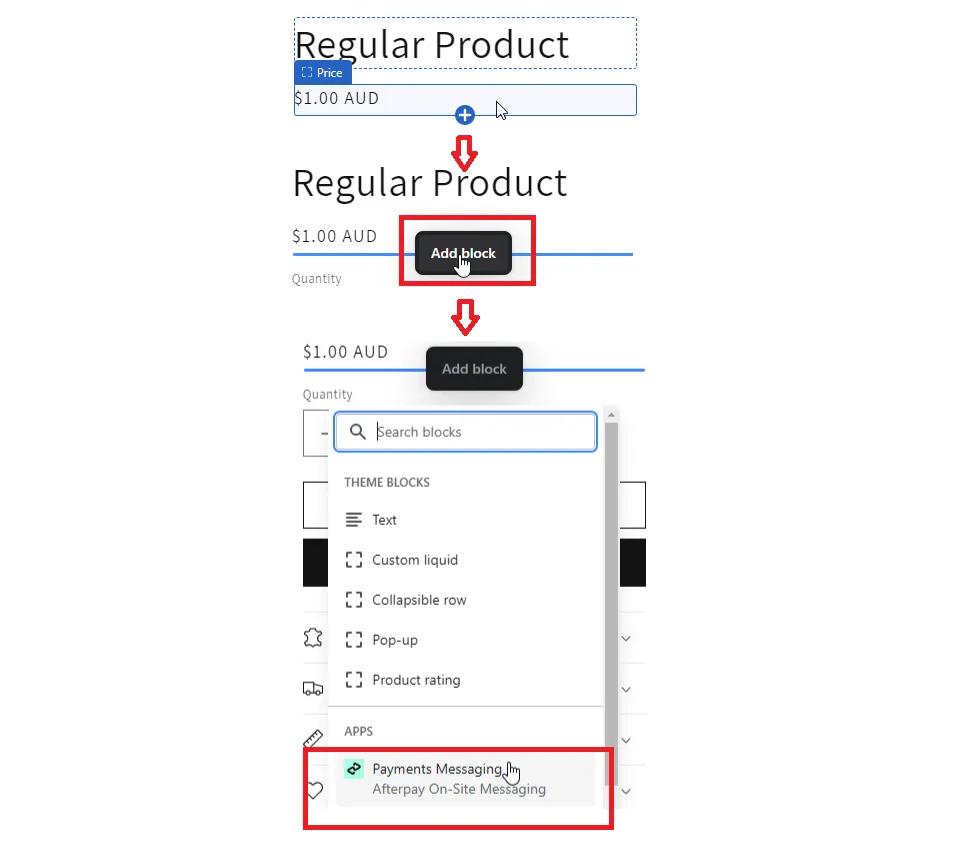
Once you’re satisfied with the placement, click “Save” in the top-right corner of the editor. From now on, any product using that template will display the Afterpay payment option.
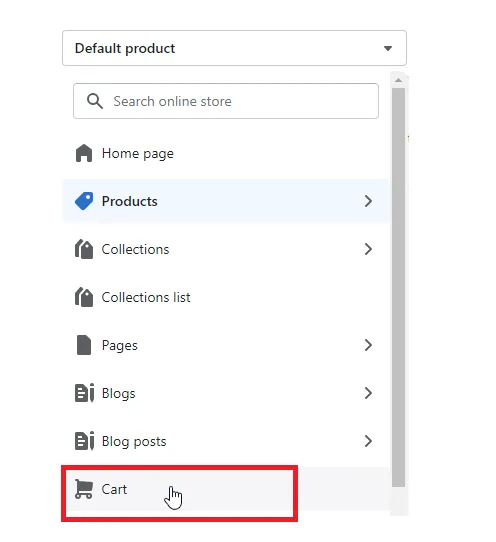
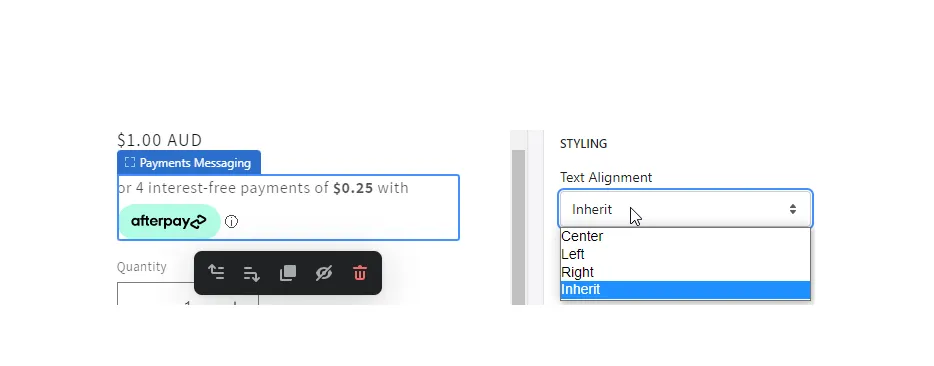
Step 3. Add Messaging to the cart page
Afterpay strongly advises against trying to modify checkout pages directly. Instead, you should add messaging to your cart page, where it can remind customers of their payment flexibility right before checkout.
To do this, first preview a cart by adding an item to it.
In the Theme Editor dropdown, select “Cart” to open the cart page template.
Next, hover near the Subtotal line above the checkout button until the “+” symbol appears. Add a block, then choose Afterpay On-Site Messaging. If the text alignment doesn’t look right, you can adjust it directly within the editor by choosing a different alignment option.
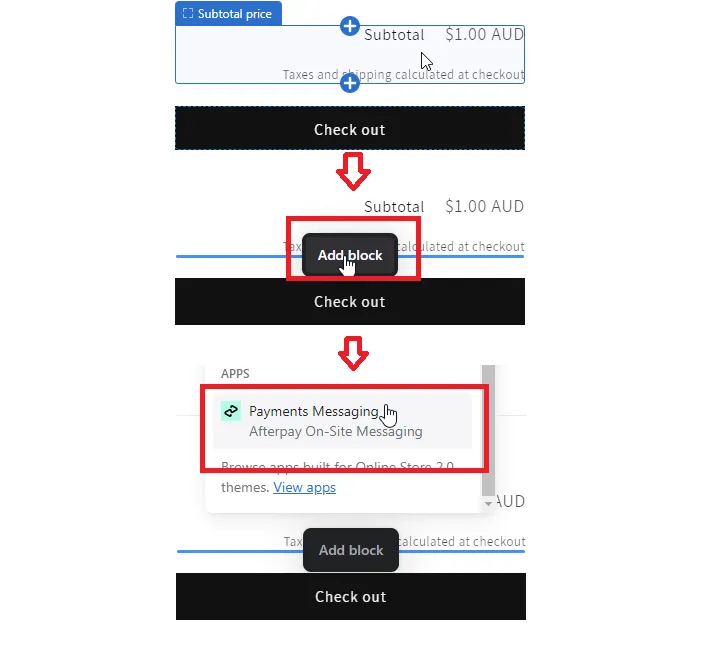
Once everything looks good across desktop and mobile, click “Save” and confirm the changes on your live site.
Step 4. Adjust style and appearance
You have managed to master how to add Afterpay to Shopify on-site messaging. Now, with the blocks in place, you can customize the look and feel of your Afterpay messages so they blend seamlessly with your store’s branding!
Select the Afterpay messaging block on your product or cart page, or choose it from the sidebar under Product Information. From there, a range of design options will be available:
- You can adjust text alignment by selecting from the dropdown menu, or modify margins above and below the message by entering new values.
- The text itself can be customized in color and size, ranging from extra small to large. Introductory text can also be changed.
- Certain message elements can be toggled on or off. For example, you can decide whether to display “interest-free,” whether the payment amount appears in bold, or whether the word “with” shows before the Afterpay logo.
How to Add Cash App Afterpay at Checkout?
We have just discussed how to add Afterpay to Shopify in multiple sections.
And here's a bonus: For those running a Shopify store in the U.S., you may want to expand your payment options by including Cash App Pay.
This method allows your customers to complete purchases either by scanning a QR code or by tapping the Cash App Pay button at checkout to be redirected to their Cash App. Once enabled, it will appear next to Afterpay on your payment page to offer even greater flexibility at checkout!
To integrate Cash App Pay, follow these steps:
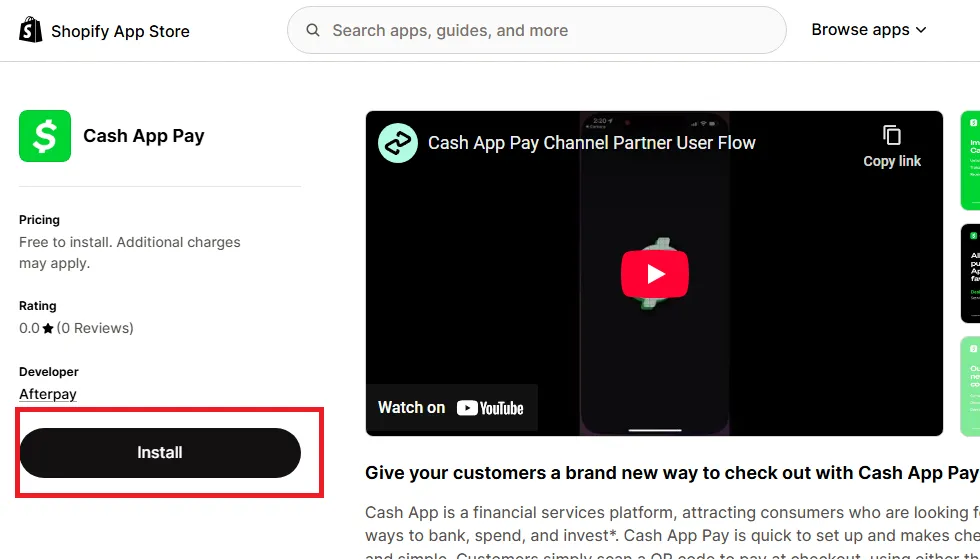
Step 1. Download the Cash App Pay application
First, head to the Shopify App Store and locate the Cash App Pay application.
Once you select it, Shopify will display the installation screen, where you’ll be asked to grant Cash App Pay permission to access certain store data, including personal and store information. Confirm these permissions by clicking “Install,” and the app will be added to your Shopify dashboard.
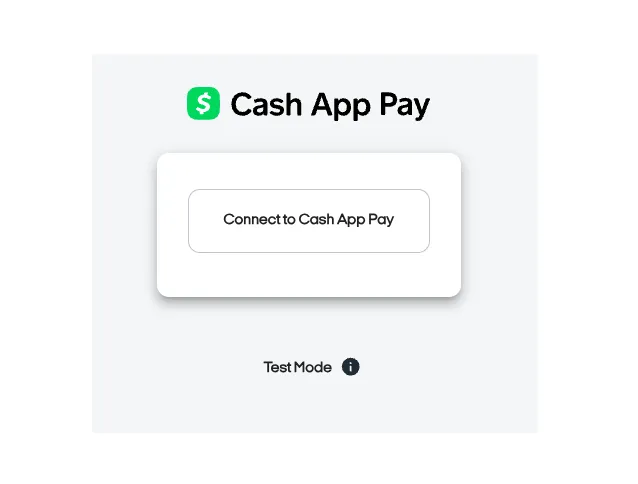
Step 2. Connect your account
After installation, you’ll be prompted to connect your Cash App Pay account.
On the connection screen, enter your Cash App Afterpay Production Merchant ID in the Merchant ID field, followed by your Afterpay Production Secret Key in the Secret Key field. Once both fields are filled in, click “Continue” to move forward.
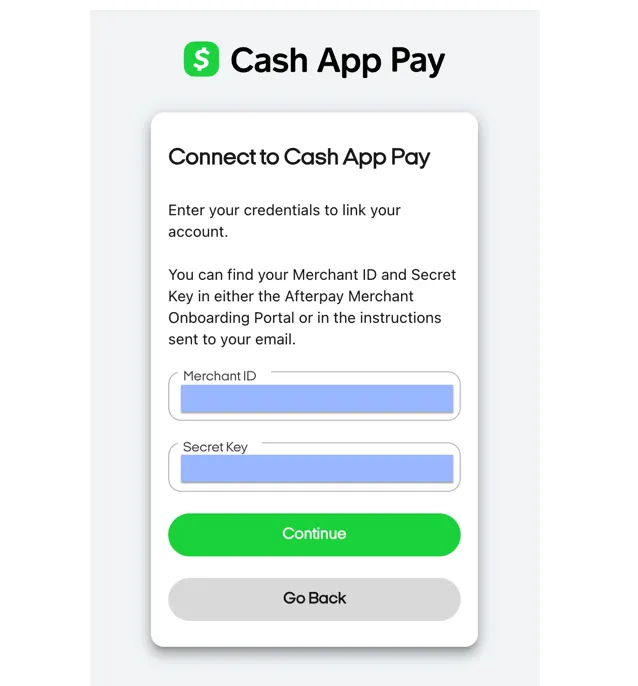
*Note: It’s critical to use your production credentials at this stage. Sandbox credentials are not valid for activating a live account, even if you’ve previously tested them in a sandbox environment.
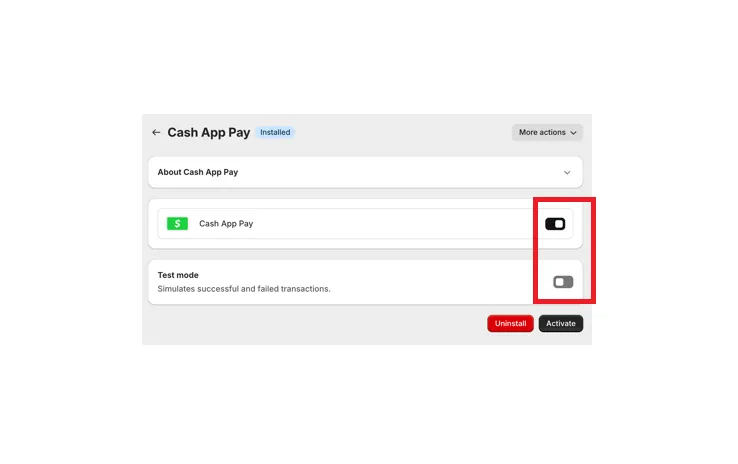
Step 3. Final Confirmation and activation
After your account details are verified, you’ll be redirected to the final confirmation page.
Here, make sure the toggle switch for Cash App Pay is enabled; it should appear black when active. Plus, double-check that Test Mode is turned off, since it must remain disabled for real transactions to process correctly. Finally, click “Activate” to complete the setup.
So, that's basically it! We have walked through how to add Afterpay to Shopify, plus Cash App Pay, in detailed steps.
Why Add Afterpay to Shopify
Learning how to add Afterpay to Shopify is a smart move since it gives your customers the flexibility to break down their purchases into smaller, interest-free installments. As a result, higher-priced products feel more accessible and ease the hesitation that often causes shoppers to abandon their carts. Simply put, you create a more seamless path to purchase and encourage more customers to complete their orders.
The benefits extend even further when you look at how Afterpay influences buying behavior. Customers who know they can spread payments over time are more likely to increase their basket size, whether that means adding extra items or upgrading to more premium products. At the same time, since Afterpay appeals strongly to younger shoppers (who prefer flexible, digital-first payment solutions over traditional credit), offering it as an alternative makes your store more aligned with their expectations and spending habits.
How to Add Afterpay to Shopify: FAQs
Why is Afterpay not showing up on Shopify?
If Afterpay isn’t appearing in your checkout, it usually means one of the eligibility requirements hasn’t been met. Your store address and currency must match one of the supported regions (such as the U.S., Australia, New Zealand, Canada, or the U.K. under Clearpay).
Another common issue is that your payment settings are not configured for automatic payment capture. Double-check these details in your Shopify admin to ensure everything is aligned.
How do I add Afterpay as a payment option?
To add Afterpay, start by downloading the Afterpay payment app from the Shopify App Store. When the app is installed, you’ll be redirected to the Business Hub, where you connect your merchant account to your Shopify store. After verifying your details, return to your Shopify admin and activate Afterpay as a payment gateway. Once activated, it should appear as an option for customers during checkout.
How do I show Afterpay on my Shopify product page?
Afterpay only becomes visible on product pages once you add On-Site Messaging, so you must use the Theme Editor to add an Afterpay messaging block to your product page template. If your store uses multiple templates, you’ll need to add the block to each one individually.
How do I add Afterpay messaging to Shopify?
You can add Afterpay On-Site Messaging by installing the Afterpay On-Site Messaging app from the Shopify App Store. After installation, open the Theme Editor and insert the Afterpay messaging block into your product and cart page templates. From there, you can adjust text alignment, color, margins, and other style elements to ensure the design blends with your store.
Final Words
Learning how to add Afterpay to Shopify only takes a few steps, but the impact it has on your store is significant! Once Afterpay is integrated and visible on your product, cart, and checkout pages, you can create a shopping experience that feels both modern and customer-centric.
For more information, check out our Shopify guide and join our Facebook Community.

