Exporting order data helps WooCommerce store owners analyze performance, create reports, or migrate to new platforms with ease. However, the default WooCommerce export feature is limited, which is why advanced order export for WooCommerce offers a more flexible and automated solution.
In this guide, we’ll walk you through the following key points:
- What advanced order export for WooCommerce is;
- How to create an advanced export using plugin;
- How to import your exported orders to another platform with LitExtension.
Not gonna let you wait any longer, let’s get started!
What is Advanced Order Export for WooCommerce?
In fact, WooCommerce does not include any built-in option called “advanced export.” By advanced order export for WooCommerce, we mean a more flexible way to extract your store’s order data using a plugin or custom tool. It gives you full control over what to export, how the file looks, and when the export runs.
Here’s how it differs from the default WooCommerce export:
Feature | Basic export | Advanced export |
Field control | Exports only a fixed set of core order details with minimal customization. | Lets you select, rename, and reorder any fields you want to include. |
Custom data | Cannot export extra data created by plugins or checkout extensions. | Supports exporting metadata from plugins, checkout add-ons, and custom fields. |
File formats | Provides only one static CSV output. | Offers multiple formats, including Excel, XML, JSON, and PDF, for flexible use. |
Formatting options | Outputs raw database data without layout or label adjustments. | Allows you to clean up layouts, rename headers, or merge fields before exporting. |
Automation & control | Requires manual exporting every time. | Supports scheduling, batch processing, and automatic reruns for recurring exports. |
With this advanced method, you can use it to:
- Keep your business organized: Generate detailed reports for accounting, inventory tracking, or sales analysis with the exact data you need.
- Connect with other systems: Share order data automatically with management tools, CRM platforms, or shipping services in compatible file formats.
- Prepare for store migration: Export orders cleanly before moving to another platform or rebuilding your WooCommerce store, making the import process faster and safer.
If you only need a quick, one-time download of all orders, WooCommerce’s default export might be enough. You can learn more in our basic WooCommerce order export guide to see how it compares to the advanced method above.
How to Create an Advanced Order Export for WooCommerce using a Plugin
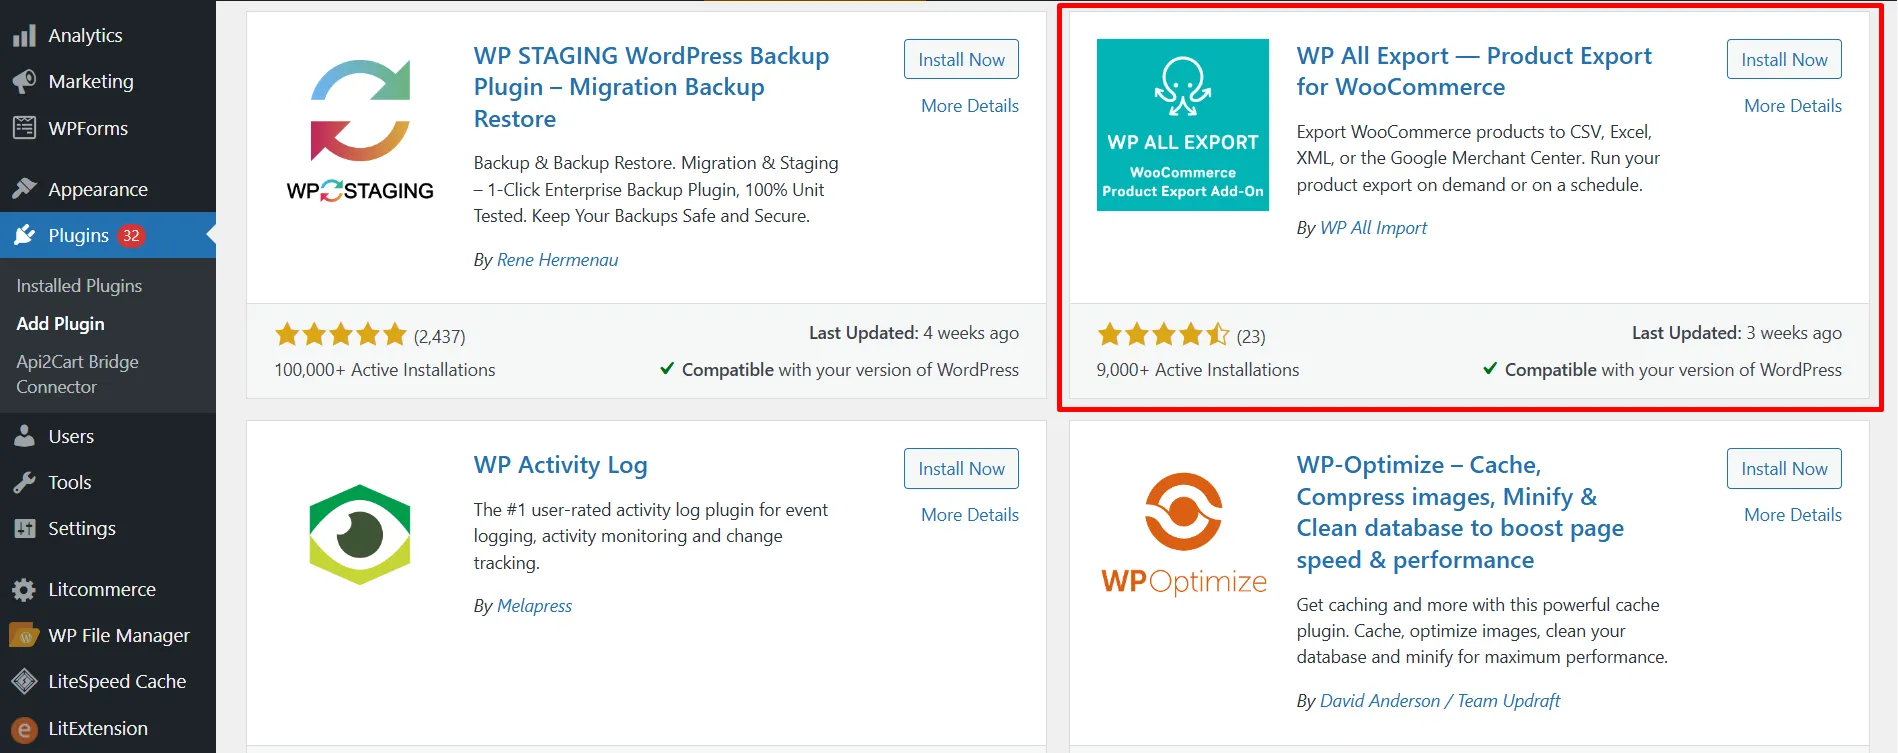
In this tutorial, we’ll use WP All Export. It’s one of the most reliable and beginner-friendly tools for WooCommerce export import orders. With a drag-and-drop interface and flexible automation options, it makes advanced order exports simple and efficient.
Let’s dig into each detailed step!
Step 1: Install your chosen export plugin
To start, you’ll need to install the advanced order export for WooCommerce plugin called WP All Export.
Go to your WordPress dashboard, navigate to Plugins > Add New, and search for “WP All Export”. Once you find it, click Install Now, then Activate. After activation, the plugin will appear in your WordPress menu, ready for setup.
Step 2: Create a new export
Once the plugin is installed and activated, you can start creating your first export. From your WordPress dashboard, go to All Export > New Export.
On the setup screen, you’ll be asked what kind of data you want to export. Choose “WooCommerce Orders” to work specifically with your store’s order data.
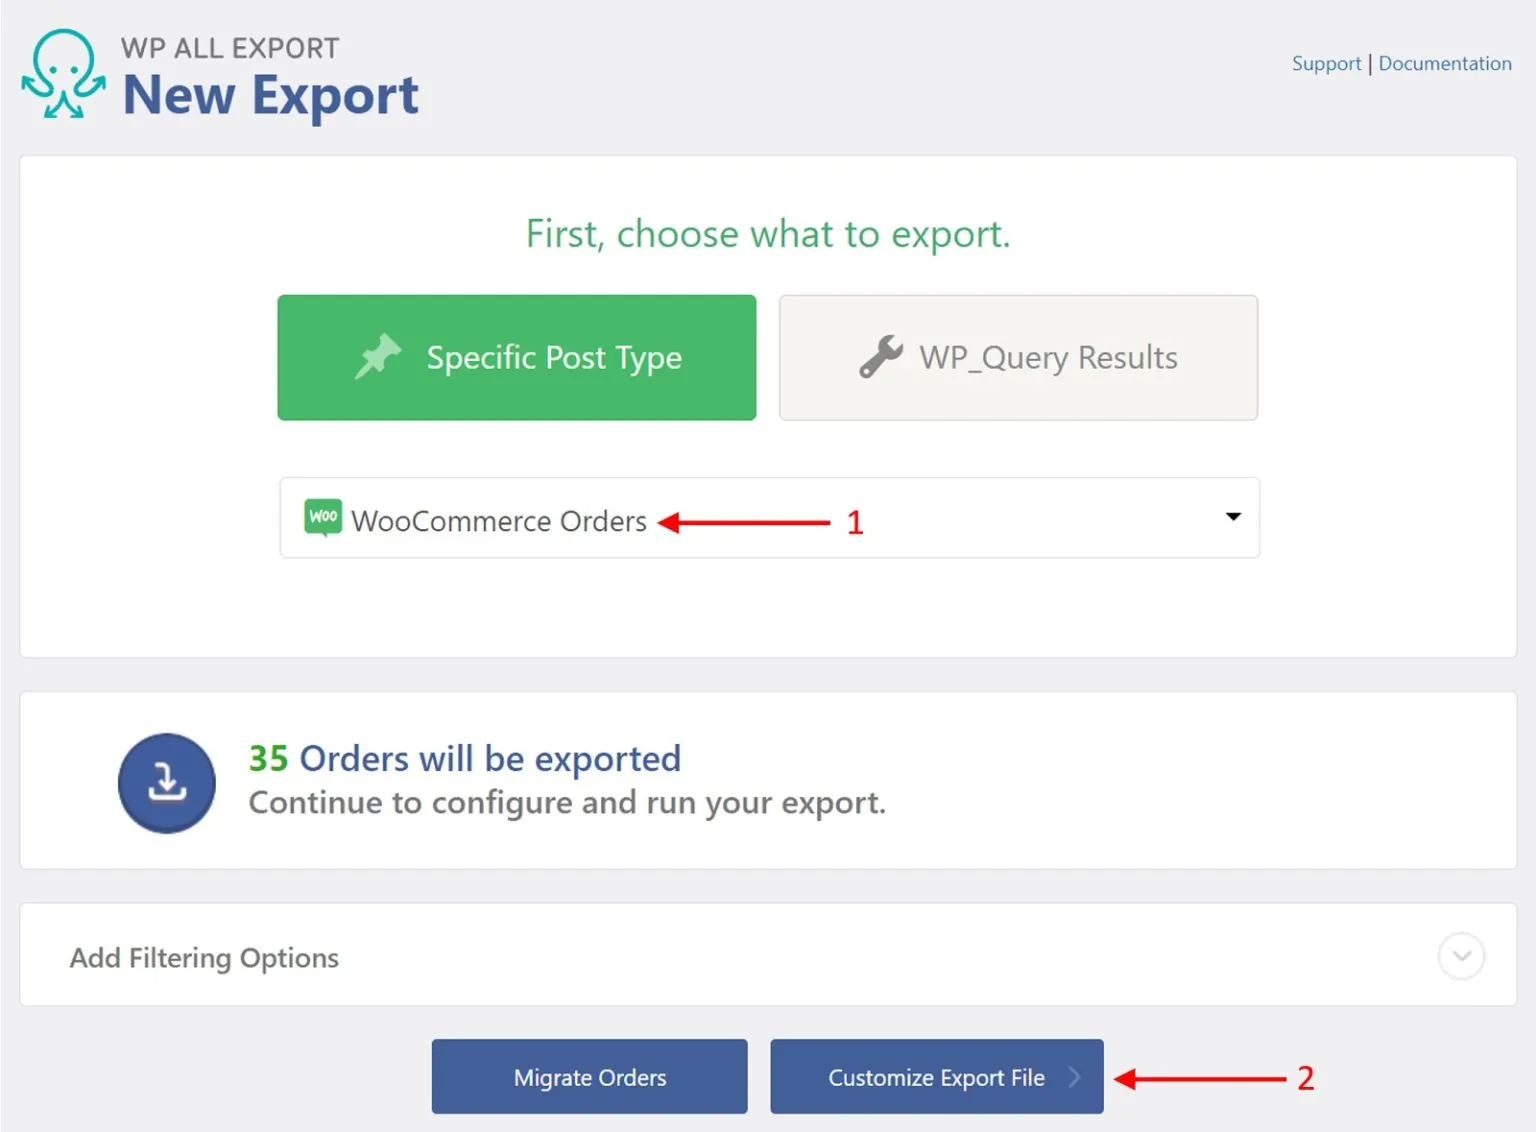
Then, click “Customize Export File” to move on to the next step.
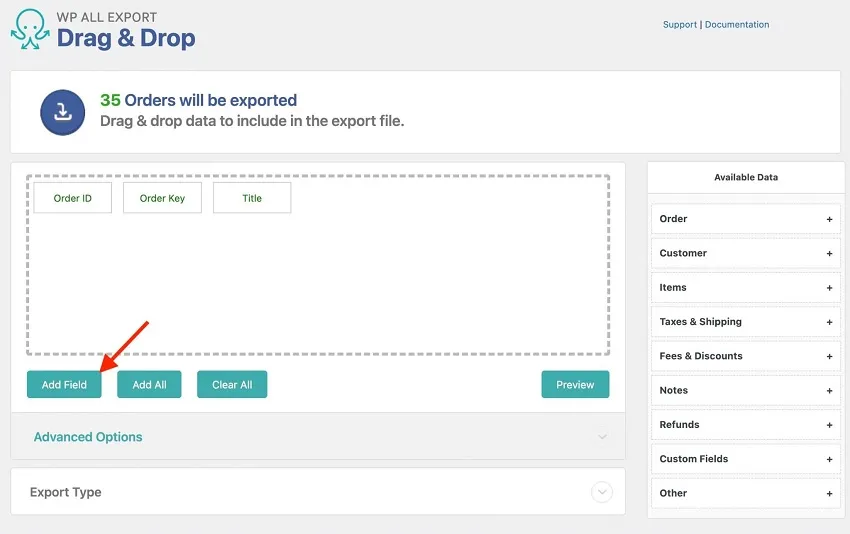
Step 3: Add custom order export columns
WP All Export will now load all your WooCommerce order data into its Drag & Drop interface. From here, you can choose exactly what information to include.
Follow these steps to add a custom export column:
- In the Drag & Drop interface, click Add Field.
- In the pop-up window, select Custom export field.
- From the Available Data panel, drag the fields you want to include into the text box.
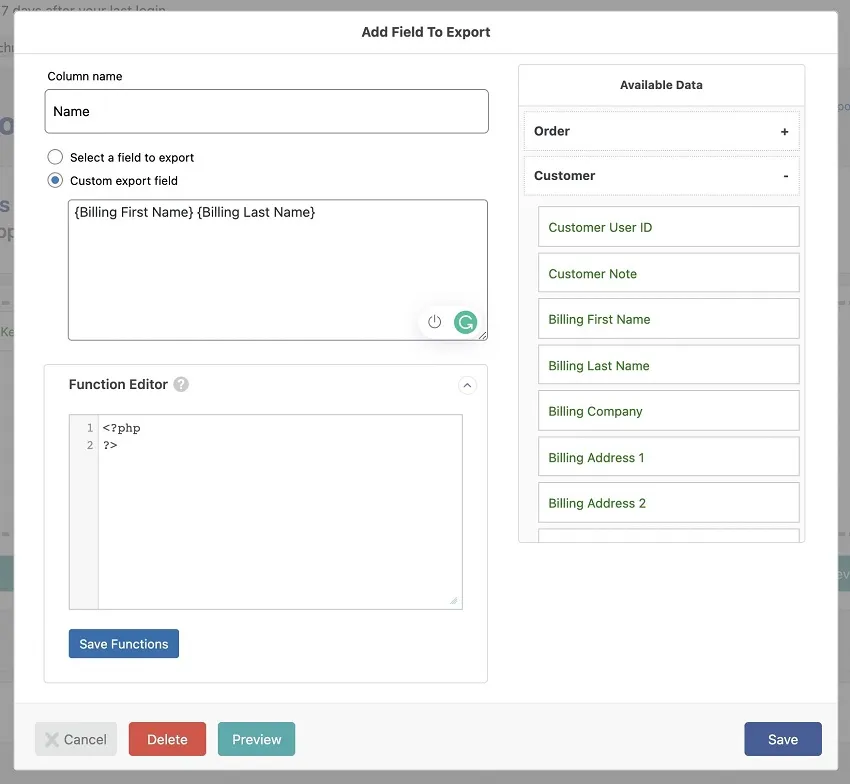
- Edit the text as needed. You can add spaces or symbols to combine multiple fields.
- Enter a name for your new column in the Column name box at the top.
Now your custom column will appear in the export layout and update automatically whenever you export your orders. Below are two common ways to use custom export columns depending on your goal.
Option 1: Combine existing fields
If you want to merge two or more fields into one, such as showing the customer’s first and last name in a single column:
- Drag Billing First Name and Billing Last Name into the text box.
- Add a space between them.
- Name the column Full Name, preview it, and click Save.
Option 2: Add a calculated field with a shortcode
You can also create columns that calculate values automatically. For example, you might assign a shipping method based on order weight.
- Click Add Field again.
- Choose Custom export field. In the text box, enter:
[output_shipping({Weight})]
- Scroll down to the Function Editor and paste this code:
function output_shipping($weight) {
    if ($weight <= 10) {

        return "USPS";

    } else if ($weight > 10 && $weight < 30) {

        return "DHL";

    } else if ($weight >= 30) {

        return "Knight-Swift Freight";

    }

}
- Click Save Functions.
- In the Column name box, type Shipping Method, then click Save.
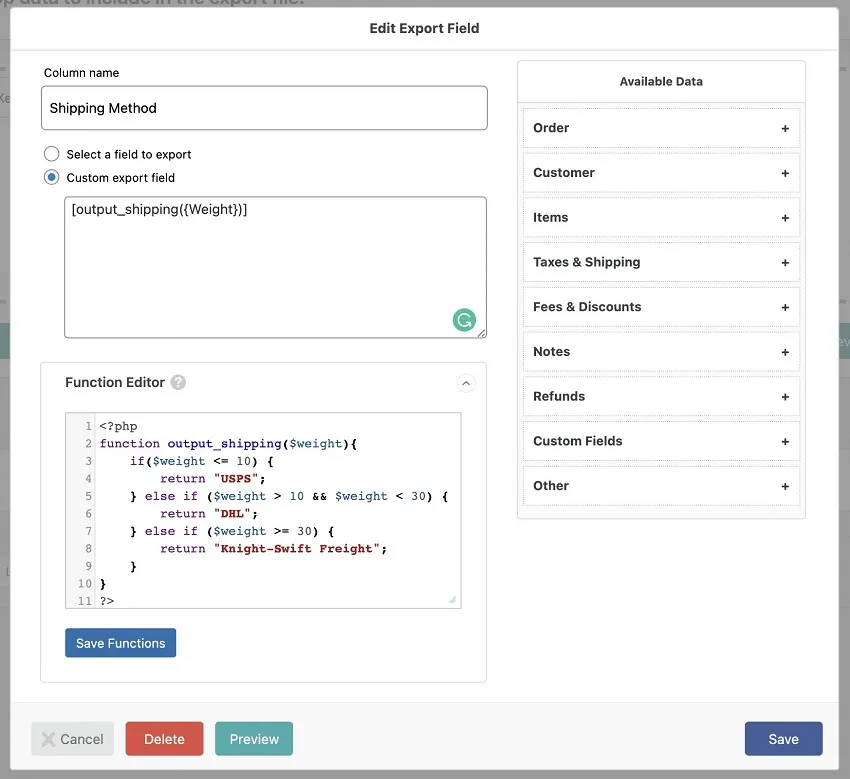
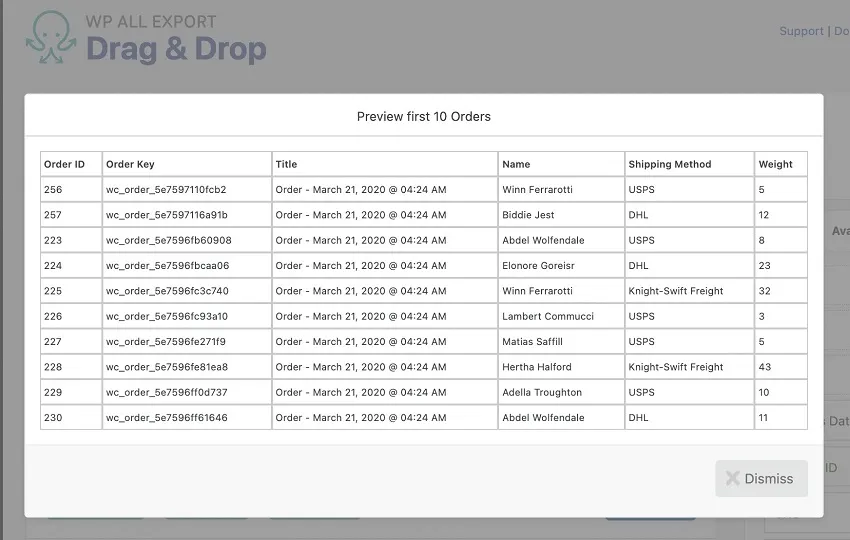
- Preview your export to confirm the results. Your new “Shipping Method” column will now automatically display the correct carrier based on each order’s weight.
Once you are done, hit “Preview” to check the output, then click “Save”:
Step 4: Apply export filters
Once you’ve set up your export layout and added custom columns, the next step in your advanced order export for WooCommerce is refining which orders to include. WP All Export lets you filter data with great precision so you only export what matters. You can create simple rules, combine multiple conditions, or even use PHP for more complex logic.
Nesting order export filters
Filtering in advanced order export for WooCommerce works through three elements: an element, a rule, and a value. You can combine several filters using AND and OR logic to match your specific criteria.
For example, you can export only orders with a total between $25 and $50 and a status of Pending.
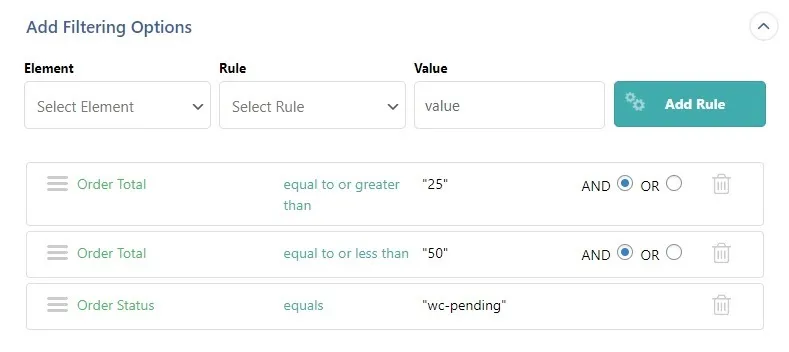
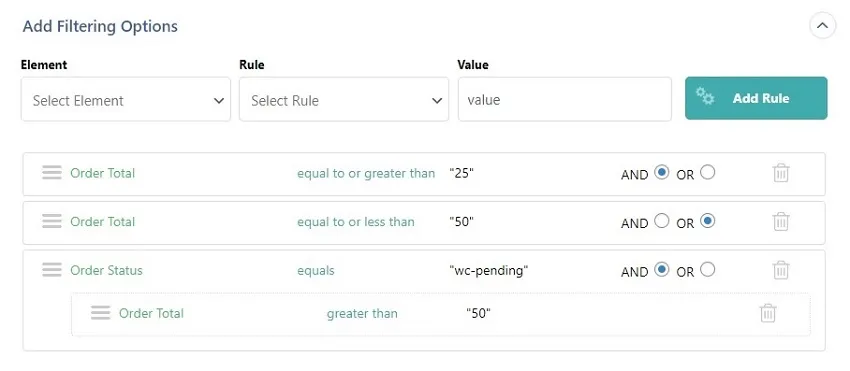
When you want something more advanced, such as exporting orders between $25 and $50, or orders that are Pending with a total above $50, you can create nested filters. To do this, drag one rule under another in the interface. This creates grouped logic that works like parentheses in a formula:
Order Total >= 25 AND Order Total <= 50 OR (Order Status = "wc-pending" AND Order Total > 50)
Relative date filters
For recurring exports, you may not want to change the date filter every time. Instead, you can use relative date filters that automatically update whenever the export runs.
For example, you can filter orders where Order Date is newer than two years ago or Order Date equals last month. These relative filters automatically adjust each time your export is triggered, which is perfect for weekly, monthly, or scheduled reports.
Filtering with PHP
For advanced users, this plugin also supports filtering through PHP hooks. This allows you to create complex, programmatic rules when standard filters aren’t enough.
For instance, you can exclude certain product variations from export if their parent product is in “draft” status:
function exclude_drafts_from_gmc_export($articles, $options, $export_id) {

    if ($options["xml_template_type"] == "XmlGoogleMerchants") {

        foreach ($articles as $key => $article) {

            if (!empty($article['id'])) {

                $post_id = $article['id'];

                $parent_id = wp_get_post_parent_id($post_id);

                if (get_post_status($parent_id) == "draft") {

                    unset($articles[$key]);

                }

            }

        }

    }

    return $articles;

}

add_filter('wp_all_export_csv_rows', 'exclude_drafts_from_gmc_export', 10, 3);
You may never need this level of customization, but it demonstrates how powerful WP All Export can be. With these options, your advanced order export WooCommerce can handle everything from simple filters to complex business rules with ease.
Step 5: Choose file format
After customizing your export columns, the next step is to decide what file format you want your data in. WP All Export supports several options, allowing you to match your export format to how you plan to use the data later.
Follow these steps to choose your file format:
- In the export setup screen, scroll down to the Export Type or File Format section.
- Select the format that fits your needs:
- CSV for spreadsheets and general use.
- Excel (XLS/XLSX) if you want to open the file directly in Microsoft Excel.
- XML or JSON for integrations with other systems such as ERPs, CRMs, or analytics tools.
- Click Preview to see how your data will appear in that format.
- Once you’re satisfied, click Continue to move to the next setup step.
If you select XML, this app also gives you the option to create a Custom XML Feed. This feature lets you define the entire XML structure yourself, which is useful when you need to meet specific system or partner requirements. To create a custom XML feed:
- Choose Custom XML Feed as the feed type.
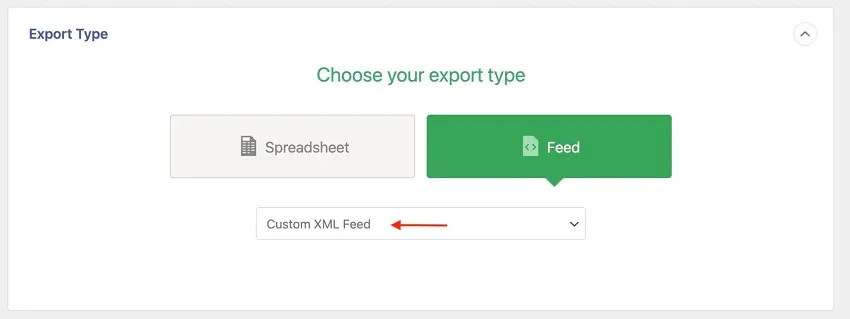
- The XML Editor will open. This is where you design the structure of your file.
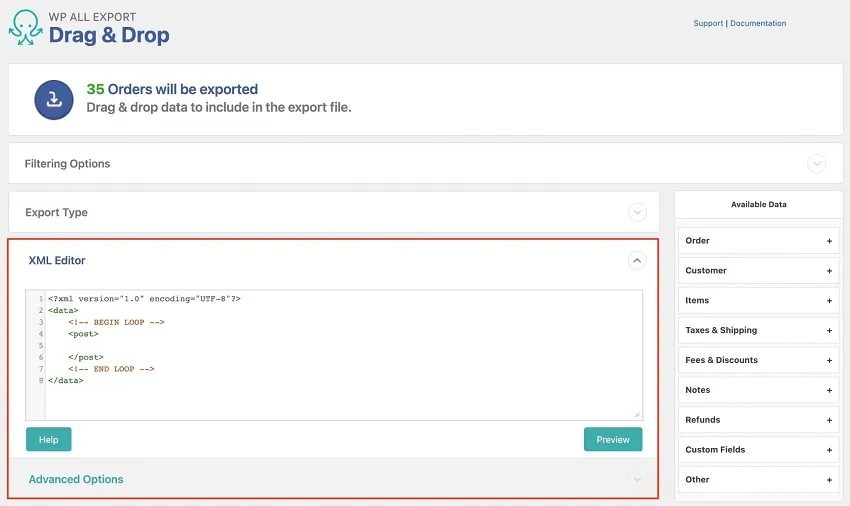
- Drag fields from the Available Data panel into the editor between the
<!-- BEGIN LOOP -->and<!-- END LOOP --> tags. - Change the wrapping tags if needed. For example, replace
<post>with<order>and add an attribute for the order ID:
<order id="{Order ID}">

<FirstName>{Billing First Name}</FirstName>

<LastName>{Billing Last Name}</LastName>

<Weight>{Weight}</Weight>

</order>
- You can rename elements or add attributes. For instance:
<Weight quantity="{Quantity}">{Weight}</Weight> - You can also include shortcodes or PHP functions you created earlier. For example:
<ShippingMethod>[output_shipping({Weight})]</ShippingMethod>
When you preview the result, you’ll see a clean XML feed where each order appears in your chosen structure.
This feature gives you complete control over your XML output, letting you customize every tag, attribute, and field exactly the way you need.
Step 6: Configure advanced options & Export
The final step in your advanced order export for WooCommerce process is to review the advanced options before running the export. This section lets you control how the export behaves, how data is processed, and whether it should run automatically.
Under Advanced Options, you’ll see several settings that give you full control over how WP All Export processes your WooCommerce orders:
- In each iteration, process [x] records: Set the number of orders exported per batch. A smaller batch size reduces server load for large exports.
- Export each WooCommerce Order in real time as they are completed: Automatically export new orders as they come in, without waiting for the next scheduled run.
- Only export Orders once: Prevent the same order from being exported more than once.
- Only export Orders that have been modified since last export: Include only new or updated orders each time you run the export.
- Include BOM in export file: Add a byte order mark (BOM) to ensure compatibility with some spreadsheet programs like Excel.
- Create a new file each time export is run: Save each export as a separate file rather than overwriting the previous one.
- Do not generate an export file if there are no records to export: Skip empty export runs to save resources.
- Split large exports into multiple files: Break down very large datasets into smaller, easier-to-handle files.
- Allow non-admins to run this export in Client Mode: Give specific users permission to run this export without full admin rights.
You can also set a schedule under the Scheduling Options section if you want the export to run automatically every week or month.
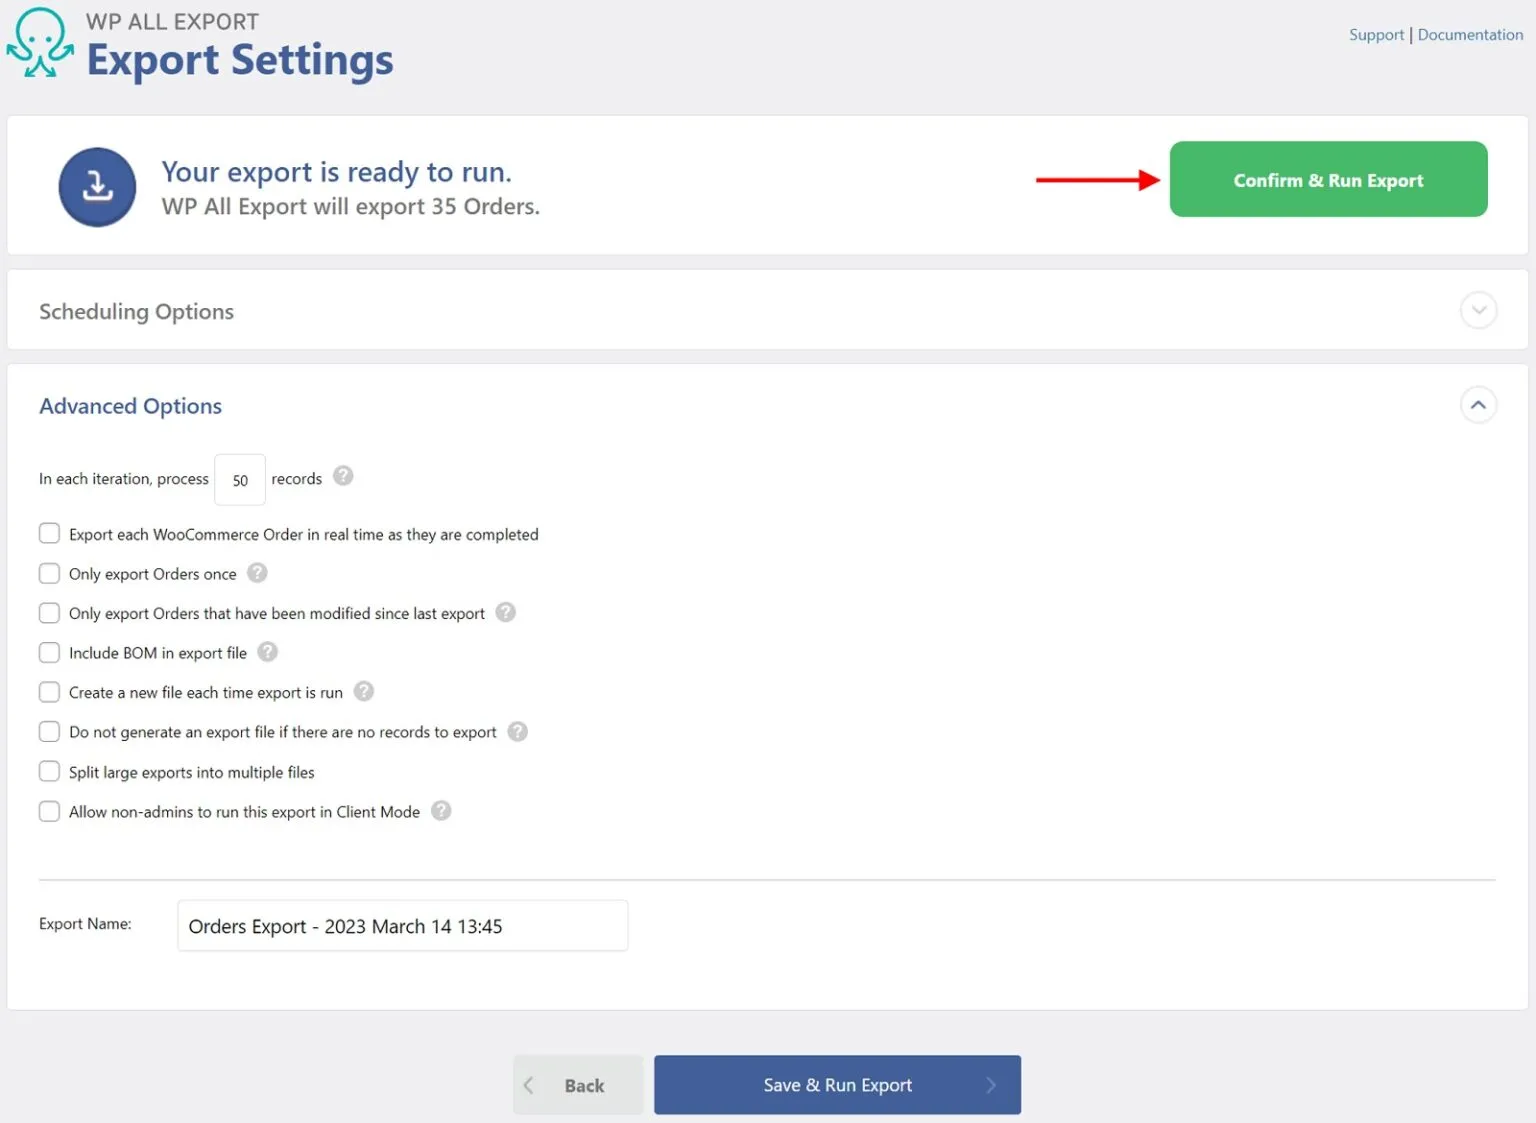
Once everything looks good, click Confirm & Run Export. WP All Export will process your configuration and generate the final file based on your layout, filters, and selected format.
How to Perform Advanced Import Order for WooCommerce with LitExtension Experts
Once your advanced order export for WooCommerce is complete, you might plan to import those orders into a new store. If your goal is to export orders for migration, LitExtension makes the entire process smooth, secure, and easy to handle.
Over 14 years, our team has helped over 300,000 store owners migrate across 200+ eCommerce platforms with precision and care. You can export and import not just orders but also products, customers, shipping details, tax data, and more.
1. Automated migration tool
If you want full control over your migration, the Automated Migration Tool from LitExtension is the perfect choice. The system automatically transfers your WooCommerce data to the new platform with no coding required. You can manage the process yourself while our team stays on standby for support whenever needed.
You only have to go through these simple steps:
- Step 1: Set up your Source and Target carts
- Step 2: Select data types to import such as orders, customers, products, reviews, coupons, pages, and blog posts.
- Step 3: Run Full migration
The automated migration tool will run entirely in the cloud, so you can close your browser and let the system work in the background. You’ll receive a confirmation email when the process is finished.
2. All-in-one migration service
If you want a hands-off experience, the All-in-One Migration Service is the best choice. This option is ideal for stores with advanced WooCommerce order import and export requirements, such as large order volumes, custom data fields, or complex integrations.
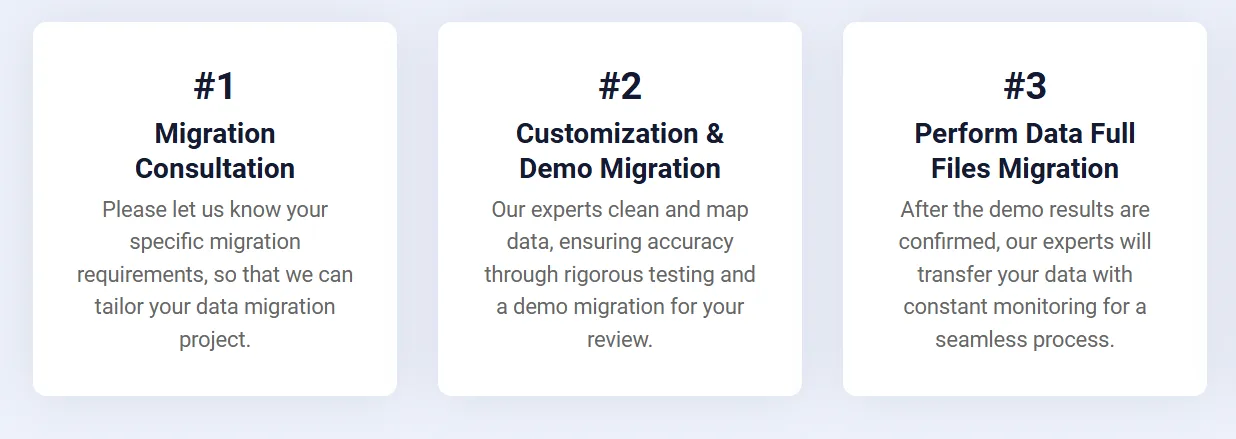
With this service, the LitExtension team takes care of everything for you, from exporting orders from your WooCommerce store to importing and verifying them on the new platform. You’ll also receive continuous expert support until your store is fully ready to launch.
Let Our Experts Handle Your Store Migration!
With the All-in-One Migration Service, our experts take care of everything, ensuring a seamless and stress-free migration.

Advanced Order Export for WooCommerce: FAQs
Conclusion
That’s it! We’ve shown you all the steps to perform an advanced order export for WooCommerce from start to finish. By following this guide, you can complete the whole process in just a few minutes without any technical effort. Hopefully, it has helped you achieve your goal and made managing WooCommerce orders more efficient.
For more WooCommerce tutorials, check out our WooCommerce blogs or join our community group to learn and share with other store owners.

