Need to bring thousands of leads, contacts, or product records into Salesforce quickly—but don’t want to mess it up? You’re not alone. For many admins, team leads, or consultants, Salesforce data import is a critical yet frustrating task. One wrong mapping, and you’re stuck cleaning bad data for hours.
This guide gives you a clear, step-by-step walkthrough on how to handle Salesforce import data like a pro—no developer needed, no guesswork involved.
Here’s what we’ll cover:
- Why importing data into Salesforce is harder than it looks
- What to prepare before the import
- Salesforce Data Import Wizard – a simple tool for basic imports
- Salesforce Data Loader – more power and flexibility for bigger jobs
- LitExtension – a safer, fully-managed solution for complex data migrations
- Best practices for Salesforce data import
If you're searching for how to import data to Salesforce, this guide will show you the best tools, tips, and techniques to get the job done right.
Why You Need to Import Data into Salesforce (and Why It’s Not Always Easy)
Importing data to Salesforce sounds simple, until you actually do it. A lot of Salesforce users hit this wall early: you’ve got a spreadsheet full of leads or customer records, and now you need to get them into your CRM… fast. That’s where Salesforce data import comes in.
Most teams need to import data at various points:
- At the beginning of a Salesforce implementation
- During a migration from another system or spreadsheet
- When updating or enriching existing records in bulk
- After offline lead collection from events or campaigns
Despite how common it is, the import process often presents challenges. These usually fall into three main categories:
- Bad formatting: field names don’t match, values break picklists, dates are off
- Tool limitations: the Wizard maxes out at 50K records, the Loader needs setup and API access
- No rollback: one mistake can create duplicates or overwrite good data
- Complex structures: linked records (like Accounts > Contacts) require careful mapping
In short: importing data is essential, but it takes the right setup. You need clean CSVs, correct field mappings, and a tool that matches the size and complexity of your job.
That’s exactly what the next sections cover—starting with the easiest method: the Salesforce Data Import Wizard.
What to Prepare Before Importing Data to Salesforce
Preparing properly before a Salesforce data import is essential to ensure clean, accurate, and successful data migration. Taking a few key steps in advance can help prevent errors, data loss, and unnecessary complications later.
1. Prepare your data file
- Save your data as a CSV file encoded in UTF-8 to ensure compatibility.
- Clean up values such as date formats, phone numbers, and country codes.
- Eliminate repeated entries that could create clutter or overwrite important records.
2. Set up access and permissions
- Ensure your user profile allows for data import on the necessary objects.
- Verify visibility and editability for fields in the target object.
- Perform a trial import in a non-production environment to spot issues early.
3. Backup and documentation
- Export current records in case you need to restore anything later.
- Keep notes on file sources, field mappings, and test results for reference.
Salesforce Data Import Using Data Import Wizard
The Salesforce Data Import Wizard is the fastest way to get started with importing data—no installation, no API setup. It’s built directly into the Salesforce UI and works well for small, straightforward jobs.
You can use the Data Import Wizard when:
- You’re importing standard objects like Leads, Contacts, Accounts, or Campaign Members
- Your file has fewer than 50,000 records
- You don’t need automation (just a one-time upload)
- You want a guided, browser-based interface that walks you through each step
Supported editions:
- Available in all Salesforce editions except Database.com
- Person Account support requires: Professional, Enterprise, Performance, or Developer Edition
- Works in both Salesforce Classic and Lightning Experience
Note: To import Person Accounts, additional permissions like Import Personal Contacts and Modify All Data may be required, depending on whether you're importing records owned by yourself or others.
Here’s how to import data using the Data Import Wizard:
Step 1. Prepare your CSV file
First, you can download a sample CSV file and ensure fields are formatted correctly. Clean data before uploading to avoid duplication and validation errors.
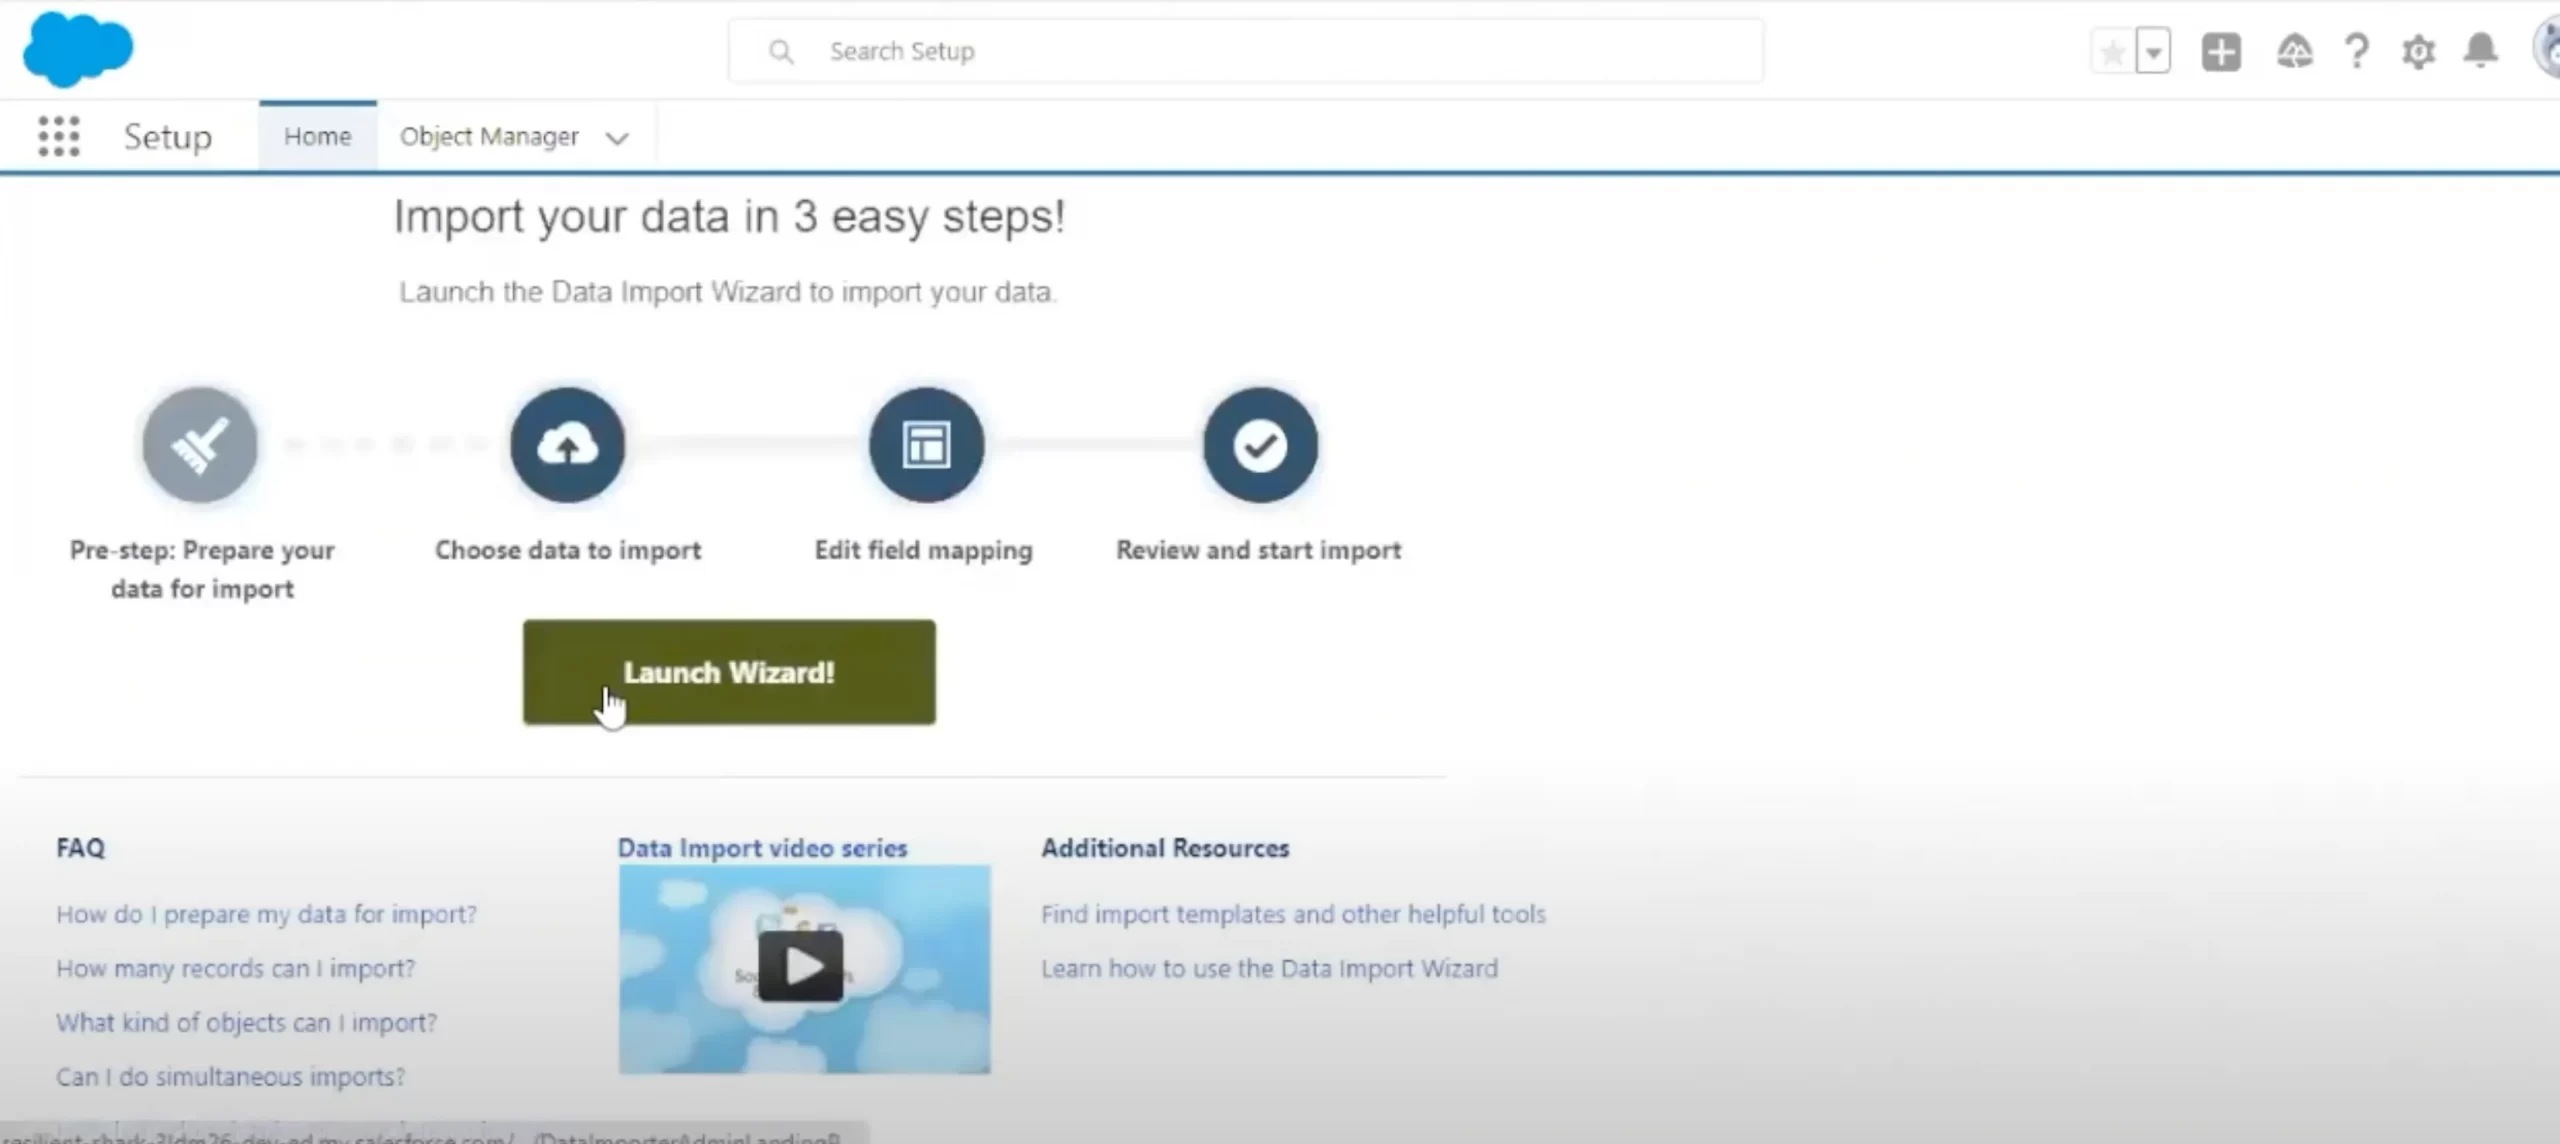
Step 2. Access the wizard
Go to Setup, search for Data Import Wizard in the Quick Find box, then click Launch Wizard. Non-admin users can access it from object-specific settings.
Step 3. Select your object
Choose between Standard Objects (e.g., Leads, Accounts, Person Accounts) or Custom Objects. If importing custom objects, click the Custom Objects tab.
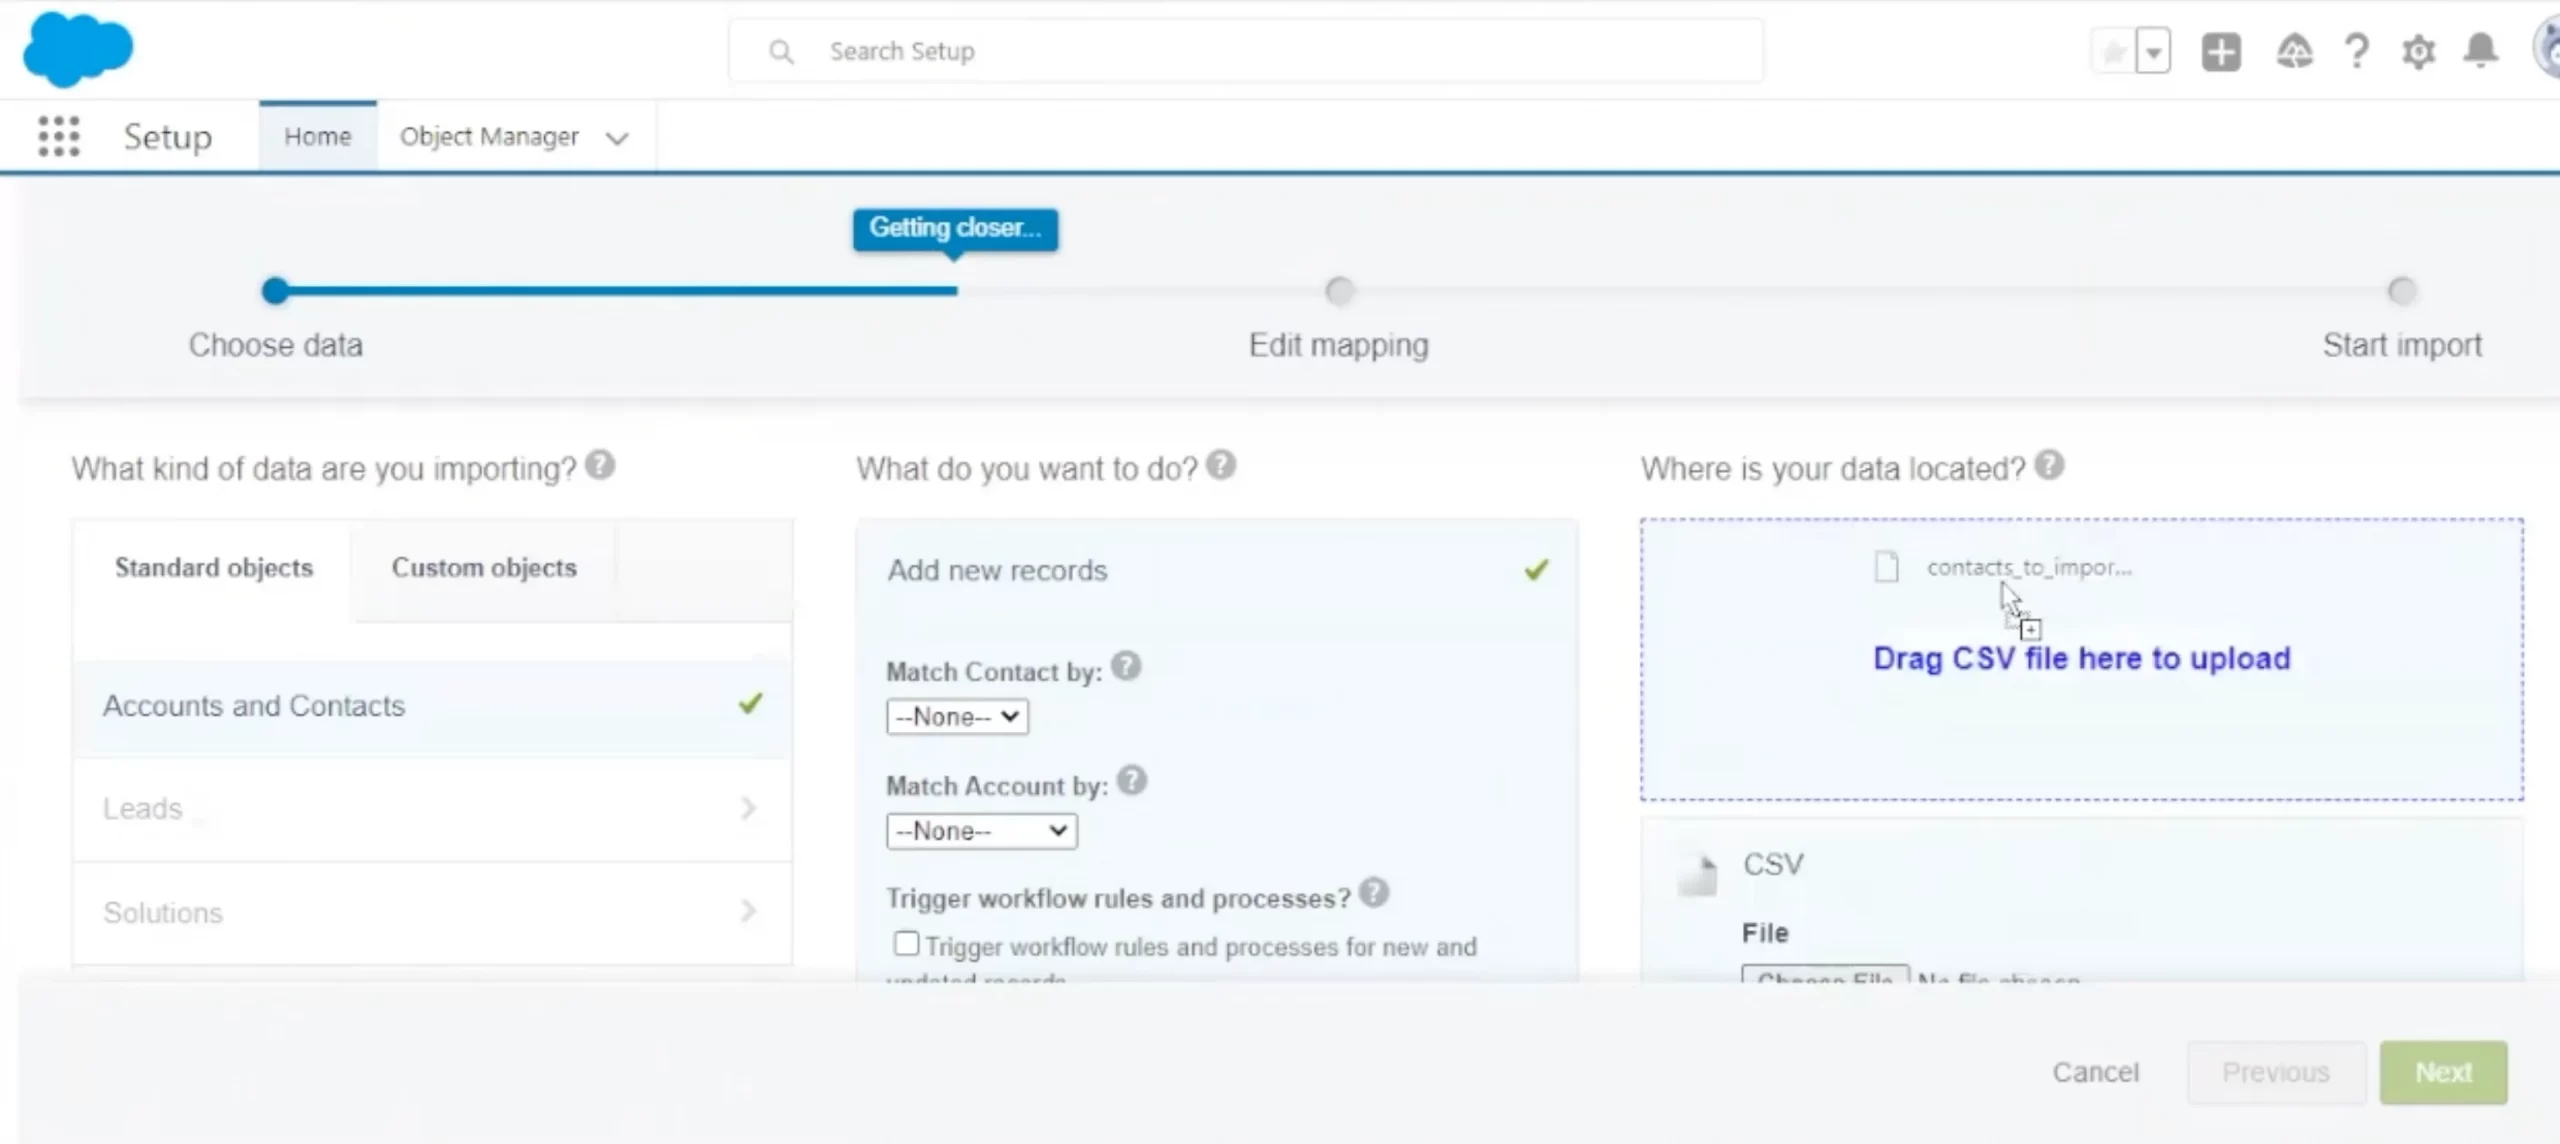
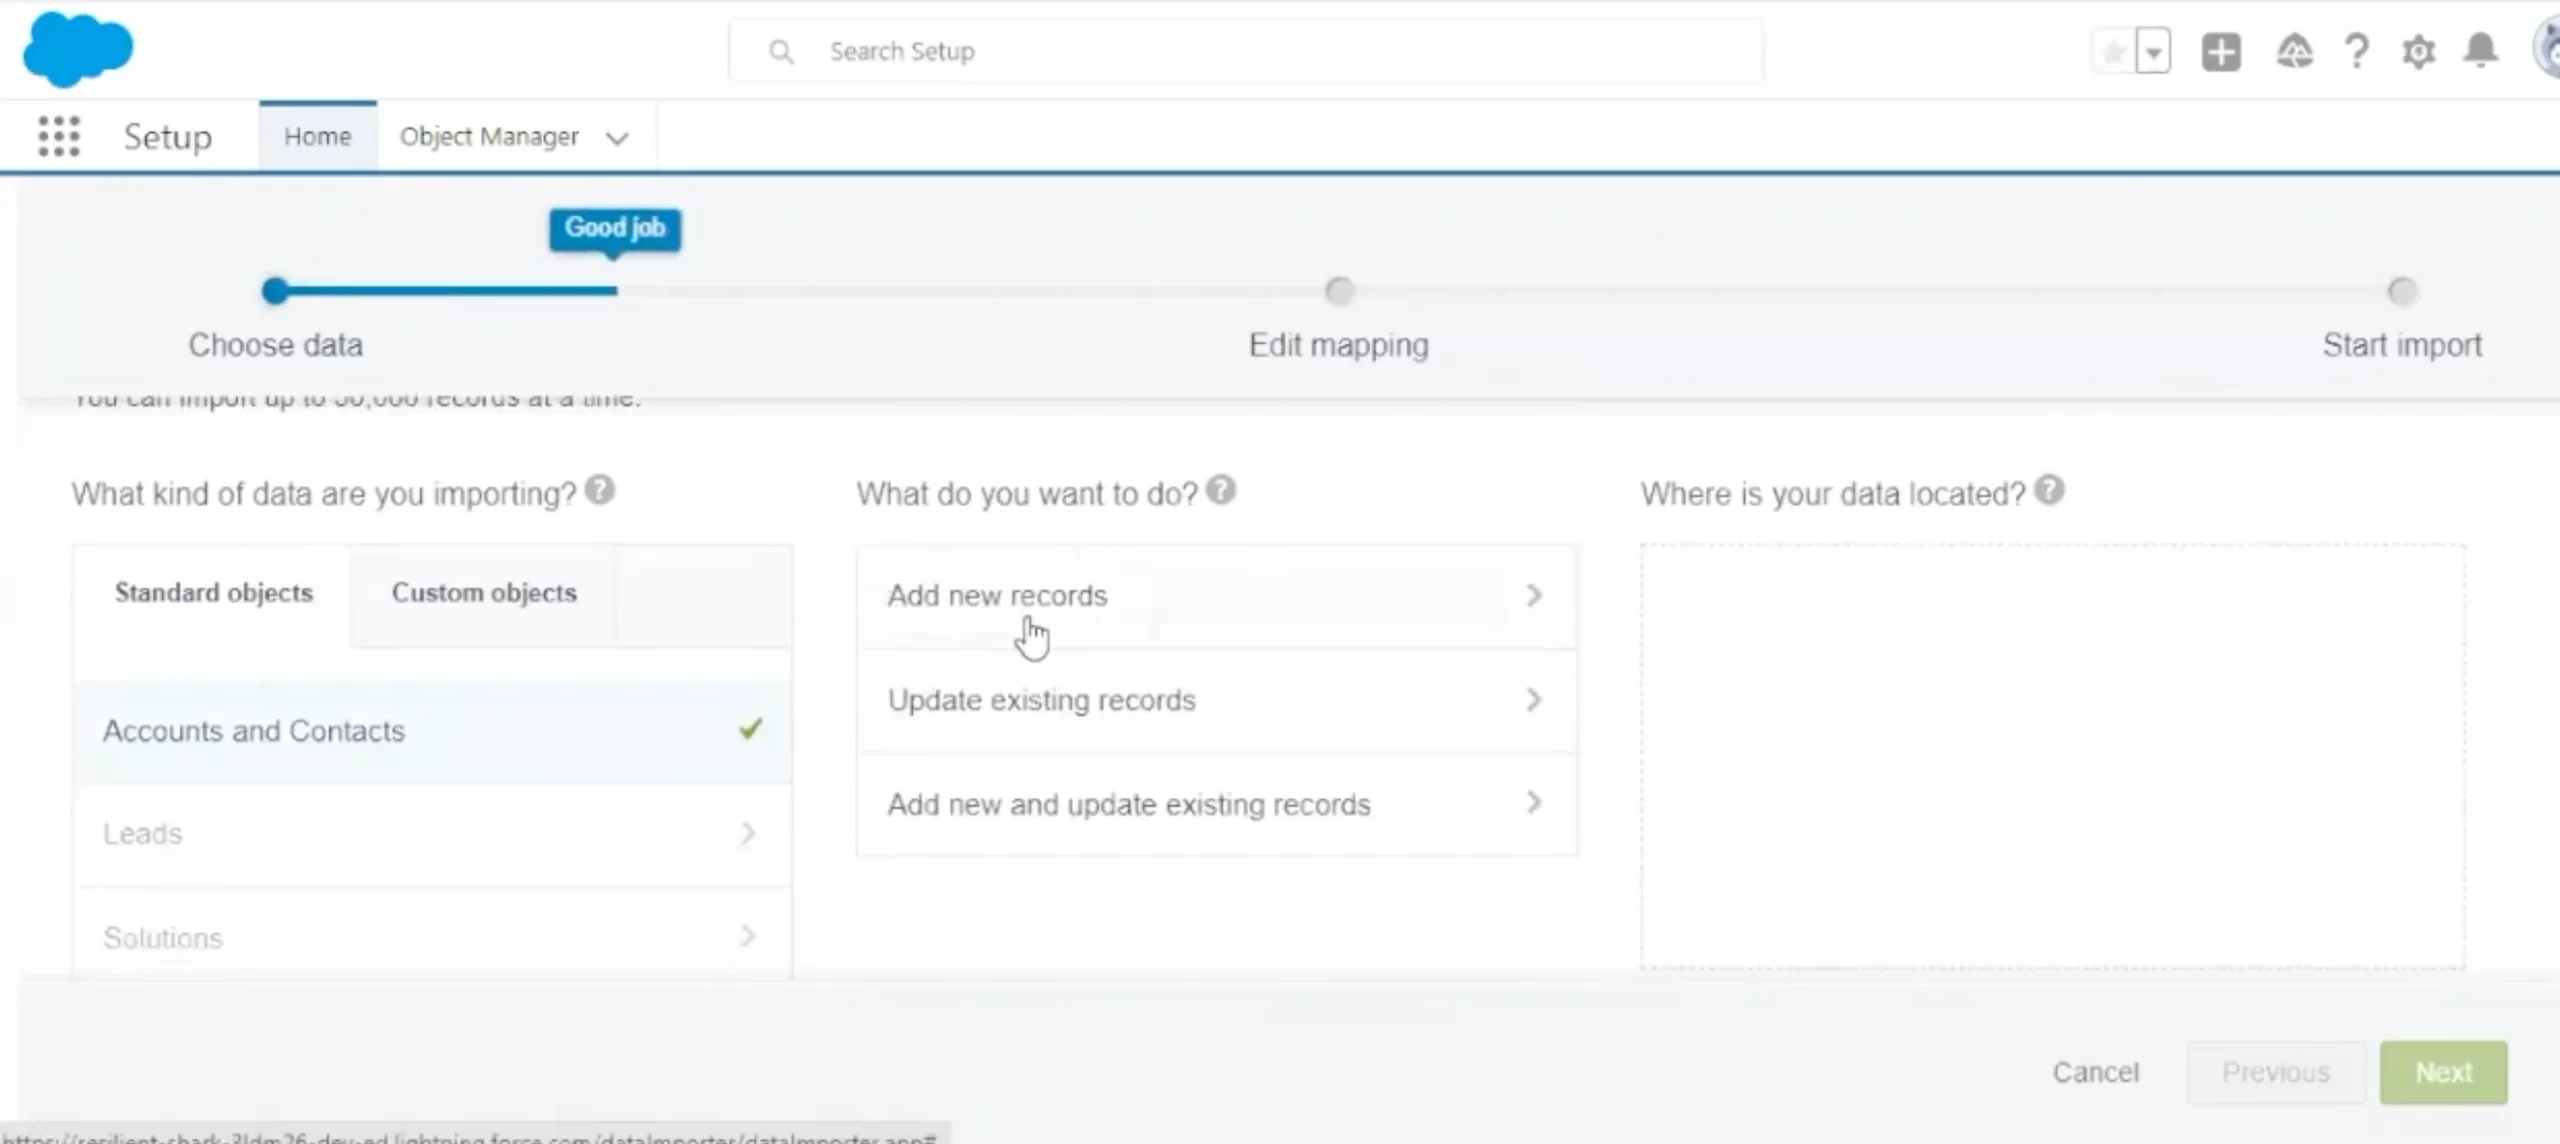
Step 4. Choose your action
- Add new records
- Update existing records
- Add and update at the same time (upsert)
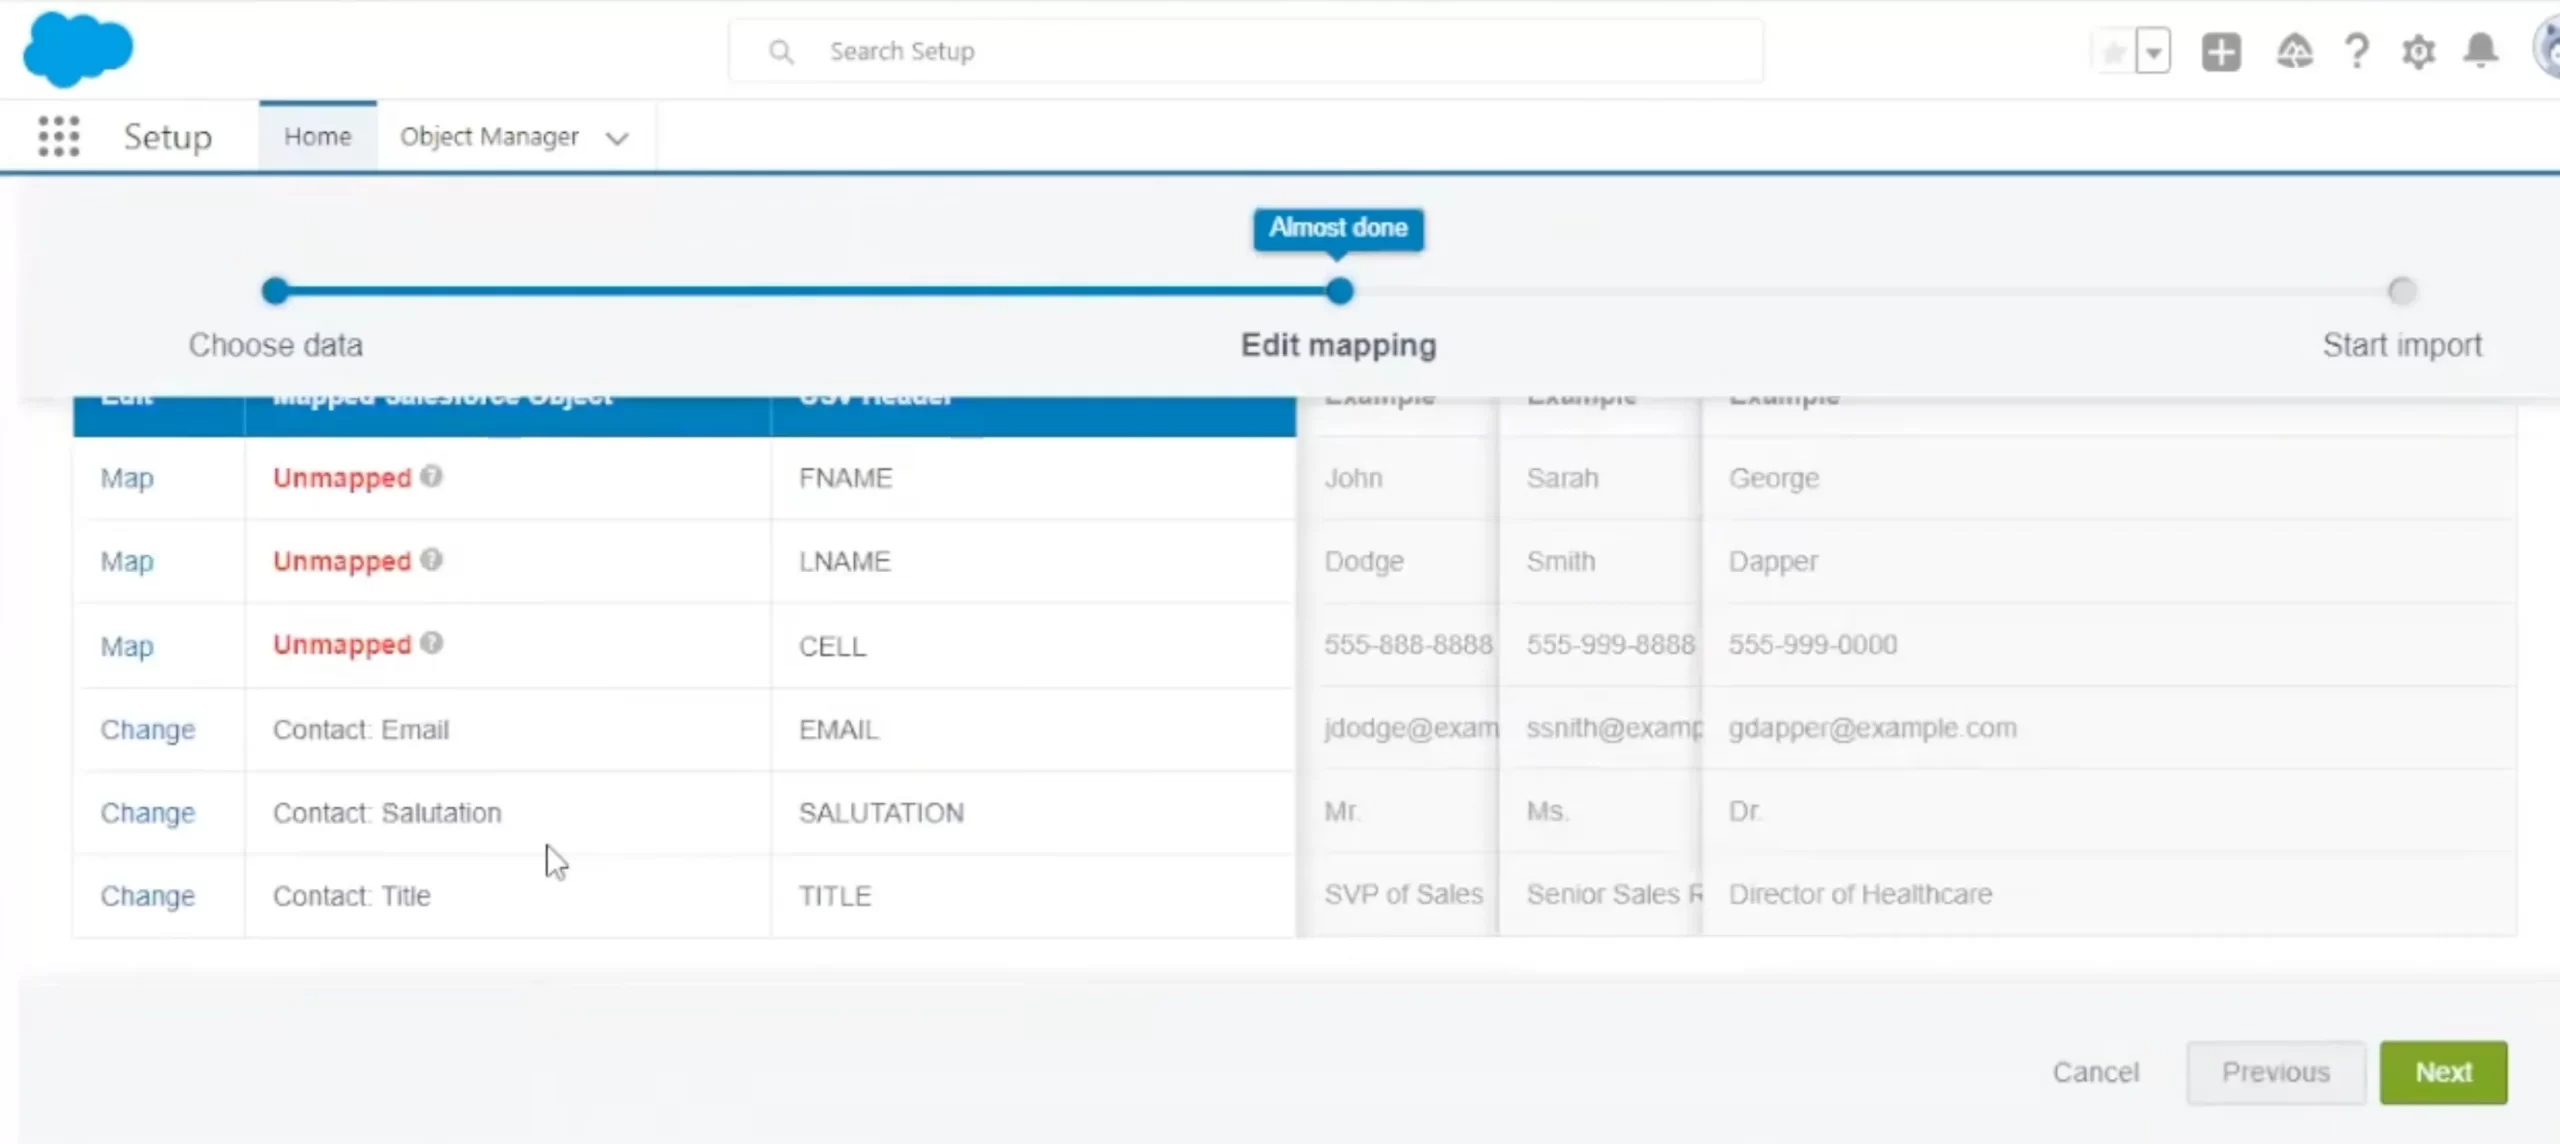
Step 5. Map fields
Match your CSV columns to Salesforce fields. Review and adjust as needed.
Step 6. Start the import
Confirm the operation. You’ll receive an email when it completes.
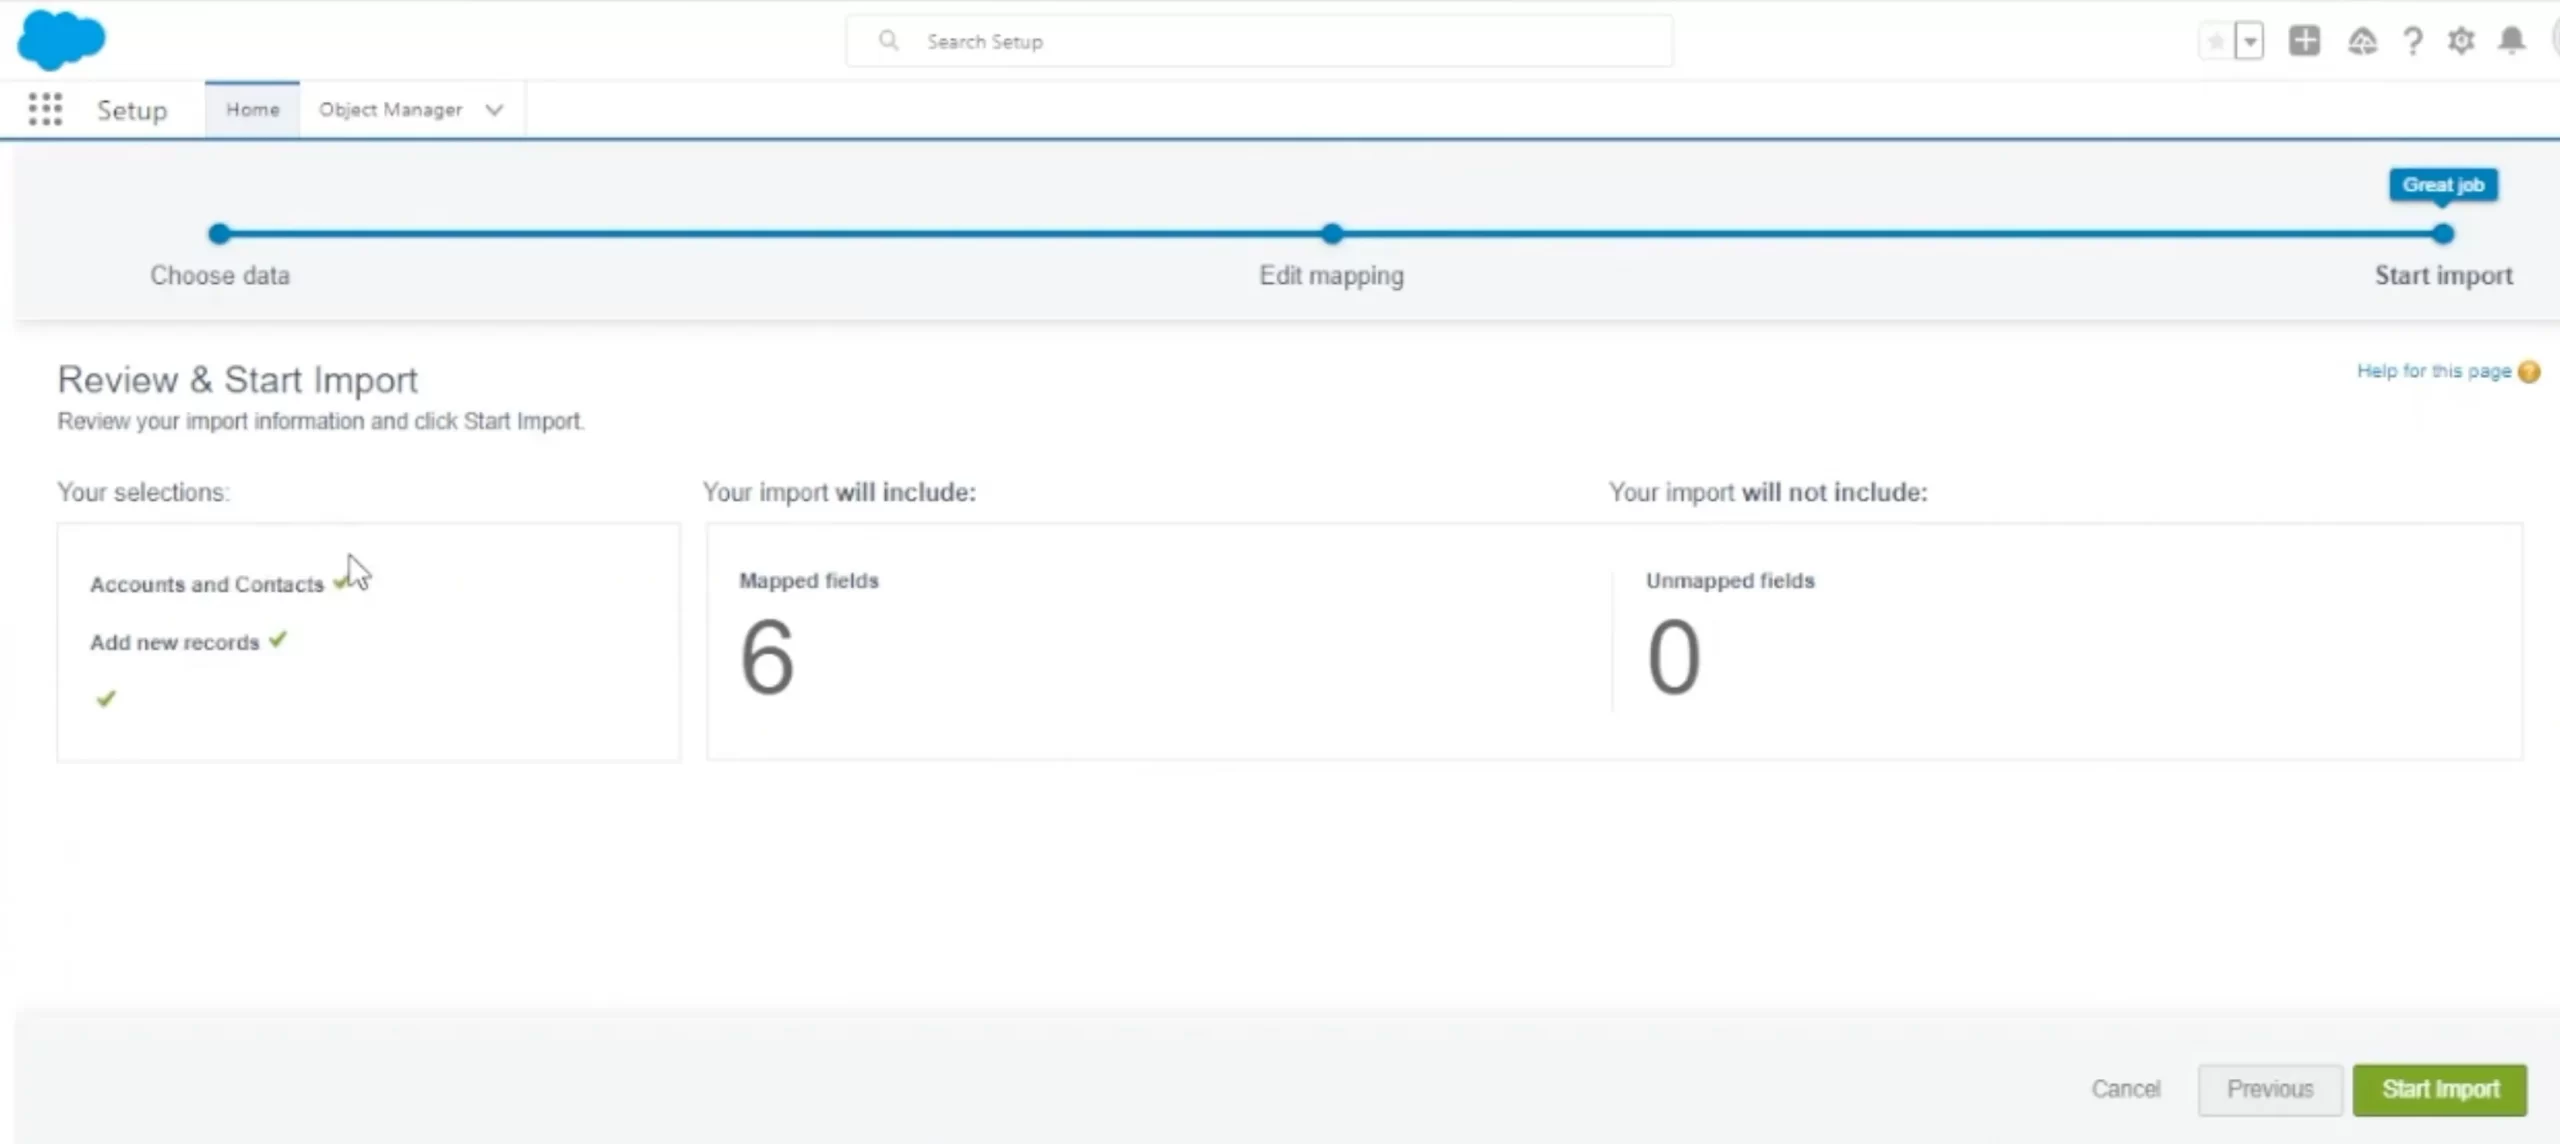
Step 7. Review results
Download success and error files to verify what was imported and resolve any failed rows.
Here’s a note on Person Account Imports!
To import Person Accounts using the Data Import Wizard, the required user permissions depend on who owns the records:
If you’re importing records you own, you need:
- Create on accounts
- Edit on accounts
- Import Personal Contacts
If you’re importing records owned by others, you also need:
- Edit on contacts
- Modify All Data
Person Accounts must be enabled in your org and are only available in Professional, Enterprise, Performance, and Developer Editions.
For many teams, the Salesforce Data Import Wizard is all you need for simple tasks. But for larger datasets or custom object imports, you’ll want something more powerful to overcome Data Import Wizard Salesforce limitations, like the Salesforce Data Loader, which we’ll cover next.
How to Import Data to Salesforce using Data Loader
The Salesforce Data Loader is a client application used for high-volume, structured data import and export. It gives users full control over how data is processed, mapped, and uploaded into Salesforce, especially when the built-in Data Import Wizard isn’t sufficient.
Between Salesforce Data Import Wizard vs Data Loader, Data Loader is the go-to tool when:
- You need to import over 50,000 records (up to 5 million+)
- The object you’re importing to isn’t supported by the Data Import Wizard
- You’re working with complex field mappings
- You want to automate and schedule imports (via CLI, Windows only)
- You need detailed success/error CSV logs
- You’re exporting large datasets for backup or offline analysis
Data Loader supports common data types including Salesforce IDs (15- or 18-character), strings, integers, booleans, dates (customizable formats), and base64-encoded files for attachments. You can also configure settings like import batch size, timezone, encoding (UTF-8), and date formatting.
Here’s how to import data using Salesforce Data Loader:
Step 1. Prepare your CSV file
Ensure field names match Salesforce API field names. Clean the data to avoid validation errors, duplicates, or formatting issues.
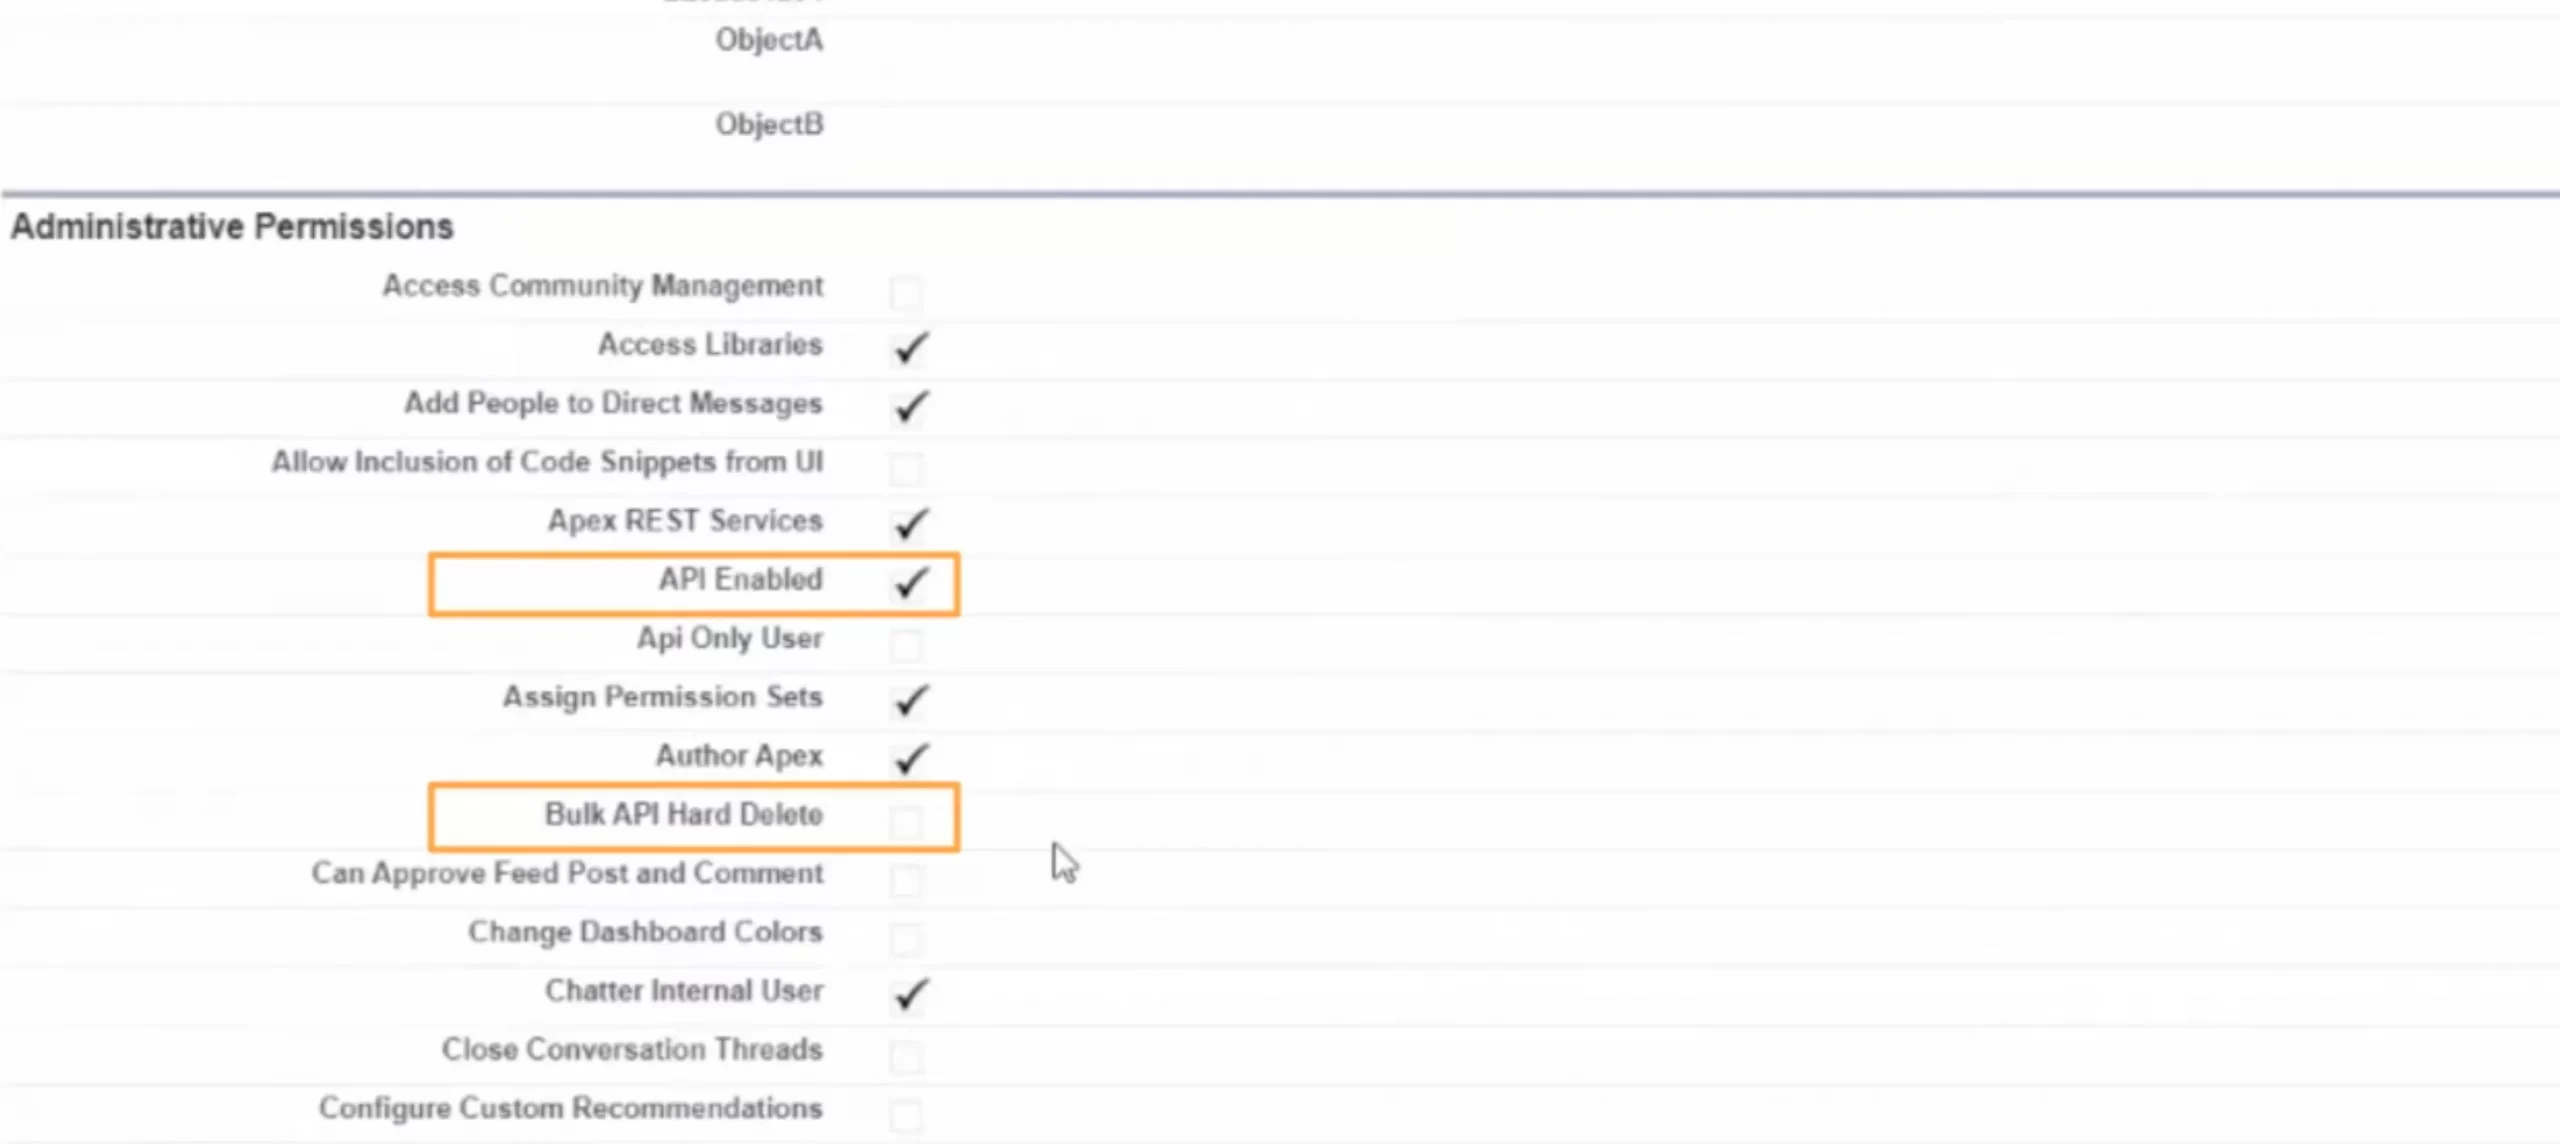
Step 2. Install and open Data Loader
Download the tool from Salesforce Setup or Salesforce Developer Docs. Open the app and log in using your Salesforce credentials (requires API access).
Step 3. Choose your operation
Select the action you want to perform:
- Insert new records
- Update existing records
- Upsert (add or update based on ID)
- Delete or Export (for backups or clean-up)
Step 4. Select the object and upload your file
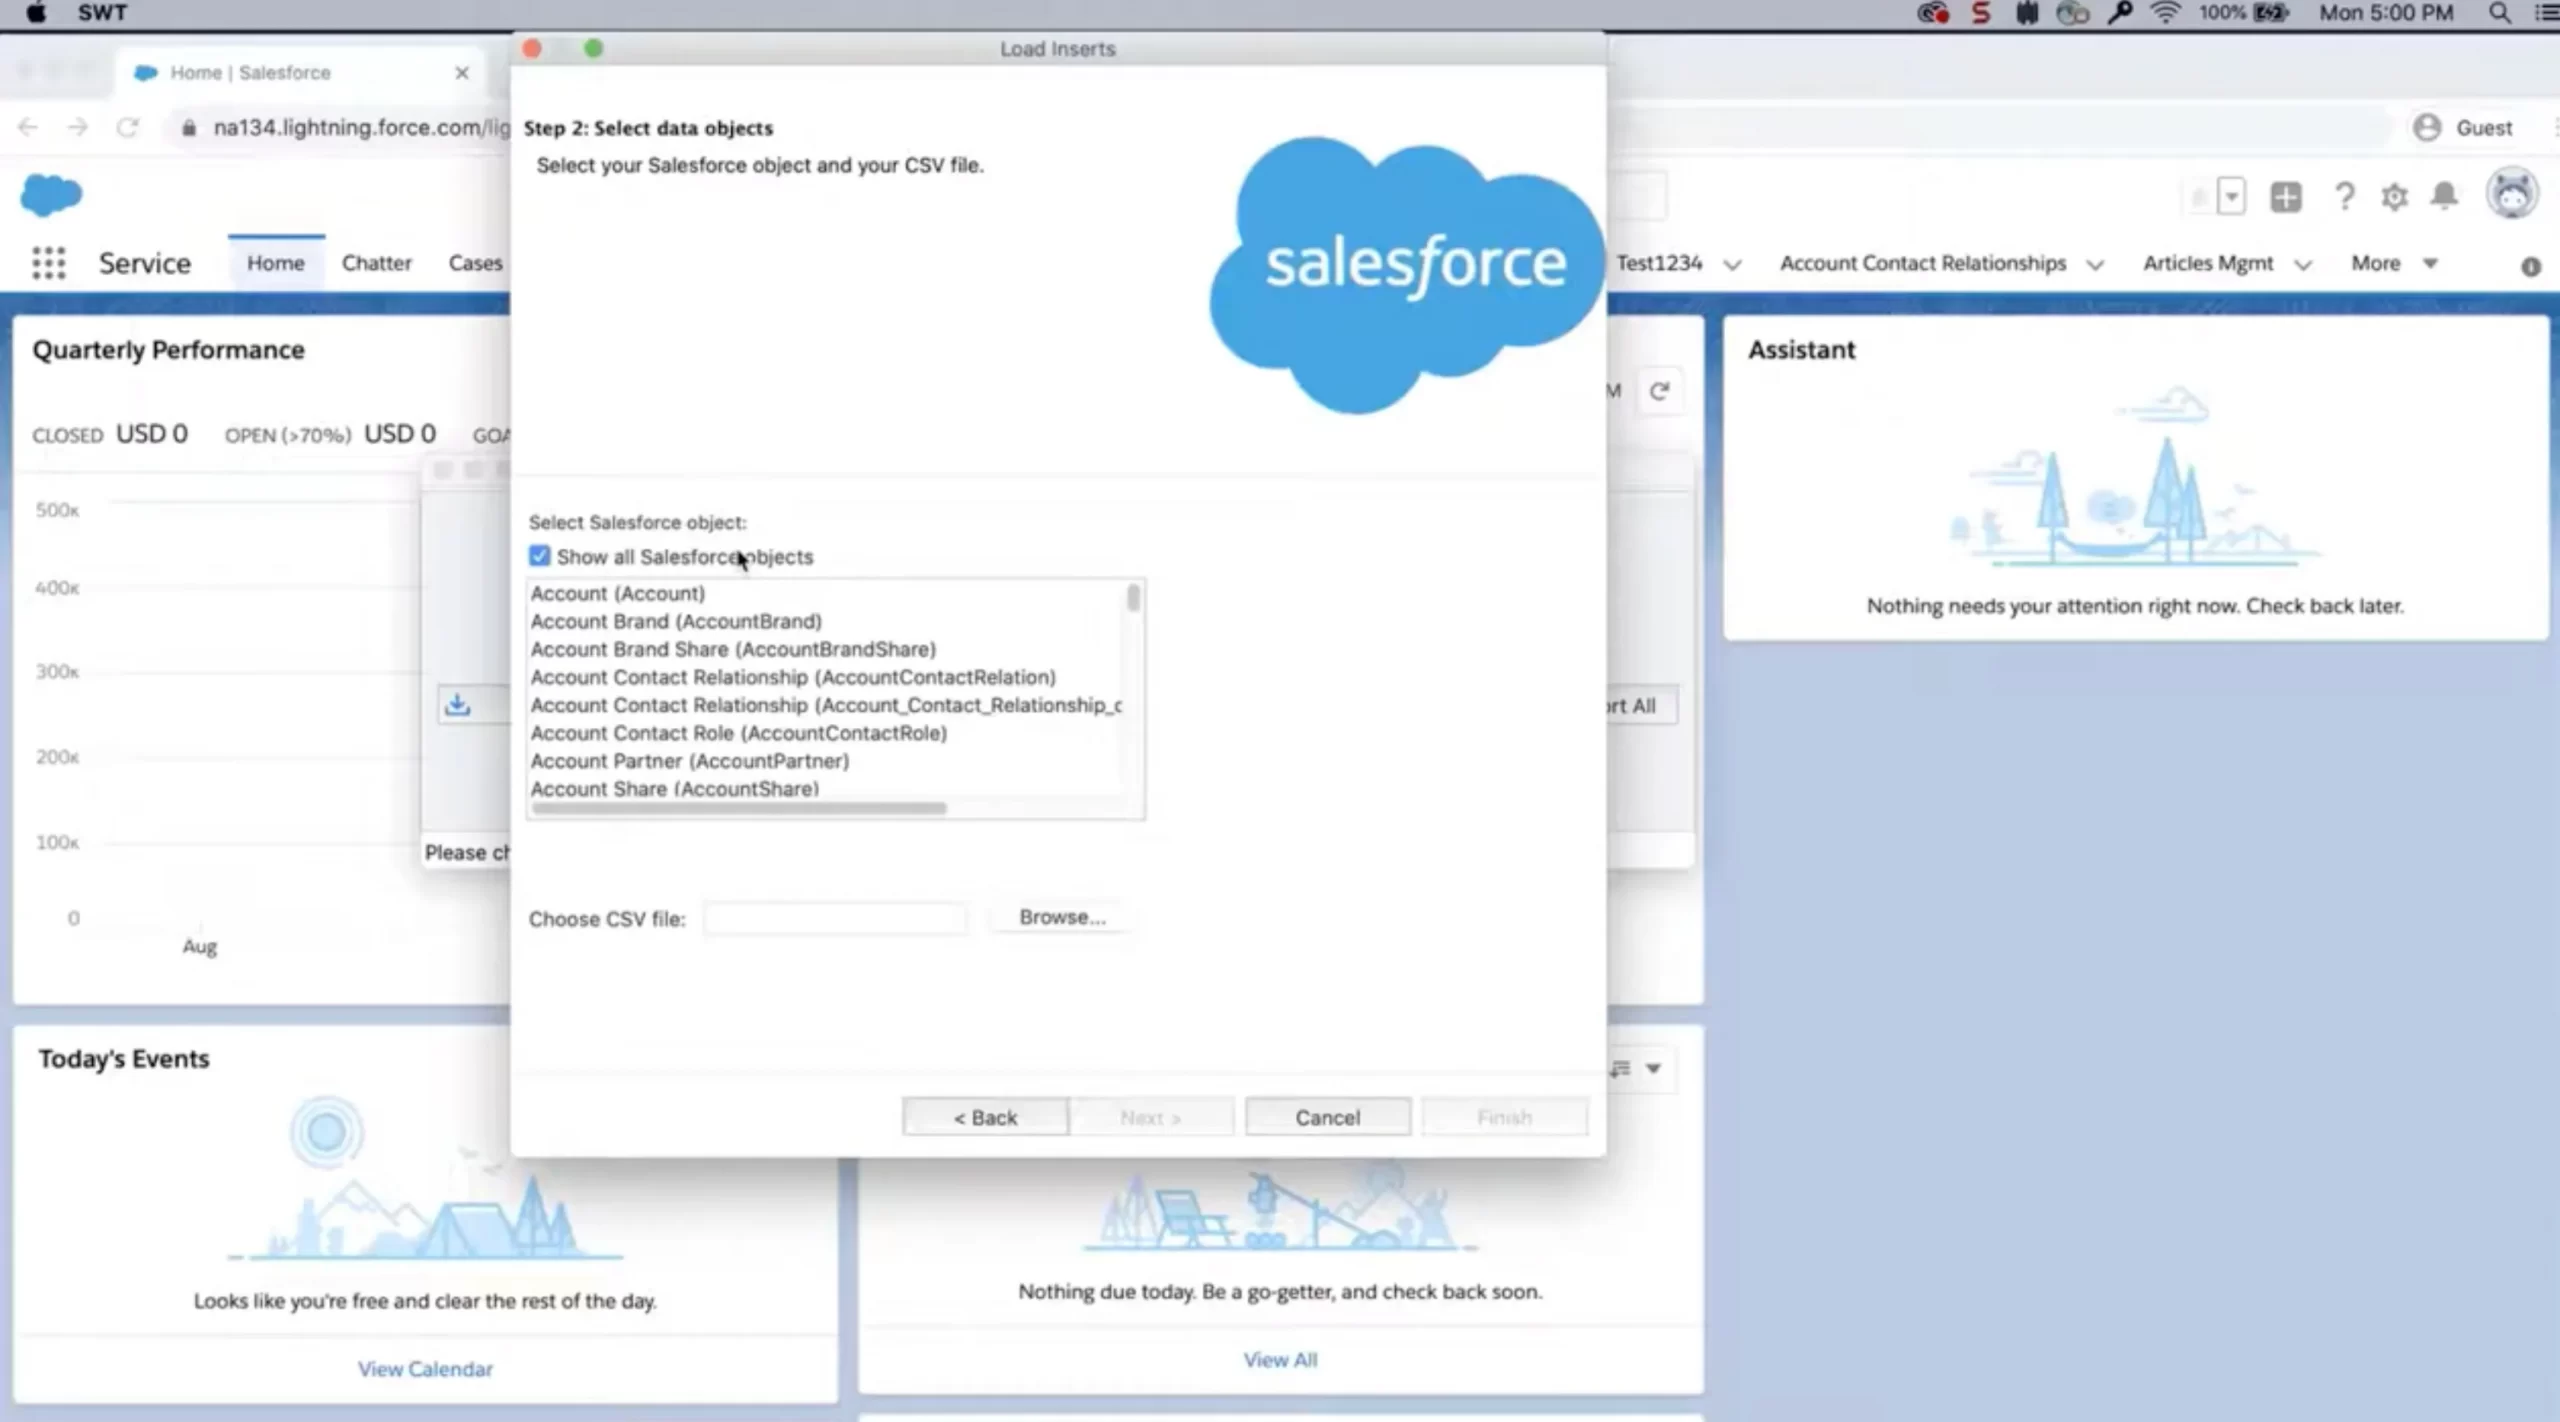
Step 5. Map fields
Match CSV columns to Salesforce fields using the drag-and-drop mapper. Save the mapping file for reuse.
Step 6. Run the import
Review your setup, then confirm to start the job. Data Loader will process the file and generate output logs.
Step 7. Review results
Check the success and error files to verify which records were processed correctly and resolve any issues for retry.
Note: Data Loader is available in Enterprise, Performance, Unlimited, and Developer Editions and is compatible with macOS and Windows.
As you can see, Salesforce Data Loader gives you more control over large and complex imports, but it also requires more setup and care. If you're handling a huge dataset or multiple objects at once, and want to avoid errors altogether, it may be time to consider a fully-managed option like LitExtension.
Easier Salesforce Data Import with LitExtension
Built-in tools like the Data Import Wizard and Salesforce Data Loader work well for basic needs. But once your dataset gets larger, more complex, or includes cross-object relationships, you may start hitting limitations fast—format errors, failed records, or hours spent fixing post-import issues.
That’s where LitExtension comes in.
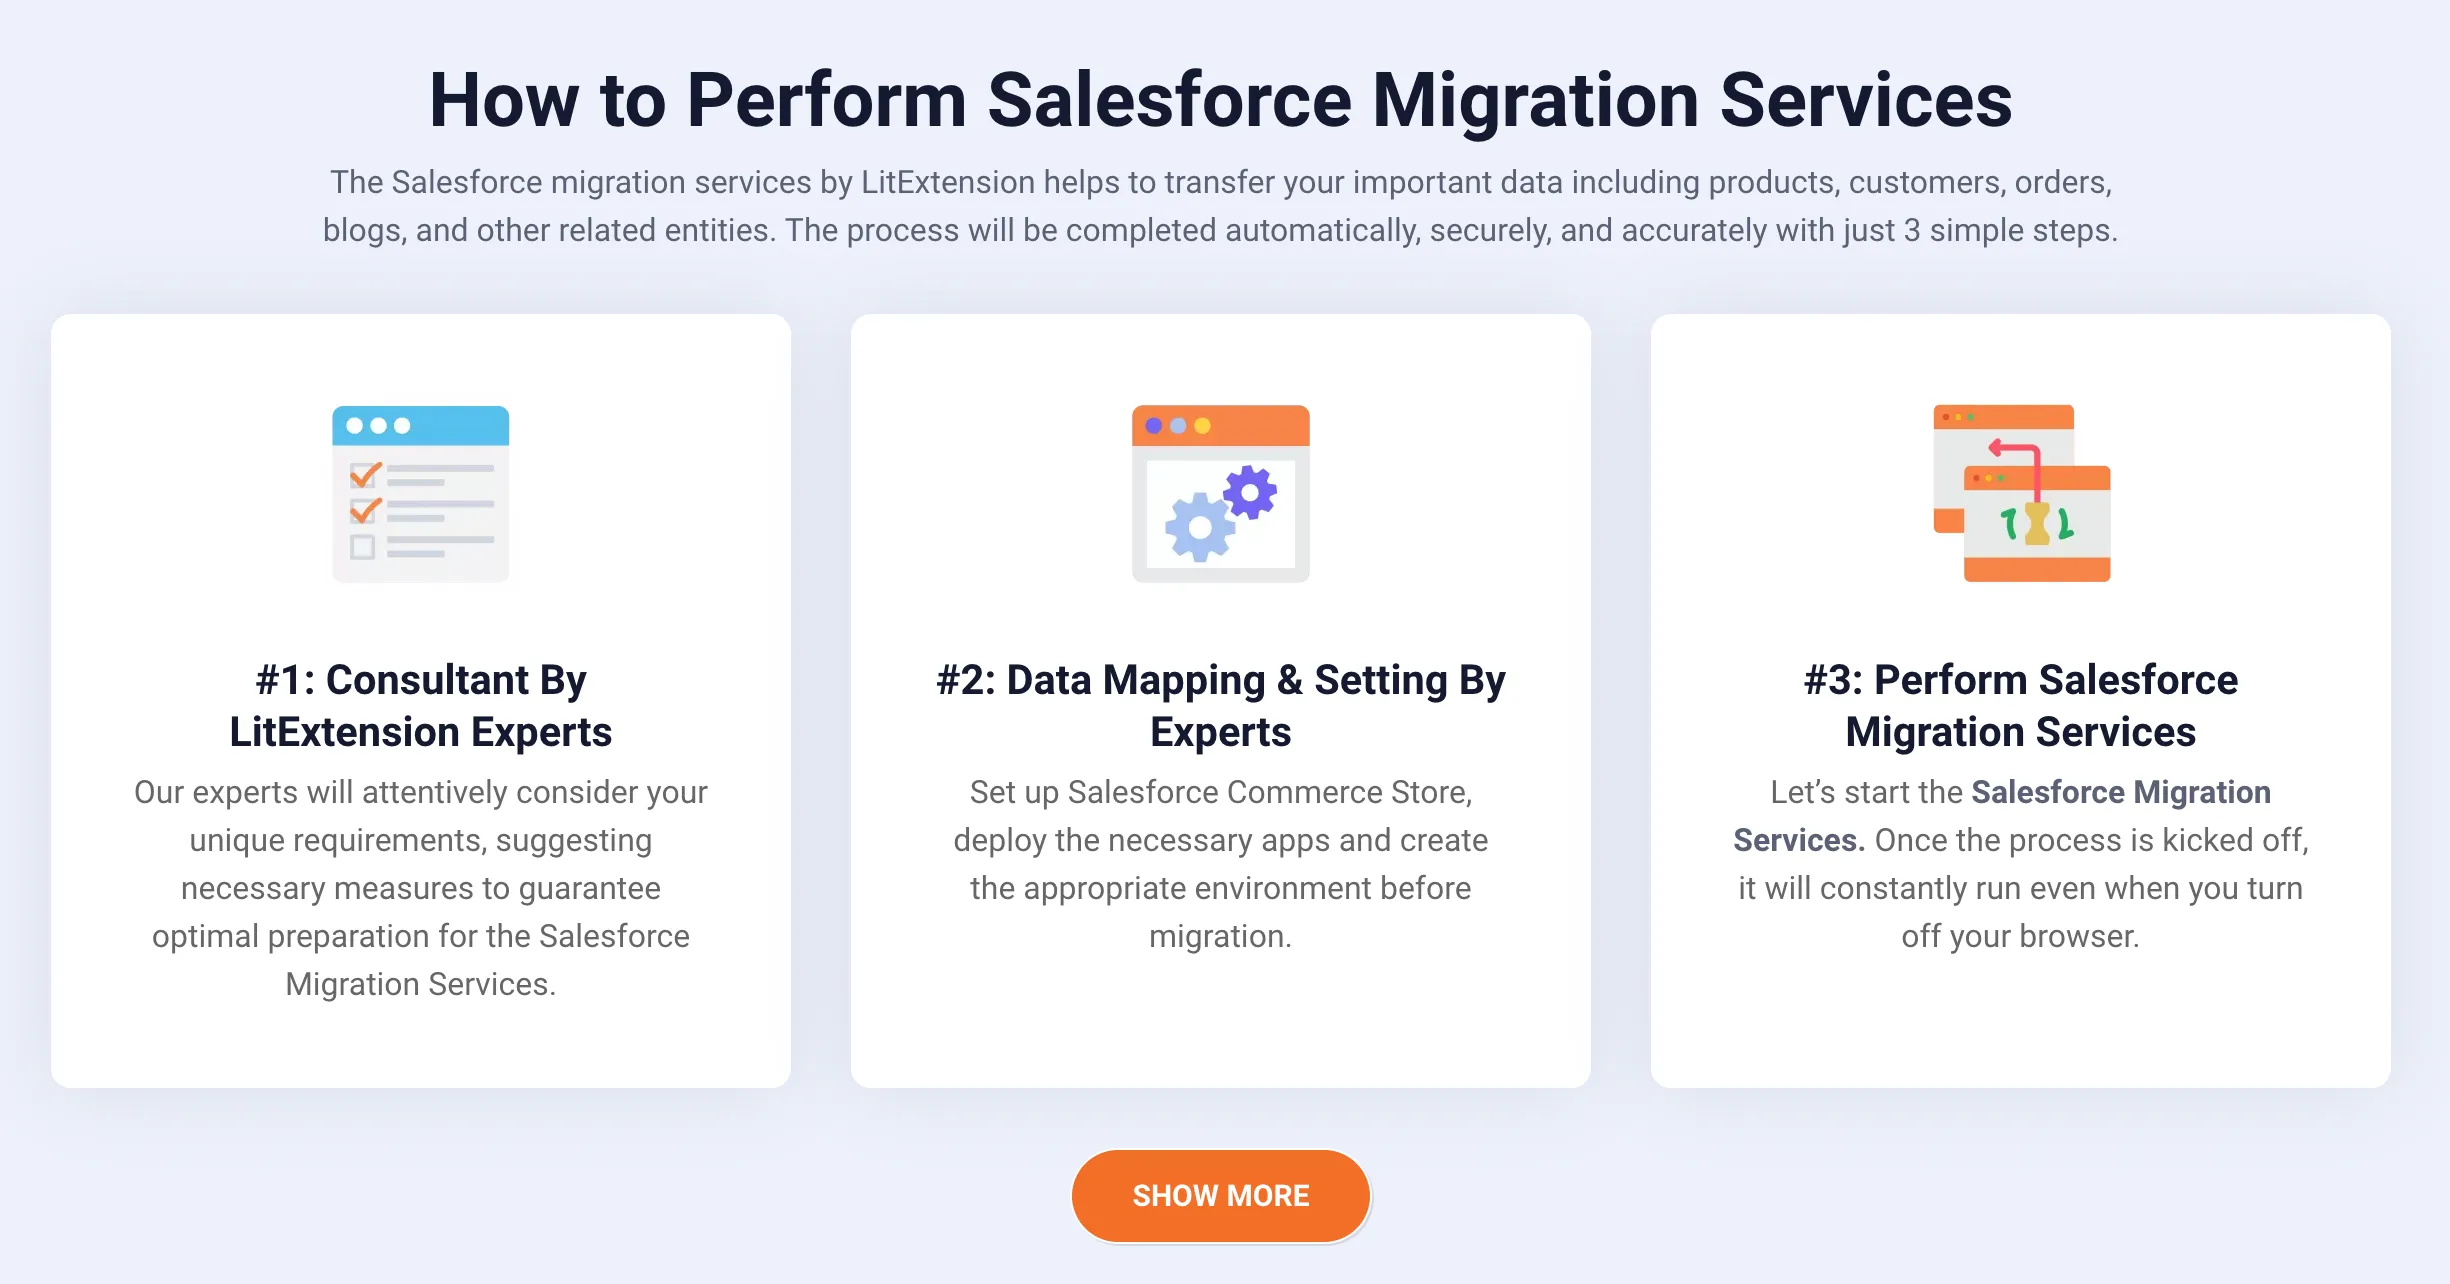
LitExtension offers a fully-managed import service for teams that want to save time and avoid manual work. Instead of handling CSVs yourself, you get a dedicated team to take care of:
- Data mapping from your source system or file
- Object relationships between leads, accounts, contacts, custom records
- Pre-import validation to catch duplicates, picklist mismatches, or missing values
- Post-import syncing for cases where source data updates after the initial import
You can use LitExtension for any Salesforce data import task—but it's especially valuable when native tools like the Data Import Wizard or Data Loader just aren’t enough.
Here’s when teams typically choose LitExtension:
- You’re dealing with complex relationships between objects (e.g., Products > Orders > Customers) that are hard to manage via CSV and manual field mapping
- You want to migrate from another CRM or eCommerce platform, not just upload a file
- You need support for cross-object mapping, custom fields, or data validation that’s beyond what built-in tools offer
- You’ve run into limits—like the Wizard’s 50,000 record cap or the Loader’s API requirement—and don’t want to deal with technical setup or cleanup
- You prefer a fully-managed solution, where data prep, import, error handling, and verification are handled for you
Simply put, if Salesforce’s tools feel like more work than they’re worth, LitExtension can take over—accurately, securely, and with expert support.
If you're running Salesforce Commerce Cloud or moving store data into Salesforce, LitExtension also supports structured migration from platforms like Shopify, WooCommerce, Magento, and more.
👉 Learn more about Salesforce data migration with LitExtension
Best Practices for Salesforce Data Import
Importing data into Salesforce can be a smooth and secure process when guided by well-established best practices. Whether you’re handling a small batch or conducting a large migration, following a consistent strategy will help you reduce errors, maintain data integrity, and save time.
1. Before you begin
Before you initiate the Salesforce Data Import, make sure your data is clean and ready. Review your CSV files to remove duplicates and irrelevant entries. Every record should be accurate, up-to-date, and formatted correctly. If your data includes custom fields, ensure that those fields already exist in Salesforce.
It’s also helpful to test the import process in a Salesforce sandbox environment. By doing this, you can preview the results and catch any mapping errors without affecting your live database. This precaution protects your production environment from unintentional changes.
2. During the import process
Once you begin the Salesforce data import, stay attentive to how the data flows into the platform. Map your source fields precisely to the corresponding Salesforce fields. A single mismatch here can lead to data errors that are difficult to trace.
Use the right import tool for the job. For simple imports, the Data Import Wizard works well. For large-scale imports or more control, the Data Loader offers enhanced flexibility. Always choose the option that matches your needs and skill level.
3. After the import completes
After the import finishes, take time to verify the results. Run Salesforce reports or create list views to ensure the records appear in the correct fields and formats. Check for missing or misaligned data.
Maintain a backup of your original files and import logs. These files are helpful for audits and can serve as a safety net in case you need to revert any changes.
Lastly, document the import process. Write down what worked, what didn’t, and how you handled any errors. This record will make your future Salesforce Data Import efforts more efficient and less stressful.
Salesforce Data Import: FAQs
How to use data import in Salesforce?
You can import data using the Salesforce Data Import Wizard or Data Loader, depending on the number of records and object types. Go to Setup > Data Import Wizard to access the built-in tool, or install Data Loader for more advanced imports.
How do I mass import data in Salesforce?
For mass imports (50,000+ records), use Salesforce Data Loader. It supports bulk operations like insert, update, and upsert, and can process millions of records with proper CSV formatting and field mapping.
How do I import data from Excel to Salesforce?
First, export your Excel file to CSV format. Then use the Data Import Wizard or Data Loader to map fields and import the file. Make sure to clean your data—format dates properly, align picklist values, and remove empty rows.
Where is Salesforce Data Import Wizard?
In Salesforce, go to Setup, then search for “Data Import Wizard” in the Quick Find box. Click “Launch Wizard” to begin the import process.
Is the Salesforce Data Loader free?
Yes. Salesforce Data Loader is a free tool provided by Salesforce for users with API access. You can download it from Setup by searching for “Data Loader.”
Final Words
Getting your data into Salesforce isn’t just a technical task—it directly impacts how clean, usable, and accurate your CRM will be moving forward. Choosing the right tool for your Salesforce data import job depends on what you’re importing, how much of it, and how confident you are in handling the setup.
To recap:
- Use the Data Import Wizard for small, simple uploads
- Switch to Data Loader for bulk or complex imports
- Go with LitExtension when you want a done-for-you solution that minimizes risk and saves time
No matter which method you choose, always clean your data first, test with a small sample, and double-check your results after importing. Need help with a large or custom Salesforce import? Explore LitExtension’s Salesforce Data Migration Service for expert support.
We hope you found this article insightful and now have a clear understanding of Salesforce data import. For more content like this, be sure to visit the LitExtension blog and join our eCommerce community to gain further insights and connect with fellow business owners.

