WooCommerce doesn’t natively support Amazon product imports, which often makes the process feel complicated. The good news is that you can still import Amazon products to a WooCommerce store smoothly by using the right tools and workflows outlined in this guide.
We will walk you through the following key points:
- Reasons to import Amazon products to WooCommerce;
- Plugin-based import method using WP All Import;
- CSV-based import method using WooCommerce’s built-in importer;
- Post-import product management inside WooCommerce.
Let’s get started!
Why Import Products from Amazon to WooCommerce Store?
There are several reasons why merchants choose to import Amazon products into WooCommerce store. Depending on what you want to achieve, the import can support a few common cases:
These different scenarios will determine how you use the import in your store.
Use case | Description |
Affiliate monetization | Display Amazon listings on your WooCommerce site and earn commissions without managing inventory. |
Multi-channel selling | Sync product data, stock, and pricing between Amazon and WooCommerce to manage both channels easily. |
Catalog expansion & traffic growth | Add more products to attract search traffic and guide visitors toward higher-value or branded items. |
Before diving into the step-by-step guide, it’s worth noting that there are two main ways to import Amazon products into WooCommerce: using a plugin-based solution for better automation and flexibility, or importing via CSV files for greater manual control. Each method suits different store sizes and workflows, which we’ll break down in the sections below.
The guide that follows walks you through a standard process to import Amazon products to WooCommerce, suitable for both affiliate websites and multi-channel sellers. You can then fine-tune the final settings based on the approach that best fits your business.
How to Import Amazon Products to WooCommerce with a Plugin?
Since WooCommerce lacks a built-in tool to convert Amazon data into WooCommerce products, you’ll need a plugin to handle the job.
From our experience testing different tools, WP All Import is currently one of the most reliable plugins to import Amazon product data to WooCommerce. It gives you full control over how your file is uploaded, how each field is mapped, and how the final products appear in your store.
Step 1: Export Amazon products
To import products into WooCommerce, you first need a file that contains your Amazon product data. The steps depend on whether you are an Amazon seller or an affiliate.
If you are an Amazon seller with a Professional Seller account:
- Log in to Amazon Seller Central.
- Go to Inventory > Inventory Reports.
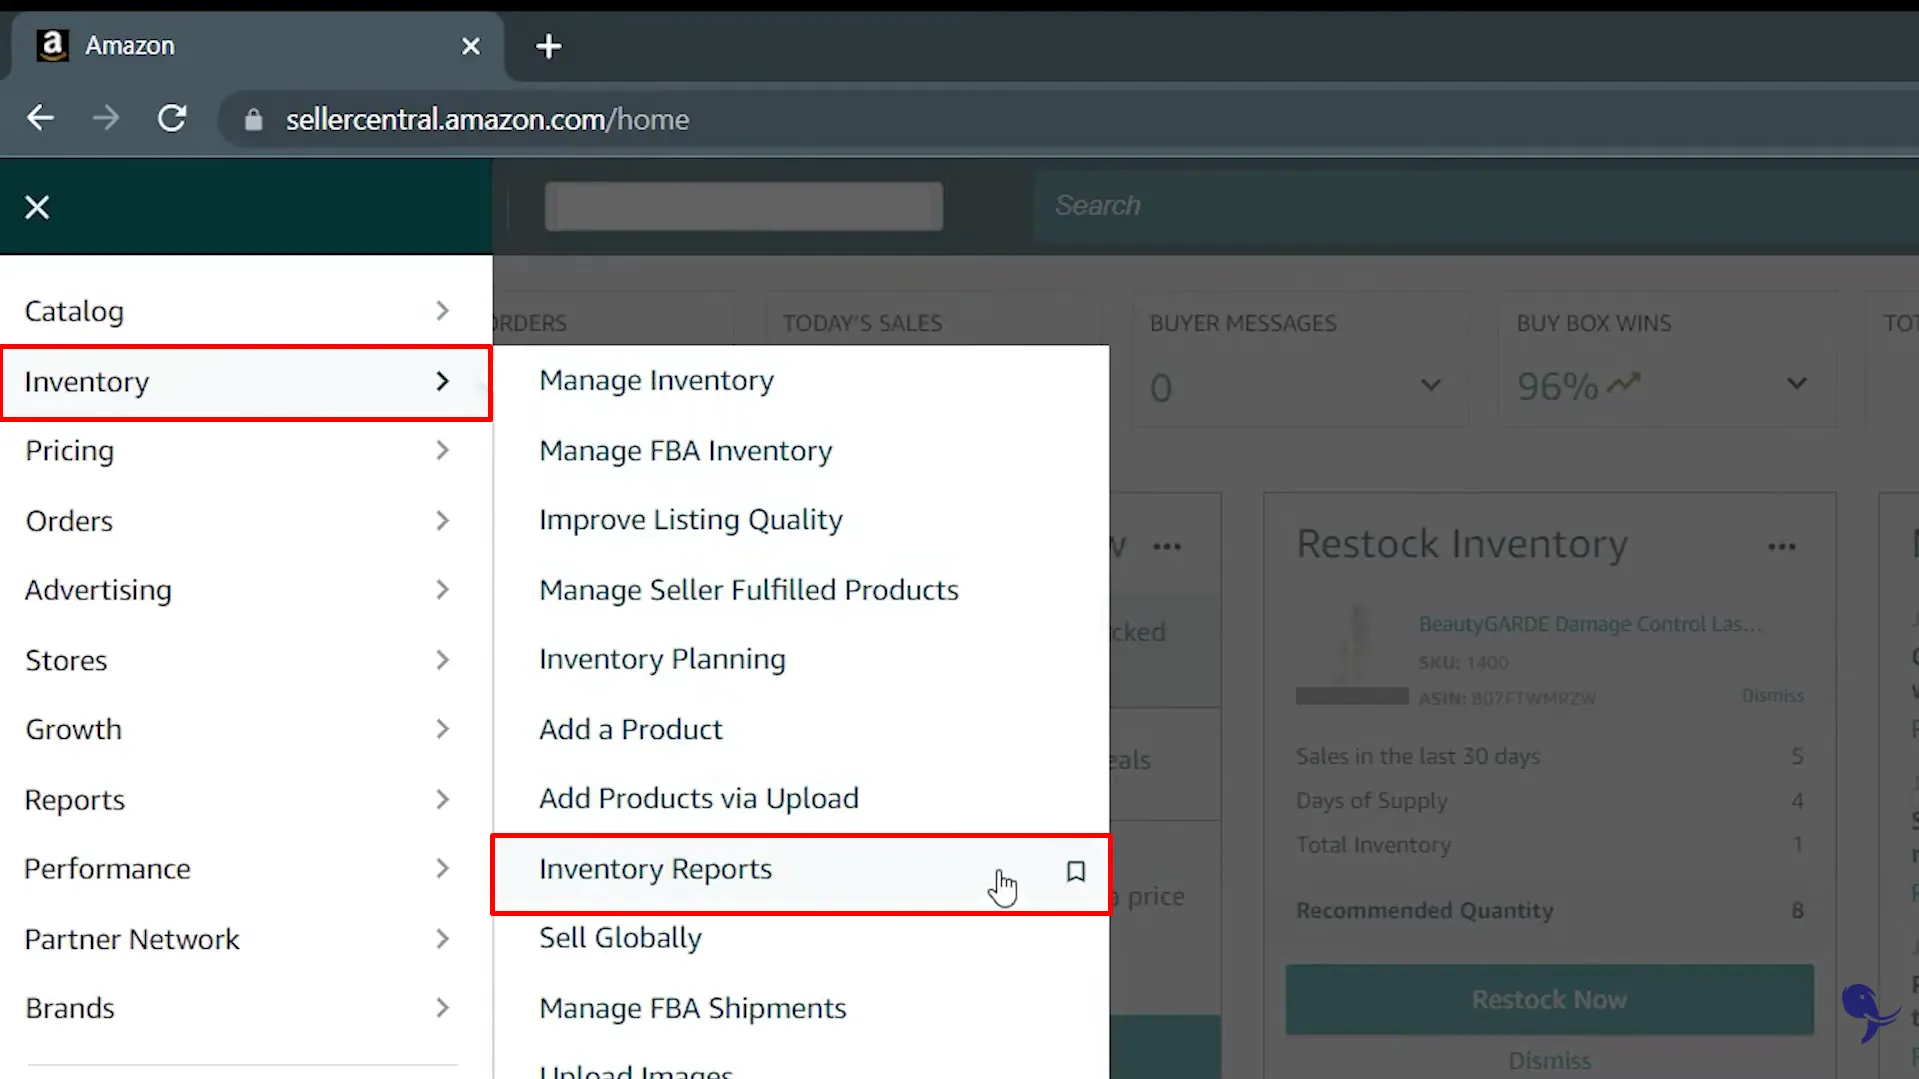
- Choose one of these report types:
- Category Listings Report (most detailed)
- Active Listings Report
- Request the report and wait for it to generate.
- Download the CSV file. This will be your source file for WP All Import.
If you are an affiliate and do not own the Amazon listings:
- Use a third-party extractor tool that supports Amazon product feeds.
- Select the products you want to include.
- Export the data to CSV or XML.
- Make sure the file includes basic fields such as title, price, image URL, and description.
Once your file is ready, you can move on to the next step to start the import Amazon products to WooCommerce process with WP All Import.
Step 2: Install plugin
To get started with the import, install the WP All Import plugin directly from your WordPress dashboard.
Go to Plugins > Add New Plugin and use the search bar to look for “WP All Import”. When the plugin appears in the results, click Install Now, then select Activate once the installation is complete.
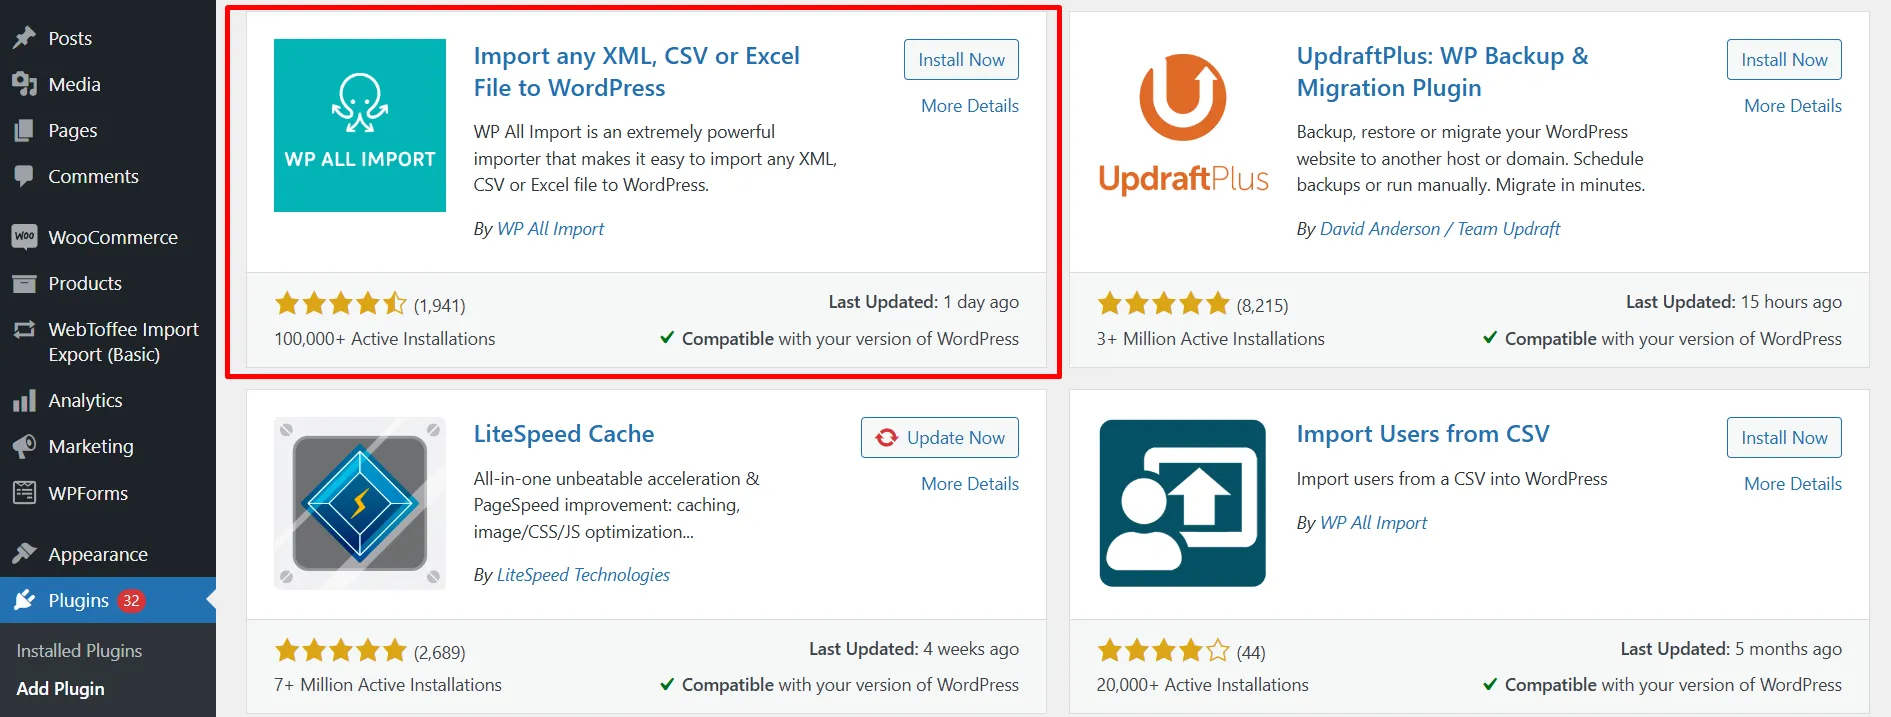
After activation, WP All Import will be available in your dashboard and ready for the next steps in the import process.
Step 3: Create a new import
With the plugin activated, you can now create a new import Amazon products to WooCommerce. From your WordPress dashboard, go to All Import > New Import to open the setup screen. This is where you’ll load your Amazon product data and choose how WP All Import should handle it.
WP All Import gives you three ways to add your file:
- Upload a file: Choose this option if the Amazon product CSV is saved on your computer.
- Download a file: Use this if your file is hosted online and can be accessed through a URL or via FTP/SFTP.
- Use existing file: Select this option if you’ve already uploaded the file in a previous import and want to reuse it.
Choose the method that fits your situation and load your Amazon product file into the importer.
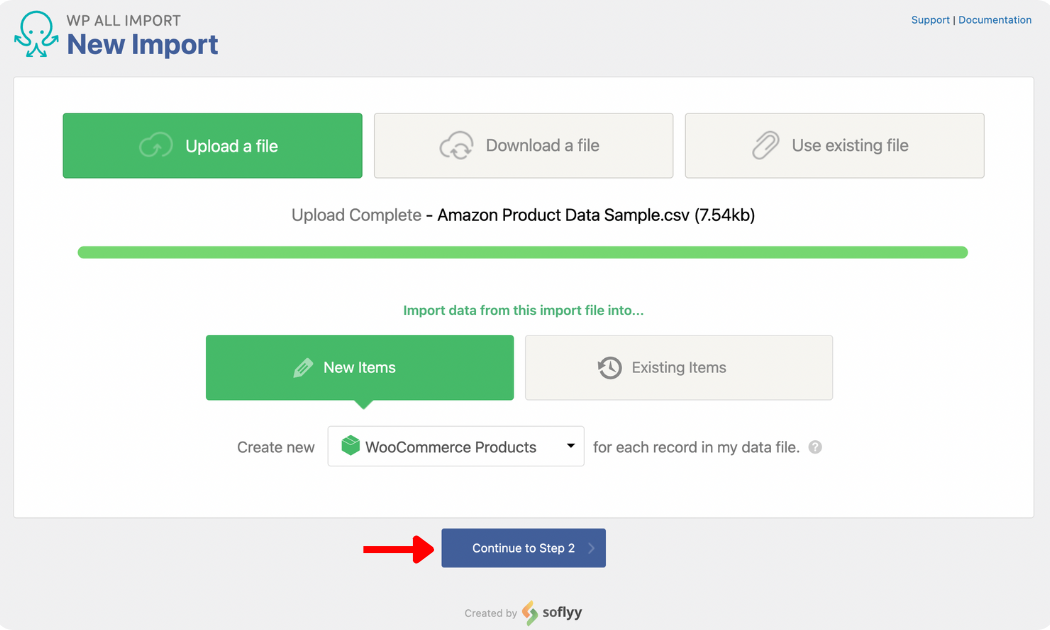
Once the file is added, look for the New Items section and select WooCommerce Products as the import type. Then click Continue to Step 2 to move on to the mapping stage.
Step 4: Decide the product details
After loading your file, WP All Import will take you to the Review Import File screen. This page shows all the product records detected in your Amazon CSV so you can confirm the data was imported correctly. Use the gray left and right arrows to browse through the records and check that the titles, prices, descriptions, and other fields look accurate.
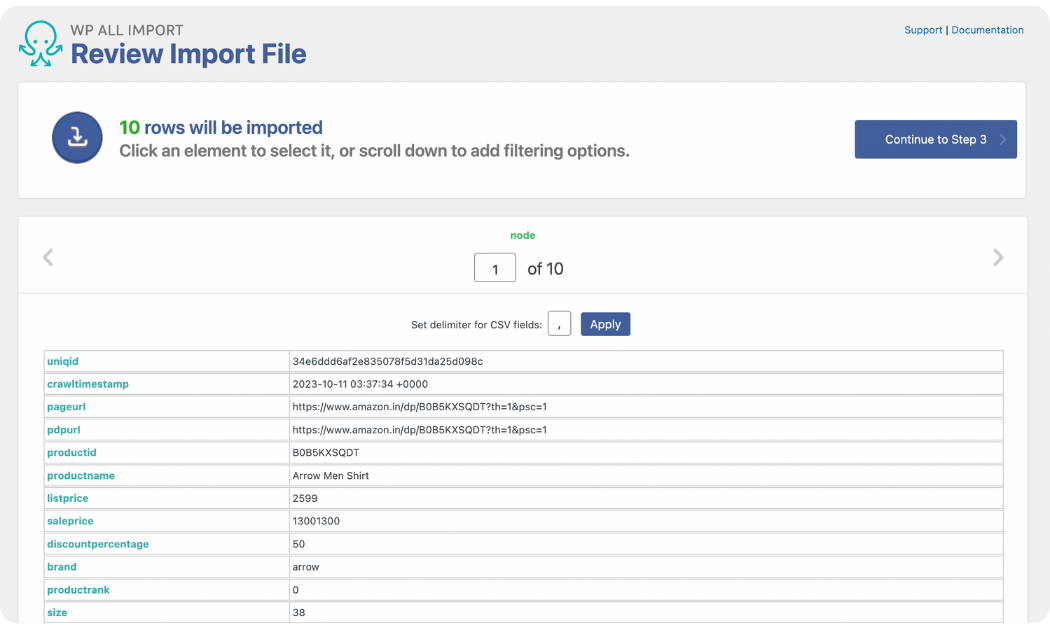
As you scroll down, you’ll see the Manage Filtering Options panel. This feature is useful when you don’t want to import every product from your file. Instead, you can set rules that tell WP All Import exactly which items should be included.
For example, if your file contains many types of products but you only want to import items with a discount of 50% or less, you can create a filter for this. Simply choose the discount column as the Element, set equals or less than as the Rule, and enter 50 as the Value. Click Add Rule, then select Apply Filter to XPath, and WP All Import will filter the data accordingly.

You can add as many filters as needed to narrow down your selection. When everything looks correct, click Continue to Step 3 to move on to mapping your Amazon fields to WooCommerce fields.
Step 5: Map the product fields
This step is where you decide exactly how your data will appear once you import Amazon products to WooCommerce. The Drag & Drop screen makes this easy by placing all WooCommerce product fields on the left and your Amazon product data on the right. Simply drag each Amazon field and drop it into the matching WooCommerce field.
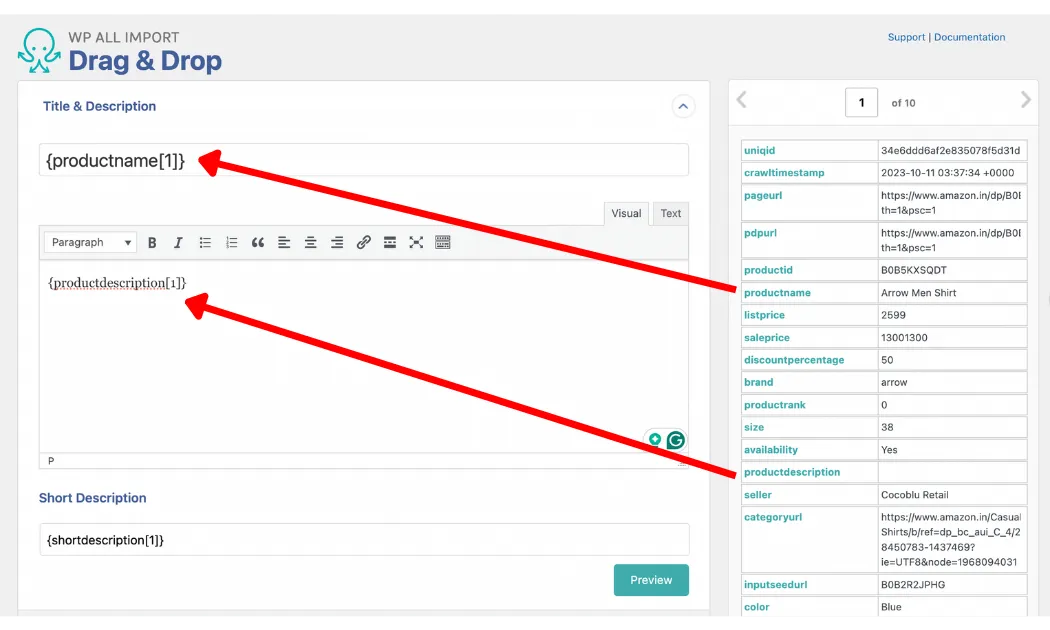
Step 5.1: Map title and description
In the Title & Description panel, drag the Amazon title field into the Title box, and do the same with the product description. This ensures your imported products appear with the correct name and content.
Step 5.2: Map WooCommerce product fields
When you open the WooCommerce Add-On panel, you will see all available WooCommerce product fields that you can use while you import Amazon products to WooCommerce.
You will first need to select the appropriate Product Type, such as simple, grouped, external/affiliate, or variable. After you choose a type, the fields inside the General tab will update to match the selected product structure.
If your Amazon file includes information such as SKU, regular price, or sale price, you can map these by dragging the corresponding Amazon fields into the matching WooCommerce fields. This ensures that pricing, identifiers, and product types are carried over correctly during the import.
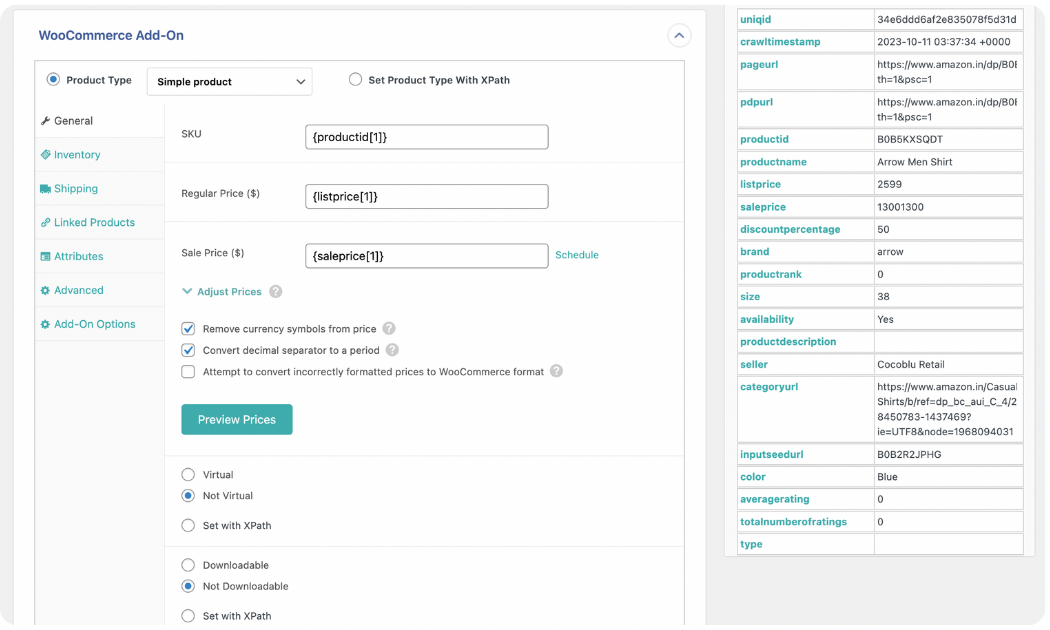
You can continue reviewing each tab in this panel, such as Inventory, Shipping, Linked Products, Attributes, Advanced, and Add-On Options, and map the fields relevant to your products. Each tab helps ensure that every important product detail is transferred properly.
Step 5.3: Map product images
The Images panel controls how WP All Import should handle your product photos during the import. The plugin offers three different ways to bring images into WooCommerce:
- Download images hosted elsewhere
- Use images currently in the Media Library
- Use images already uploaded to wp-content/uploads/wpallimport/files/
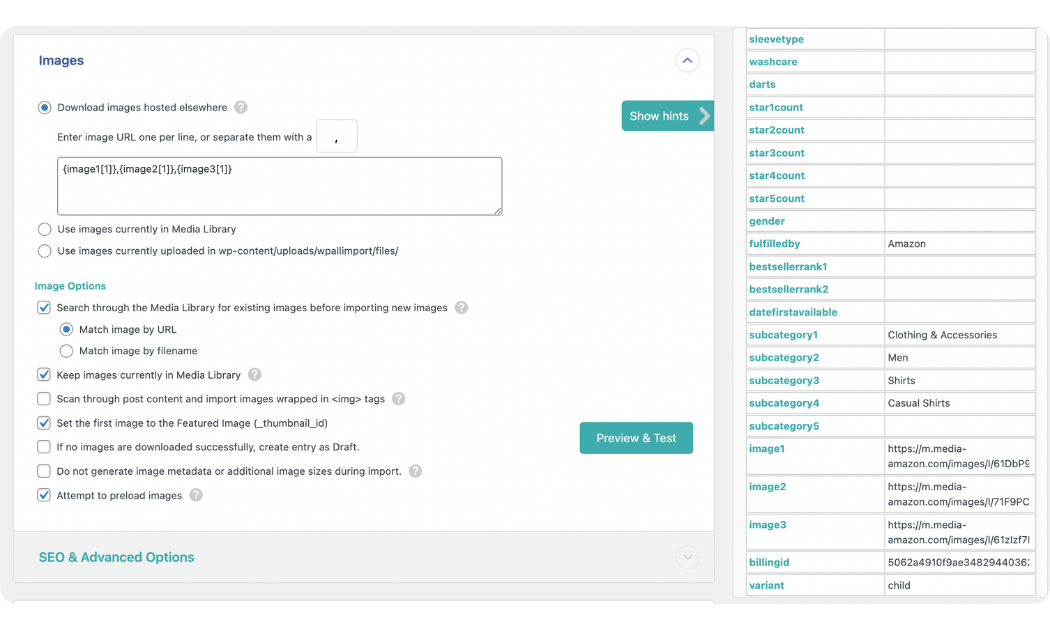
Because Amazon hosts all product images on its own servers, the most appropriate choice for this import is Download images hosted elsewhere. After selecting this option, you can drag the image URL field from your Amazon data file into the image box provided. This tells WP All Import where to find and download each image.
You will also notice additional image settings in this panel. The default options work well for most imports, but you can adjust them if your file has specific requirements or if you want to control how images are named or organized.
Step 5.4: Map custom fields (optional)
If your product file contains extra details that do not match any standard WooCommerce field, you can map them through the Custom Fields panel. WP All Import may detect existing custom fields on your site, but you can also create new ones by specifying a field name and mapping the value from your file.

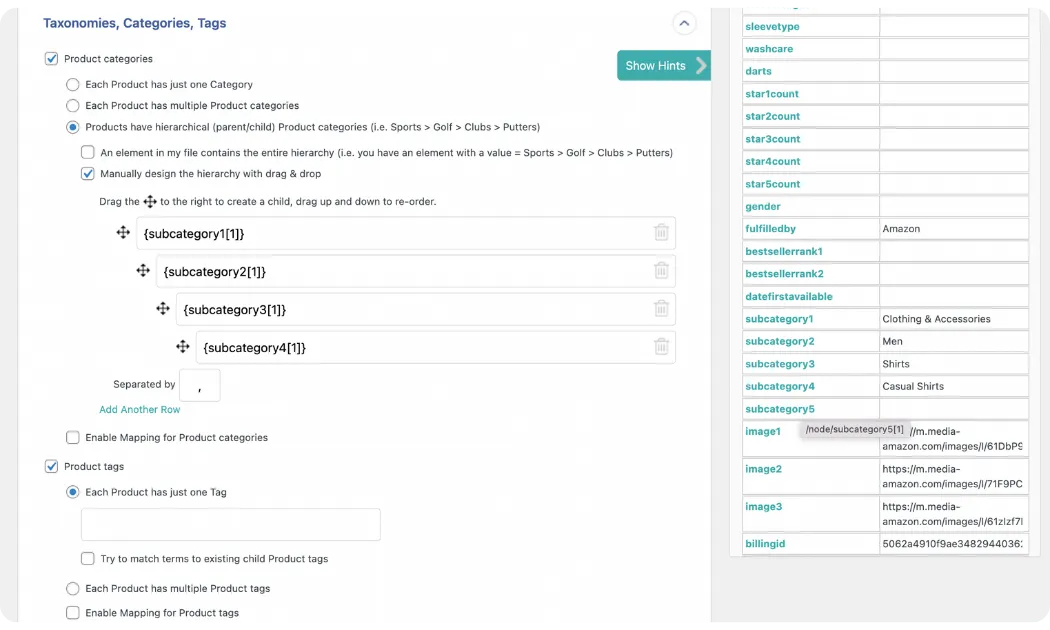
Step 5.5: Map categories and tags
The Taxonomies, Categories, Tags panel allows you to assign product categories and tags during the import. You can choose whether each product has a single category, multiple categories, or a hierarchical structure. Once you select the structure that fits your data, the mapping field will appear so you can assign categories and tags from your Amazon file.
After reviewing and mapping all relevant fields, you can scroll to the bottom of the screen and click Continue to Step 4 to move on to the next part of the setup.
Step 6: Set up advanced import options
After you finish mapping your fields, WP All Import will take you to the Import Settings screen. This page allows you to configure how the import Amazon products to WooCommerce should behave, especially if you plan to run it more than once.
The first setting you will notice is the option to create a Unique Identifier. You can generate this automatically by clicking the Auto-detect button. The Unique Identifier helps WP All Import match each product in your current file with the same product in future imports.
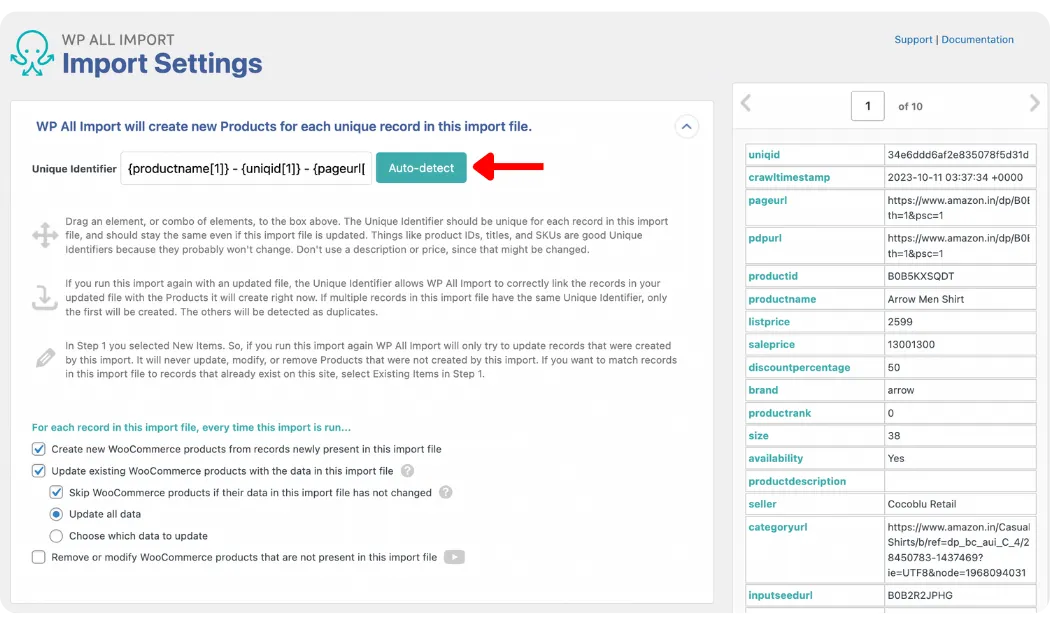
Below this section, you will see additional options that control how WP All Import handles product records if you run the same import again. In most cases, the default settings are suitable, especially if you are performing a one-time import or updating only a few fields.
Near the bottom of the page, two more panels are available:
- Scheduling Options, which allows you to automate imports on a set schedule.
- Configure Advanced Settings, which lets you fine-tune performance and import behavior.
When you finish reviewing the options, you can click Continue to move on to the final step.
Step 7: Activate the import
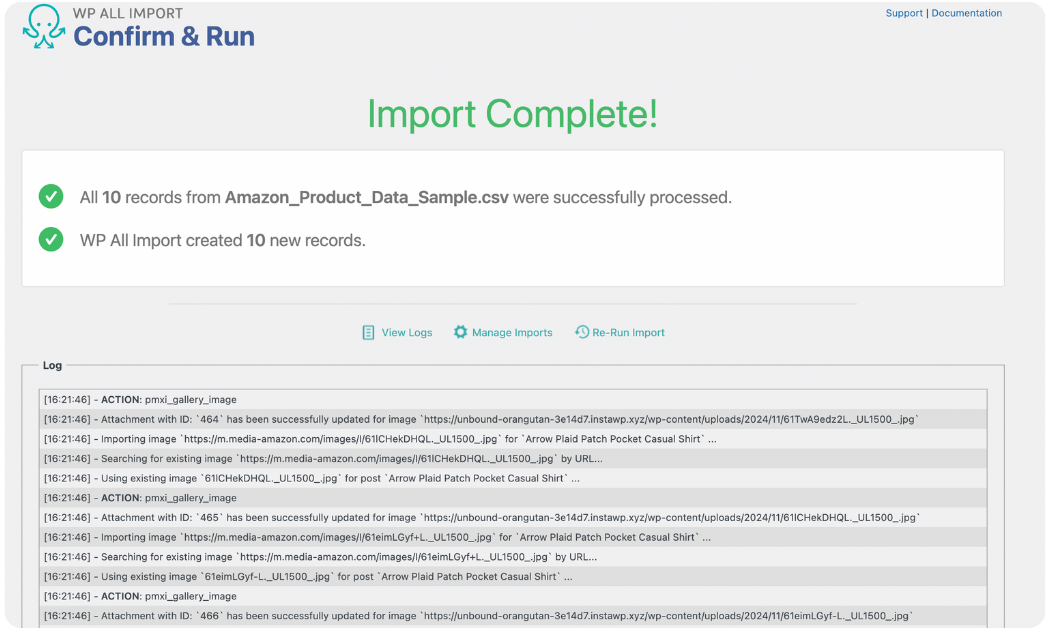
The Confirm & Run screen is the final step in importing your Amazon products to WooCommerce with WP All Import. This page displays a summary of your setup so you can make sure every detail has been configured correctly before running the import.

WP All Import will show an overview of:
- The number of records detected in your file
- The product type selected
- The fields you mapped
- Any filters or special settings applied
This summary gives you a quick way to verify that nothing is missing or incorrectly configured.
When everything looks correct, you can click Confirm & Run Import. The import will begin immediately, and once the process is finished, you’ll be taken to the Import Complete screen.
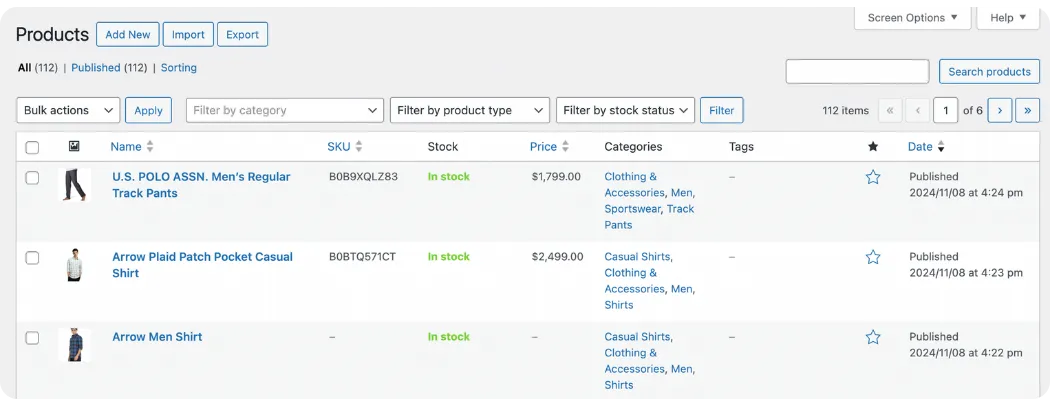
After the import finishes, you can go to Products > All Products in your WordPress dashboard to review the newly created listings. This is a good time to check that all titles, images, prices, and categories were imported correctly and that nothing was omitted.
Once you’ve completed all the steps, your Amazon products should now be fully imported into WooCommerce and ready to appear on your storefront. From here, you can refine the product details, adjust pricing or categories, and start managing everything directly inside your WordPress dashboard.
Let Our Experts Handle Your WooCommerce Migration!
With the All-in-One Migration Service, our experts take care of everything, ensuring a seamless and stress-free migration.

How to Import Amazon Products to WooCommerce with a CSV File?
If you prefer not to use a plugin or simply want more control over your data, you can also import Amazon products to WooCommerce using a CSV file. This method requires a bit more manual preparation, but it works well if you only need to bring in a limited number of products or if your Amazon export file already matches WooCommerce’s required format.
Step 1: Export Amazon products
Just like in the previous method, the first step is exporting your Amazon product data. To do this, you must be a Professional Seller. Amazon only allows Professional Seller accounts to download listing reports that include the detailed product information needed for a WooCommerce import. If your account is Individual, you won’t have access to these reports.
Once you have a Professional Seller account, you can export your product data as a CSV file:
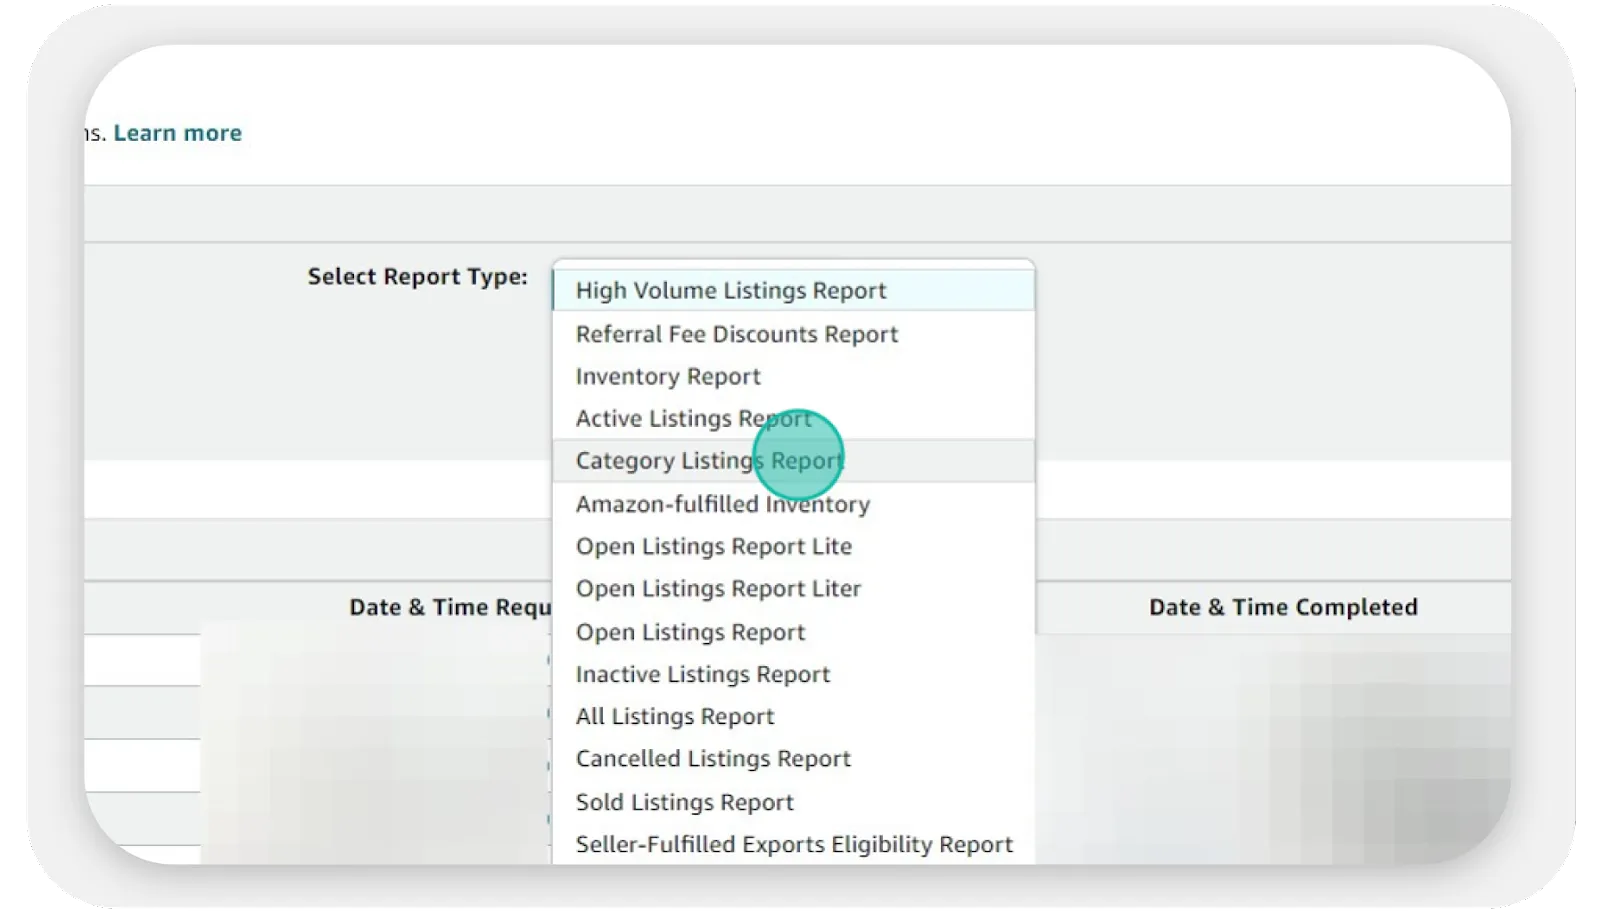
- Go to Amazon Seller Central and open Inventory > Inventory Reports.
- Select a report type that includes listing information.
- The Category Listings Report is the most complete option, containing titles, descriptions, images, SKU, pricing, attributes, and variations.
- If you choose Inventory Report (Custom), you must manually select all the necessary fields; missing fields will not appear in your WooCommerce import.
- Click Request Report and wait for Amazon to generate the file.
- When the report is ready, download the CSV file to your computer.
This CSV file will be the base for your WooCommerce import, and you will prepare it in the next step before uploading it.
Step 2: Format the CSV file
Once you have exported your Amazon product data, the next step is to prepare the CSV file so WooCommerce can read it correctly. A simple way to start is by downloading a sample product CSV file from GitHub and using it as your template.

After downloading the sample file, you can open it in Microsoft Excel or upload it to Google Sheets for editing. This template shows the basic structure that WooCommerce expects, including columns for product titles, descriptions, pricing, stock, and images.
You can now replace the sample values with the details of the products you want to upload.
- You don’t need to fill out every column. Only complete the fields that are relevant to your products and leave the rest blank.
- Any missing or optional information can be edited later directly inside your WooCommerce dashboard.
For product images, you will need to upload the images to your WordPress site or another hosting location. After that, paste the image URL into the image column of your CSV file. If a product has multiple images, you can separate the URLs with a comma in the same cell.
Before closing Excel or Google Sheets, make sure you save your changes so the file is ready for the final import step.
Step 3: Import products to WooCommerce
After preparing your CSV file, you can upload it directly into WooCommerce. Start by opening your WordPress dashboard and navigating to Products > All Products > Import. On this screen, you can click Choose File and select the CSV file you edited in the previous step.
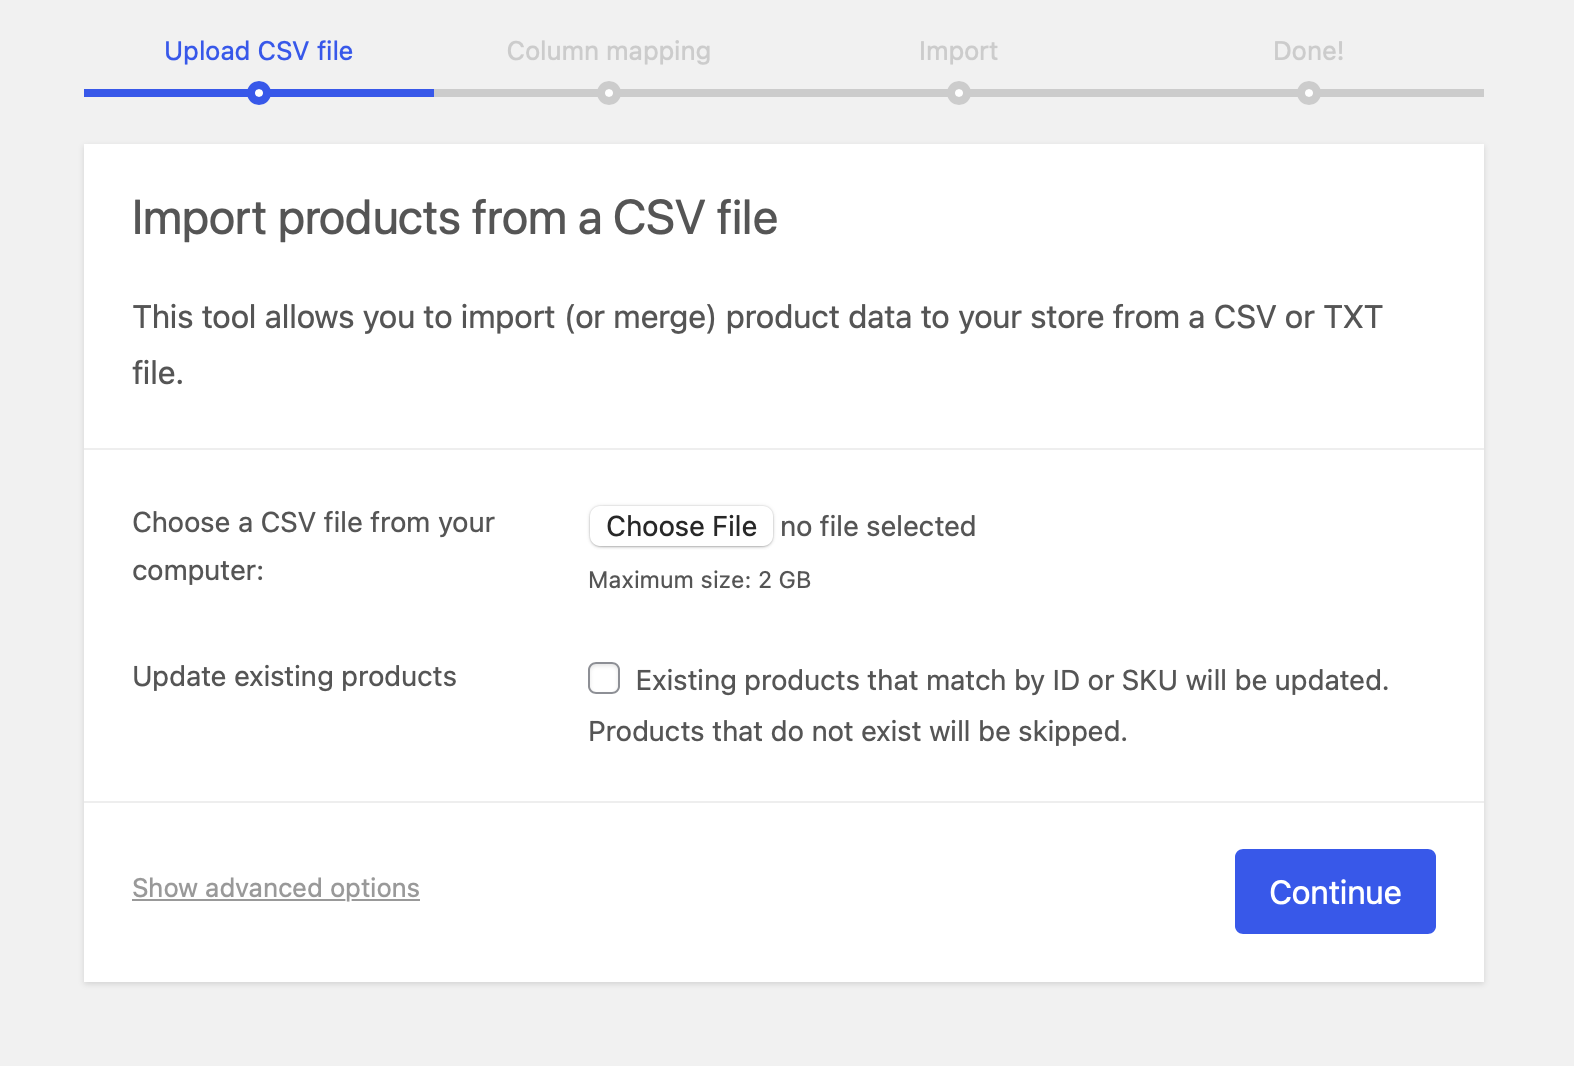
Once the file is uploaded, WooCommerce will display a preview of the data and ask you to map each column in the CSV file to the correct WooCommerce product fields.
- In most cases, WooCommerce will detect the fields automatically.
- If any fields look incorrect or unmapped, you can manually assign them during this step to ensure the product data is imported the way you expect.
After you confirm the mapping, the importer will begin running. The time to import Amazon products to WooCommerce will vary depending on how many products you are uploading, so it’s normal for larger files to take a bit longer.
When the process is complete, you can go to Products > All Products to review your imported items and make sure everything appears correctly in your WooCommerce store.
How to Manage Imported Amazon Products in WooCommerce?
Once you finished the import Amazon products to WooCommerce process, the next step is making sure they are organized and ready for customers. WooCommerce gives you full control over every product detail, so you can refine and manage the imported items just like any other listings in your store.
The table below summarizes the key tasks you should focus on after the import.
Task | What you should do | Why it matters |
Review imported products | Go to Products > All Products and scan titles, images, prices, and categories. | Ensures the import was accurate and nothing is missing. |
Edit product details | Update titles, descriptions, short descriptions, images, and pricing. | Makes your listings polished, consistent, and SEO-friendly. |
Organize categories & tags | Reassign categories and add relevant tags. | Improves navigation and product discoverability. |
Check variation settings | Verify attributes, variation pricing, and images. | Prevents broken variations and improves user experience. |
Update stock & pricing | Adjust inventory, stock status, and pricing rules. | Keeps your store operational and up to date. |
Bulk edit products | Use WooCommerce bulk actions for categories, pricing, visibility, and stock. | Saves time when cleaning or reorganizing large imports. |
Preview on the storefront | View product pages on the live site to confirm layout and functionality. | Ensures customers see accurate and well-formatted listings. |
When you review and optimize each part, your store becomes easier to use and maintain. After setup, you can keep improving your listings, add more products, or sync data across channels.
Import Amazon Products to WooCommerce: FAQs
How to integrate Amazon with WooCommerce?
You can integrate Amazon with WooCommerce by using a multi-channel tool such as LitCommerce. It allows you to connect both platforms, sync listings, and keep inventory and pricing updated automatically. This is the simplest way to manage Amazon and WooCommerce from one place.
How to bulk upload products in WooCommerce?
The simplest way to bulk upload products is to use the WooCommerce CSV importer. Create or format a CSV file containing all your product details, then upload it in Products > All Products > Import. If you need more flexibility, such as handling large catalogs, variations, or custom fields, plugins like WP All Import provide more advanced bulk import capabilities.
Can you update existing products with an import in WooCommerce?
Yes, WooCommerce supports updating existing products during an import. When uploading a CSV file, you can enable the “Update existing products” option and map a unique identifier such as ID, SKU, or slug. Plugins like WP All Import offer even more control by allowing you to match products using a unique key and update only the specific fields you choose.
Conclusion
By now, you’ve seen that the import Amazon products to WooCommerce process is completely achievable. You can choose the plugin method for convenience or the CSV method for more manual control.
With your Amazon listings now fully integrated into WooCommerce, you can continue optimizing your store with better content, cleaner structures, and improved product displays. We have plenty of WooCommerce tutorials to help you take the next steps, or you can join our community group to learn from other merchants and ask questions anytime.

